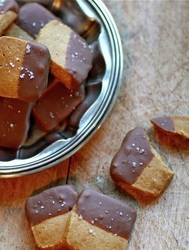
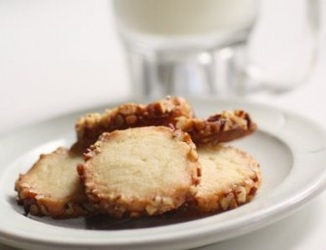
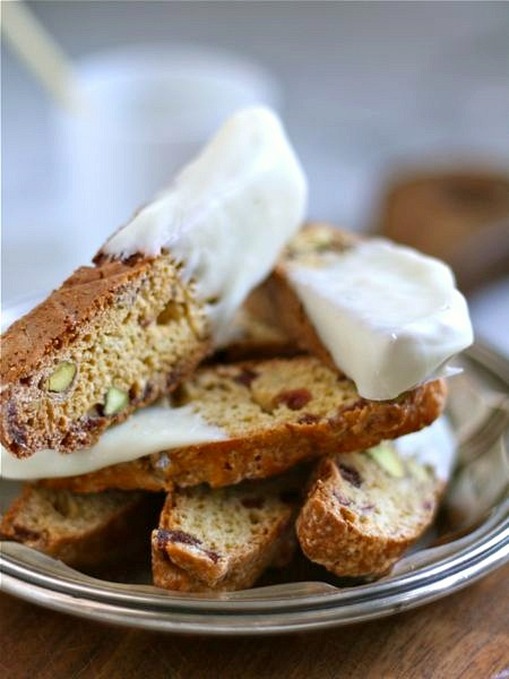
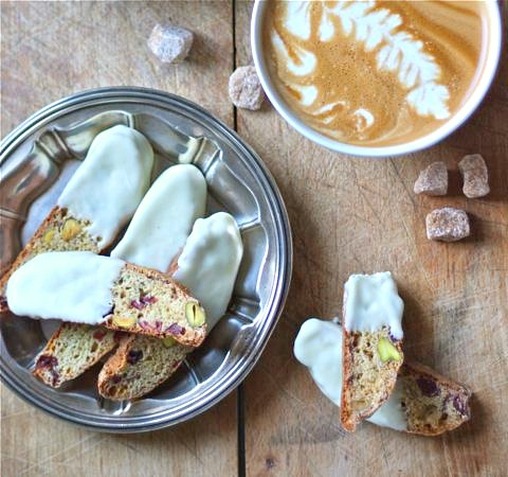
       Gourmet | December 2001 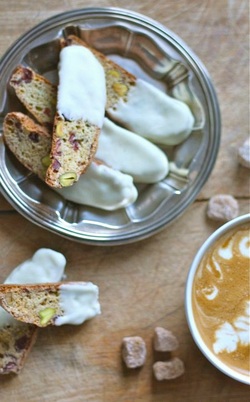 • 1 1/3 cup dried cranberries • 2 1/2 cups unbleached all-purpose flour • 1 cup sugar • 1/2 teaspoon baking soda • 1/2 teaspoon baking powder • 1/2 teaspoon salt • 3 large eggs • 1 teaspoon vanilla • 1 cup salted shelled natural pistachios • 1 large egg, lightly beaten with 1 teaspoon water to make egg wash 1. Soak cranberries in boiling-hot water to cover in a small bowl until softened, about 10 minutes. Drain, then pat dry with paper towels. 2. Preheat oven to 325˚F. Butter and flour a large baking sheet, knocking off excess flour. 3. Mix together flour, sugar, baking soda and powder, and salt in a large bowl with an electric mixer at moderate speed until combined well. Add eggs and vanilla and beat just until a dough forms. Add cranberries and pistachios and mix at low speed. 4. Turn out dough onto a well-floured surface and knead several times. Halve dough, then form each half into a 13-by 2-inch slightly flattened log on baking sheet, using floured hands and spacing logs about 3 inches apart. Brush logs with egg wash. 5. Bake in middle of oven until golden 25 to 30 minutes. Cool logs on baking sheet on a rack 10 minutes. Transfer to a cutting board and cut diagonally into 1/2-inch thick slices with a serrated knife. Arrange slices, a cut side down, in 1 layer on baking sheet. Bake in middle of oven, turning once, until golden and crisp, 20 to 25 minutes total. * If desired, cooled biscotti can be dipped in white chocolate that has been melted in a double boiler. TAKE a LOOK:
1 Comment
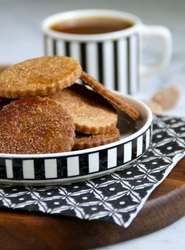
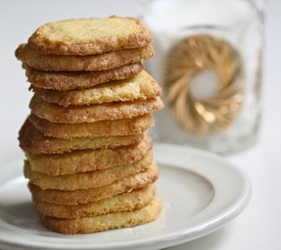
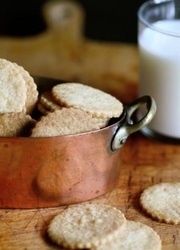
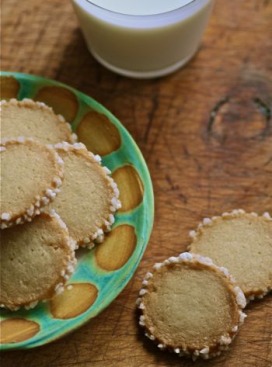
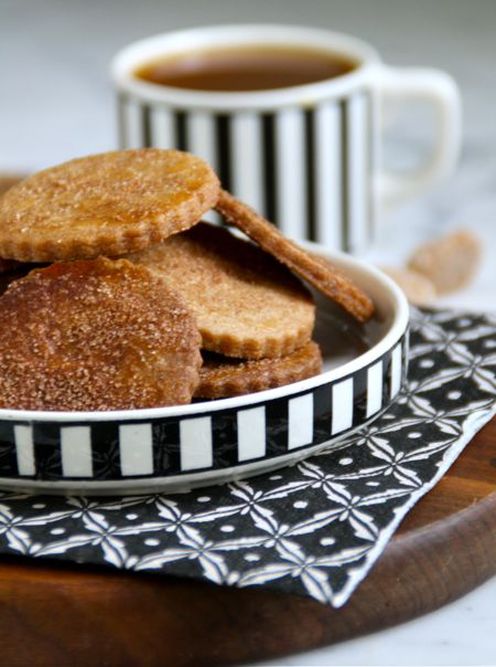 My first week home from Paris and what did I bake in my kitchen? You would think that seeing pâtisserie after pâtisserie, and eating pastry after pastry, I would be inspired to pull out all of my French tinware and get to work on tarts, financiers, or éclairs.     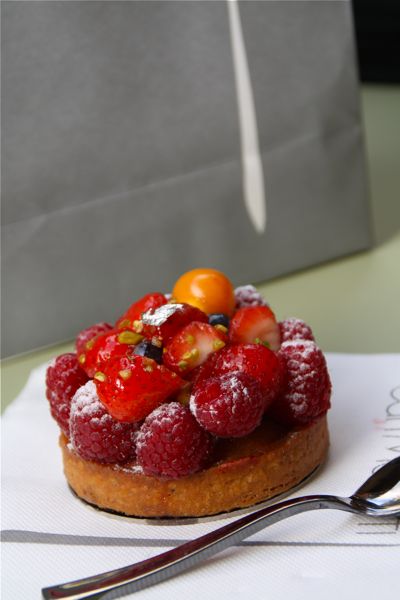 I brought back a couple of tarts to the hotel for my sister and me. One was fresh berries piled atop pastry cream and the other, an orange curd tart with a sliver of silver leaf.  Pastries from Carl Marletti Pâtissier in Paris' Latin Quartier Oddly enough, I started baking cookies when I was home again... three different kinds. Usually, if I'm mixing up and baking this amount of cookies, it means the holiday season is approaching; but in this case, it was all about the empty, clear glass jars on my kitchen counter begging to be filled. The first morning home from my trip, I made Chocolate Chip-Dried Cherry-Pecan Cookies. Most of those headed back to college with my youngest daughter who was home from school for the first time -- a BIG surprise last weekend when I returned! I followed those with Pecan & Butter Log Cookies, a favorite of mine. The third cookie has been bookmarked on my computer for almost 2 years now -- Swiss Cinnamon Crisps. This cookie was posted on Serious Eats by Gina DePalma (pastry chef at Mario Batali's Babbo in Manhattan) back in December of 2010. It's a great cookie for fall and cooler temperatures served with mugs of hot chocolate, fresh apple cider, or a big glass of cold milk. 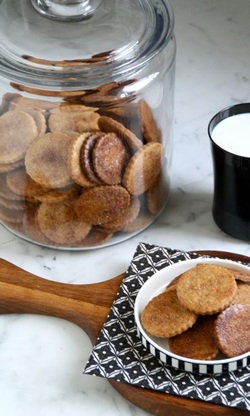 :: Swiss Cinnamon Crisps original recipe - McCall's Cookie Collection (1965) | via Gina DePalma INGREDIENTS: • 3 cups unbleached all-purpose flour • 1 teaspoon kosher salt • 1 tablespoon ground cinnamon • 1 cup (8 ounces) unsalted butter, softened • 1/2 cup light or dark brown sugar • 3/4 cup granulated sugar • 1 large egg • 1 teaspoon pure vanilla extract • Finely grated zest of one lemon TOPPING: • 1 egg • 2 tablespoons milk • 1/4 cup granulated sugar • 1 tablespoon ground cinnamon 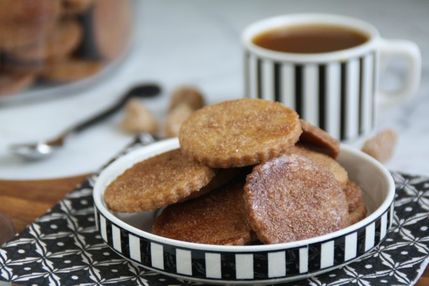 1. In a medium bowl, whisk the flour, salt, and cinnamon together and set aside. 2. Place the butter and both sugars in the bowl of an electric mixer and use the paddle attachment on medium speed to cream them together until light and fluffy, about 1 minute. Beat in the egg, vanilla, and lemon zest, stopping once to scrape down the sides of the bowl, until the egg is fully incorporated. 3. On low speed, slowly beat in the flour mixture, then increase the speed to medium and beat the dough until it comes away from the sides of the bowl. Shape the dough into a large disc and wrap it in a sheet of plastic; refrigerate at least one hour. 4. When you are ready to bake the cookies, preheat the oven to 350˚F. Remove the dough from the refrigerator and break off about 1/4 of the disc. Wrap and return the rest of the dough to the refrigerator. Line 2 cookie sheets with parchment paper. 5. Make the topping by whisking the egg and milk together in a small bowl. In another bowl, combine the sugar and cinnamon. Set both bowls aside. 6. On a lightly floured surface, roll the piece of dough 1/8-inch thick. Using a cookie cutter, cut out desired shape and transfer to the parchment-lined baking sheet, leaving about 1/2-inch between each cookie; fill cookie sheet, getting more dough from the refrigerator as needed. Brush the tops of the cookies with the egg-milk mixture and sprinkle each cookie generously with the cinnamon-sugar. Place the sheet on the center rack of the preheated oven and bake for 10-12 minutes, or until they are golden brown. While these cookies are baking, continue to roll and cut the remaining dough, filling the second cookie sheet, and repeat the glazing and sprinkling of the cinnamon-sugar mixture. 7. When pulled from the oven, let the cookies cool on the baking sheet one minute before removing to a cooling rack. TAKE a LOOK:  I was up before 5 a.m. this morning. The papers were being delivered, I started thinking about a cappuccino, and I just plain couldn't sleep any longer. The problem with that... it was Sunday morning! All week I anxiously look forward to Sundays and being a bit lazy, and laziness to me includes sleeping a little longer. By the time it was 10 a.m. I felt the urge to go back to bed, but instead, I made myself a second cappuccino, grabbed a few magazines, and headed outdoors for the patio. One of the magazines, a 2008 issue of Gourmet magazine titled, PARIS ON A BUDGET, has an article on "Every Parisian's Favorite Cookie". No surprise, the favorite cookie is considered to be a French macaron. Oh yes, a display case full of colorful macarons can take your breath away when you enter a French patisserie; a macaron's taste, plus the texture of the crisp meringue and flavorful, chewy center can again, take your breath away... but my favorite French cookie, or maybe overall favorite cookie, sans French, happens to be this Sablé à l'Orange et Raisins (currants, in this case). I have been making this orange and raisin cookie for several years, but it did not immediately steal my heart. The cookie can be made two ways -- either with the grated zest of one orange, or, with candied orange peel. It is much easier when making them on the spur-of-the-moment to grab an orange and simply grate the rind. This was what I had always done. Making candied orange peel is not at all difficult, but you do need to plan ahead if you intend to use it when making this cookie. The candied orange peel, however, is what finally won me over. Sablés à l'Orange et Raisins is not an overly sweet cookie (another reason I love it... my tastes have changed), and when you bite into the candied orange peel and get that intense jolt of pure orange flavor... well, for me, there's nothing better. Sablés à l'Orange et Raisins adapted from Paris Boulangerie Patisserie by Linda Dannenberg • 1/2 cup plus 2 tablespoons unsalted butter, softened • 1/3 cup sugar • 1 large egg • 1 large egg yolk • 2 tablespoons ground almonds • 1 2/3 cup all-purpose flour • 1 teaspoon baking powder • 1/2 cup raisins or currants (I always use currants) • 1/4 cup chopped, candied orange peel (recipe follows) • 1 large egg beaten with 1 teaspoon water, for glaze 1. In a large bowl with an electric mixer, cream the butter with the sugar until light. Add the egg, egg yolk, and almonds in turn, mixing after each addition until well blended. Sift the flour with the baking powder and add to the butter mixture, mixing just until partially incorporated. Add the currants and orange peel and finish mixing the dough with a large rubber spatula just until blended. Be careful not to overmix. Divide dough in half, and place each half on a sheet of plastic wrap. Roll each piece of dough into a log 1-inch in diameter. Wrap entirely in the plastic and refrigerate at least 1 hour. 2. Preheat the oven to 350˚F. Line 2 baking sheets with parchment paper. Remove the dough from the refrigerator and slice each log in 1/8 to 1/4-inch pieces; place on prepared sheets. Brush the cookies lightly with the egg wash. Bake until light golden, about 13 minutes. Watch carefully so the cookies do not overbake. 3. Cool the pan briefly, then carefully transfer the cookies from the pan to the rack with a spatula. Cool completely. These cookies keep well, stored in an airtight container, up to 2 weeks, or frozen. • I think the cookies taste better a day after baking, after the orange peel has time to infuse its flavor in the cookie. Candied Orange Peels adapted from Four-Star Desserts by Emily Luchetti • 3 organic navel oranges • 2 1/4 cups granulated sugar • 1 1/2 cups water • 1 tablespoon freshly squeezed lemon juice 1. Thinly slice both ends from the oranges, and starting at one end, take a sharp knife and slice the entire length of the orange, taking off a piece that includes some of the white pith (about 1/4-inch thick). Continue, until all of the oranges have been peeled. Lay the pieces on a cutting board and slice them lengthwise into 1/4-inch pieces 2. Fill a medium saucepan with water. Over high heat bring the water to a boil. Add the orange peels and boil for 5 minutes. Strain the peels and discard the water. Fill the saucepan with fresh water and again bring it to a boil. Add the peels and boil for 5 minutes. Strain. Repeat this process of boiling the orange peels 2 more times, each time with fresh water. This will remove the bitter flavor from the peels. 3. In a clean medium saucepan dissolve 2 cups of the sugar in the 1 1/2 cups water and the lemon juice over medium-low heat. Add the orange peels and cook until all the peels are translucent, about 1 to 1 1/2 hours. 4. Strain the orange peels and place them, so they are not touching, on a wire rack. Let sit overnight to air-dry. 5. Toss the citrus peels in the remaining 1/4 cup sugar, coating them thoroughly. • Store peels in an airtight container at room temperature. TAKE a LOOK:  This could go on forever... the posting of the French inspired treats I served at my daughter's recent graduation party in our back yard. The majority of offerings, actually all of the offerings, were sweet treats except for this one savory sablés that was offered alongside wine we were serving to the adults. 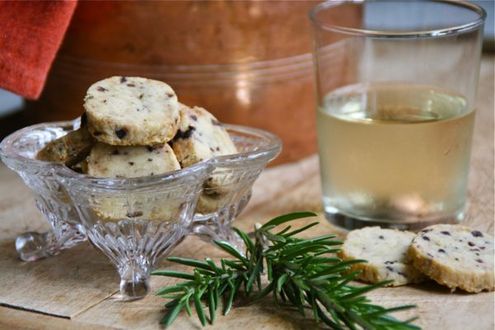 I made this recipe for Olive and Rosemary Shortbread five years ago for the first time, after a trip to Provence with my daughter and sister. I purchased a small tin of Sablés salés aux olives noires in the town of Saint Rémy de Provence. I decided on my return home that this was one savory cookie I needed to have on hand for friends who stop by for the occasional glass of wine. I haven't made them in quite a while but after nibbling on many this past week, I was again reminded of how good these are! And really... when you add a large amount of butter and fleur de sel to anything, it has to be good! ROSEMARY-OLIVE SHORTBREAD inspired by a visit to Le Petit Duc | Saint Rémy de Provence  • 2 1/4 cups flour • 2 1/2 teaspoons sugar • 1 teaspoon Fleur de Sel • 1 1/2 teaspoons finely chopped fresh rosemary • 13 Tablespoons cold unsalted butter, cut into small pieces • 2 large egg yolks • 3-4 Tablespoons chopped Nicoise olives 1. Preheat oven to 350 degrees. 2. Pulse flour, sugar, salt and rosemary in a food processor until combined. Add butter and pulse just until mixture resembles coarse meal, then add yolks and process until dough just starts to clump together. Add chopped Nicoise olives and process briefly. Turn onto a work surface and gather dough together. Divide dough into 4 pieces and smear each portion to help distribute the butter. Divide dough in half. Lay each half on plastic wrap and form into a log about 1 1/4-inch in diameter. Chill at least one hour. Slice log into 1/4-inch thick pieces and place on parchment-lined baking sheets. Bake in the middle of the oven, for about 25 minutes, until light-golden brown. Cool on a rack and store in an air-tight container. Dream that you're in Provence. TAKE a LOOK: 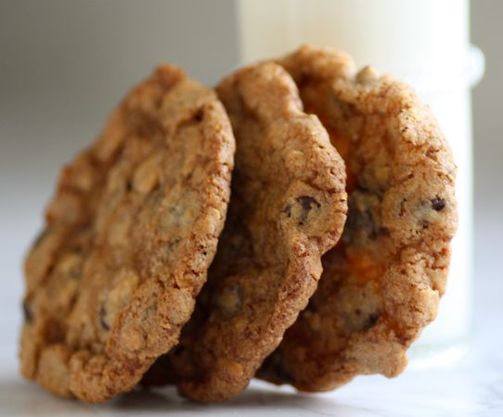  I've been wanting to make these "Chocolate Clouds" for some time now, and finally got around to it yesterday while plumbers and workmen were pulling 81-year-old lead pipes from my bathroom walls... baking is a stress-reducer for me! This recipe comes from Sarabeth Levine of Sarabeth's Bakery in NYC, and was published by Caroline Russock on Serious Eat's Cook the Book this past December. The name alone, "Chocolate Clouds", convinced me to pull out my cookie sheets and mix up these Chocolate Chip Almond Cookies. I also wholeheartedly agree with Caroline's critique of this cookie -- "I'd definitely bake them again, next time I'd add a touch more salt and go with a darker, more bitter chocolate to cut the sweetness a bit." This is an extremely sweet cookie that would benefit from a bitter chocolate... but whatever your chocolate preference, they are the perfect accompaniment to a tall glass of cold milk! 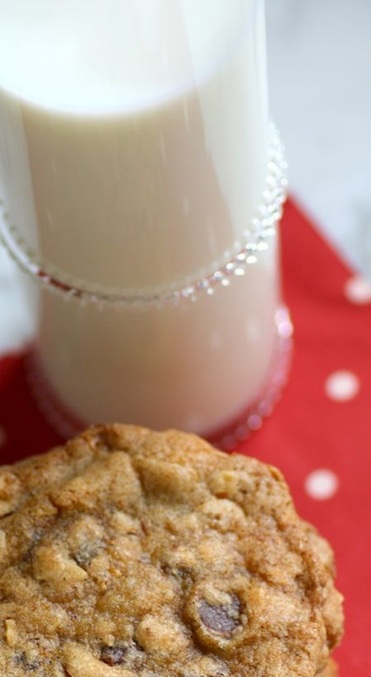 Chocolate Chip Almond Drop Cookies a.k.a. Chocolate Clouds | from Sarabeth Levine | Sarabeth's Bakery recipe via Serious Eats' Cook the Book • 1 1/3 cup superfine sugar • 1 1/3 cup packed light brown sugar • 16 tablespoons (2 sticks) unsalted butter at room temperature, cubed • 3/4 teaspoon pure vanilla extract • 2 large eggs, at room temperature, beaten • 2 cups unbleached all-purpose flour • 3/4 teaspoon baking soda • 1/4 teaspoon fine sea salt • 2 cups toasted, sliced almonds • 2 cups chocolate chips (consider using a bittersweet chocolate) 1. Position racks in the middle and top third of the oven and preheat to 350˚F. Line 3 baking sheets with parchment paper. Rub the superfine sugar and brown sugar together through a coarse-mesh wire sieve into a medium bowl; set aside. Beat the butter in the bowl of a heavy-duty stand mixer fitted with the paddle attachment on high speed until smooth, about 1 minute. Gradually add the sugar mixture; then the vanilla. Beat, occasionally scraping the bottom and sides of the bowl, until the mixture is pale yellow and light-textured, about 5 minutes. Gradually beat in the eggs. 2. Sift the flour, baking soda, and salt together in a medium bowl. With the mixer speed on low, add the dry ingredients in 3 additions, mixing just until each addition is incorporated. Add the almonds and chocolate chips and mix just until combined. Remove the bowl from the mixer. Empty the bowl onto the work counter, and use your hands to equally distribute the almonds and chocolate chips throughout the dough. 3. Using a 2-inch diameter ice cream scoop, portion the batter onto the prepared pans. Slightly flatten each ball of dough. Place 2 of the baking sheets in the oven, one on each rack, switching the position of the baking sheets from top to bottom, and front to back, about half-way through the baking, until the cookies are evenly golden brown; 15 to 18 minutes is suggested. My cookies were in for less time than that. Keep an eye on them once you reach 10 minutes. It is recommended that the baking sheets are rapped on the rack during the last 3 minutes of baking to deflate the cookies. Repeat these steps with the remaining cookie dough. • Makes about 3 dozen cookies • TAKE a LOOK: 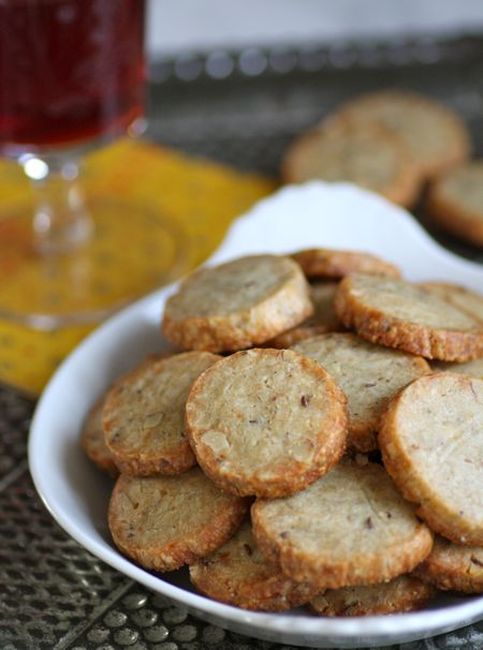 My new kitchen has been officially christened! Our friends who gave us that wonderful piece of slate chalkboard that now graces my kitchen wall, had not yet seen the kitchen renovation and came by for dinner. I was loosening the wire cage on a celebratory bottle of champagne, and before I could safely cover the cork with a towel as I normally do, it shot straight up into the kitchen ceiling. I was thankful it missed the overhead light (by a matter of inches). But, if that wasn't bad enough, the cork ricocheted off the ceiling and hit one of our guests standing in an adjacent room! I suppose you could say it's risky eating at Eileen and Bill's. Earlier in the day, I baked these Gorgonzola Walnut Shortbread to serve alongside that explosive bottle of champagne. The recipe is via The Rainbow Ranch in Big Sky, Montana. A great nibble to have on-hand. 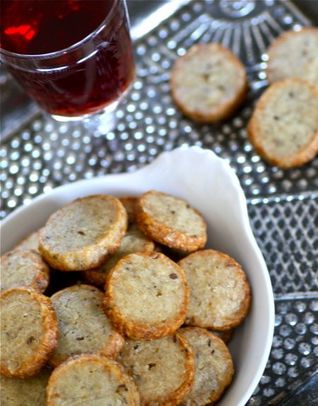 + Gorgonzola and Walnut Shortbread + recipe from The Rainbow Ranch | Big Sky, Montana • 4 ounces gorgonzola cheese • 5 tablespoons butter • 1 cup flour • 1/8 teaspoon salt • 3/4 teaspoon caraway seed • 1/4 cup chopped walnuts 1. In a work bowl or food processor, combine the gorgonzola cheese, butter, flour, salt and caraway seeds. Blend until the dough forms a ball. Add the walnuts and process until just combined. Place dough on a sheet of plastic wrap, form into a cylindrical log and wrap in plastic. Refrigerate 1 to 2 hours, remove dough from plastic wrap and cut into 1/4-inch slices. Place rounds on parchment-lined baking sheet and bake in a preheated 350˚F oven for about 15 minutes, or until edges are golden brown. TAKE a LOOK: 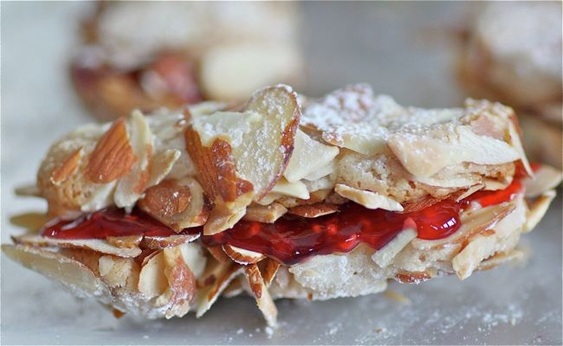 Wow... isn't this a beautiful cookie? And what's really great is that it's also a great-tasting cookie; and how could it not be? Toasted almonds and sweet raspberry jam... heaven! Since there was virtually no baking in my kitchen this past holiday season, I have been making up for lost time. I found this recipe in a recent Bon Appetit magazine and thought it looked too good to wait until the next Christmas season to mix up and bake.  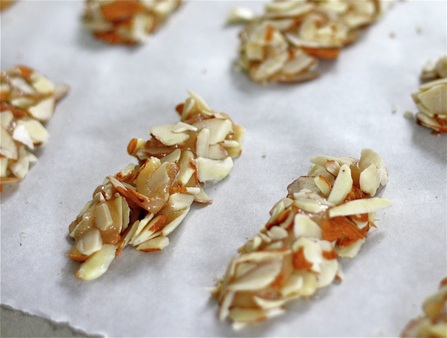 As you can see, I heavily coated my almond batter "fingers" with the sliced nuts. You can certainly go lighter in your coverage, but if you like almonds... go for it! 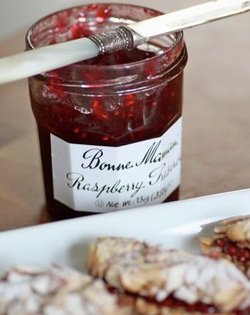 Substitute another flavor of fruit jam if you so desire. Apricot would be delicious, too! 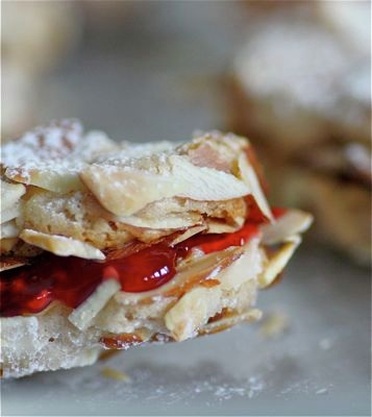 These cookies are crisp to begin with, but after a day or two they become chewy and unbelievably good! 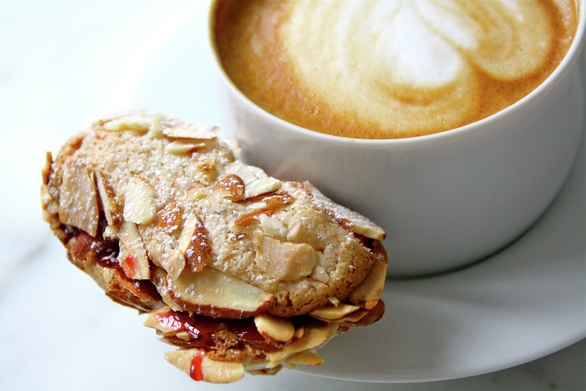 Almond and Raspberry Sandwich Cookies adapted from Bon Appetit | December 2010 Makes about 20 sandwich cookies • 1 1/2 cups sliced almonds * • 1 7-ounce tube almond paste, cut or broken into pieces • 1 cup sugar • 1/2 teaspoon ground cinnamon • 1/4 cup egg whites (about 2 large) • Raspberry jam (seedless, or not) 1. Position 1 rack in the top third and 1 rack in bottom third of oven; preheat to 350˚F. Line 2 large baking sheets with parchment. Place almonds in center of a third (unlined) rimmed baking sheet, forming a 1/4-inch-thick layer. 2. Finely grind almond paste, 1 cup sugar, and cinnamon in a food processor. Add egg whites; process until well blended. Transfer dough to a large resealable plastic bag. Press dough down into 1 corner of bag, and using scissors, snip off opposite corner, leaving 1/2-inch opening. Working in batches, squeeze dough from bag in 2 1/2-inch strips atop almonds on sheet. Sprinkle some of the loose almonds over the strips; carefully roll strips in almonds to coat lightly. Carefully transfer cookies to the parchment-lined baking sheets, spacing apart. 3. Bake cookies until light golden brown, reversing position of sheets halfway through baking, about 12 minutes. Let cookies stand on sheets 5 minutes; transfer to rack. Sift powdered sugar over cookies. 4. The recipe calls for simmering jam in a heavy, small saucepan over medium heat until jam is bubbling and thick, about 30 seconds, and the cooling. I totally skipped this step. It's your call. 5. Spread jam over bottom of 1 cookie. Top with second cookie, bottom side down. Transfer cookie sandwich to plate. Repeat with remaining cookies and jam. Can be made 3 weeks ahead. Store airtight in freezer. Bring to room temperature before serving. * I used quite a lot more sliced almonds than called for in the recipe (maybe 3 cups), which calls for the strips of dough to be covered with and rolled in. Mine were pretty heavily coated, but I like it that way! TAKE a LOOK: 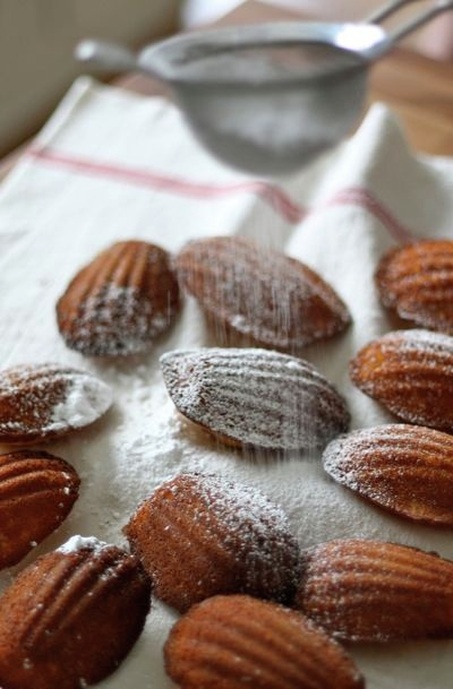 SIMPLE... simple is what I need right now. Birthday parties, Thanksgiving, applying to colleges for my daughter, visiting relatives out-of-state, decorating for the holidays. As one of the busiest months of the year is beginning, I want to slow down and do nothing. But "doing nothing" doesn't mean not being in my kitchen baking. With Thanksgiving's pumpkin pie long gone, I need something alongside my cappuccino. These freshly-made honey madeleines satisfy all my cravings, and they're easy. Tender, crisp around the edges, slightly sweet, cakey; just what I needed today! 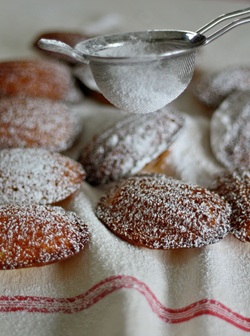 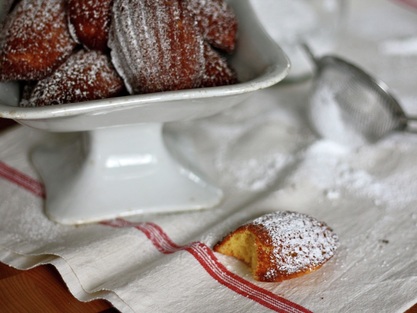 I hope there are several left for breakfast tomorrow morning! + Honey Madeleines + …from Once Upon a Tart | Frank Mentensana and Jerome Audureau… • 4 tablespoons unsalted butter; plus more, melted, for brushing in madeleine molds • 1 tablespoon honey • 1/2 teaspoon vanilla or almond extract • 2 large eggs • 1/3 cup granulated sugar • 1 tablespoon packed light-brown sugar • 3/4 cup unbleached all-purpose flour • 1 teaspoon baking powder • A pinch of salt • Confectioners' sugar for dusting madeleines 1. Melt the 4 tablespoons butter in a small saucepan over low heat, being careful not to burn or brown the butter. Remove pan from the stove. Stir in the honey and the extract, and let cool to room temperature. 2. Beat the eggs and sugars together in a big bowl, using the whisk attachment of an electric mixer on high speed (or a wire whisk), until the eggs are foamy and light in color. 3. In a separate, small bowl, whisk the flour, baking powder, and salt together. Slowly fold these dry ingredients into the wet, using the paddle attachment of your mixer on low speed (or stirring with a wooden spoon), stopping as soon as no flour is visible. Pour in the cooled butter-honey mixture, and continue mixing until all the ingredients are combined. Cover the bowl and refrigerate for at least 30 minutes, until the batter is chilled. 4. Before removing the dough from the refrigerator, position your oven racks so that one is in the center and preheat the oven to 425˚F. Brush your madeleine molds with melted butter. 5. Take a spoonful of batter and fill each mold three-quarters full. Madeleines rise a lot, so don't overfill the molds. The goal is to have the cookies retain their perfect little scallop shape. 6. Place the mold on the center rack in the oven, and bake the madeleines for 8-10 minutes, or until they are puffed up above the edge of the mold and each madeleine has a bump on it. Don't overbake. Take them out when the edges have turned golden brown. 7. Remove the mold from the oven, and set it on a wire rack for a few minutes. Don't let them cool too long. You want the madeleines to still be warm when you eat them. Turn the mold over onto a dish towel and shake the madeleines out onto the towel. They should fall out easily. 8. Sprinkle with confectioners' sugar before eating. • Best eaten the day they are baked, warm from the oven. TAKE a LOOK:  My husband had two comments when he tasted the Peanut Butter Shortbread Cookies with Chocolate and Fleur de Sel. 1st Comment: "These are too good!" 2nd Comment: "Do you have to put salt on everything?" Yes, this cookie is one of the best I've made. What could be better than peanut butter, lot's of sweet unsalted butter, and chocolate? Right there you've got a winning combination. But, the addition of the fleur de sel is what really makes this cookie exceptionally good. In my mind, it's hard to beat good chocolate with a sprinkling of French sea salt. These cookies seem to melt in your mouth. Pour yourself a big glass of ice cold milk and try to eat just one; it's impossible. 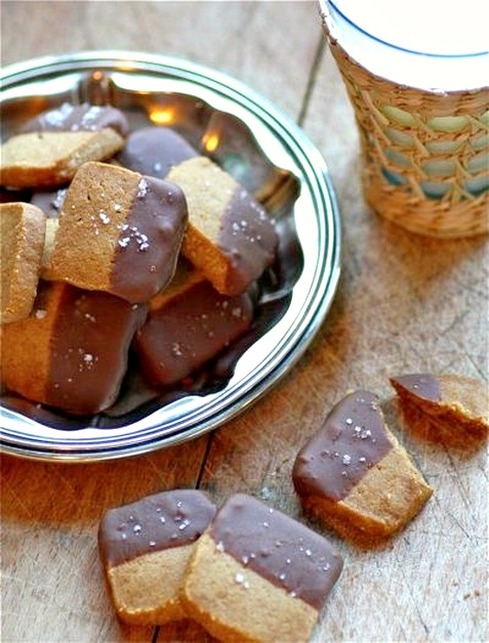 I changed the original recipe just a bit which called for rolling the cookie dough 1/2-inch thick and cutting shapes with a cookie cutter. I chose to form the dough into two logs, chill, then slice about 3/8-inch thick; easy and delicious! Peanut Butter Shortbread with Salted Chocolate adapted from a recipe on Food.com • 3/4 cup unsalted butter, softened • 1/2 cup creamy peanut butter • 1/2 cup brown sugar, packed • 1/4 teaspoon vanilla extract • 2 1/4 cups unbleached all-purpose flour • 1/4 teaspoon salt • 4 ounces good quality chocolate- milk, semi-sweet, or bittersweet • 4 tablespoons unsalted butter, plus additional butter if needed to thin chocolate • Fleur de Sel, for sprinkling 1. Beat together the butter and peanut butter with mixer at medium speed until smooth. Gradually add sugar, beating well. Stir in the vanilla. 2. Combine the flour and salt. Gradually add to the butter mixture, beating at low speed until blended. 3. Divide the dough in half and place each half onto a piece of plastic wrap. Roll into two logs, wrap in the plastic and refrigerate until firm. 4. Preheat the oven to 275˚F. Line two baking sheets with parchment paper. Remove the cookie dough from the refrigerator and slice the logs 3/8-inch thick. Place each slice onto cookie sheet leaving a 1-inch space between each cookie. Place one baking sheet in the middle of the oven and the other baking sheet on the rack directly below. Bake the cookies for 40 minutes or until the cookies are nicely browned, switching the baking sheets after 20 minutes. Remove the cookies from the oven and transfer the cookies to a cooling rack. 5. When the cookies have cooled, melt the chocolate in a bowl over simmering water, making sure the bowl does not touch the water. Add butter until the chocolate is a good consistency for dipping. Dip half of each cookie into the melted chocolate and place on a parchment-lined sheet. Sprinkle chocolate immediately with a few grains of Fleur de Sel. TAKE a LOOK:  I've had carrot cake on my mind, lately. I love carrot cake! But I don't know exactly what it is about cakes. I wouldn't think twice about making a tart (making a tart every day, in fact). But a cake... I don't know. I seem to need some sort of a celebration to push me into baking and frosting a cake. Now, is that just me, or do you feel that way too? So... what to do? Nothing of great importance happening this week that deserves a cake. What I settled on, to get my "carrot cake" fix were these Carrot Cookies with Orange Frosting. In fact, the carrot cake that I make and love is also iced with orange frosting. These cookies were a perfect substitution. 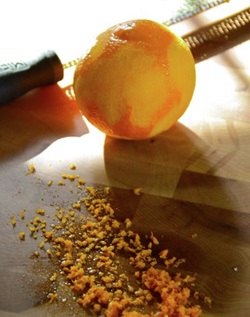 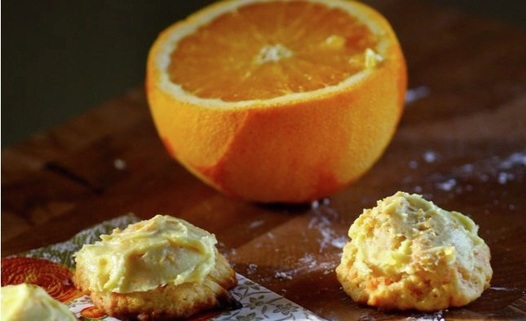 Now, there is a celebratory cake in LivingTastefully's future. My father is turning 90 and will be here with us and many others the end of October; definitely an event worthy of a cake!  Carrot Cookies with Orange Frosting • 2 cups unbleached all-purpose flour • 2 teaspoons baking powder • 1/2 teaspoon salt • 1 cup unsalted butter, softened • 3/4 cup sugar • 1 cup cooked and puréed carrots • 2 eggs at room temperature • 3/4 cup flaked coconut • Orange frosting, recipe follows 1. Preheat oven to 400˚F. 2. Combine flour, baking powder and salt; stir well. Set aside. Cream butter; gradually add sugar, beating until light and fluffy. Add carrots and eggs, beating well. Add dry ingredients, mixing well; stir in coconut. Drop by teaspoonfuls onto parchment lined baking sheets, 2-inches apart. 3. Place baking sheet on a rack in the center of the oven and bake for approximately 10 minutes, or until golden brown. Remove from oven and transfer cookies to a rack to cool completely. Frost with the orange frosting. Orange Frosting • 3 tablespoons unsalted butter, softened • 1 1/2 cups powdered sugar • Grated rind of 1 large organic orange • 1 tablespoon orange juice 1. Combine all of the ingredients; beat until light and fluffy. YOU MIGHT LIKE: |


Categories
All
|