Living Tastefully
  • Home
  • PAINTINGS
  • About
  • Passions-to-Pastry Blog
  • Contact
  • Recipes

Salted Chocolate Chunk Shortbread Cookies

2/24/2018

3 Comments

 
Picture
     
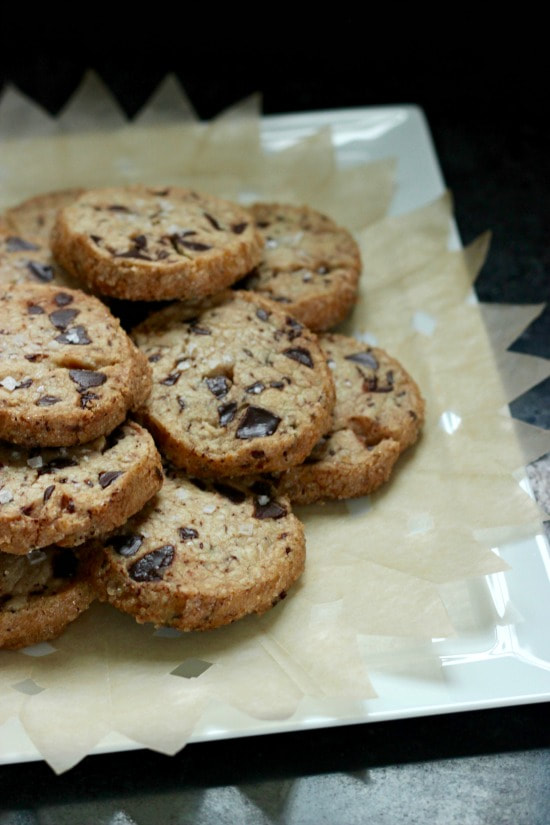
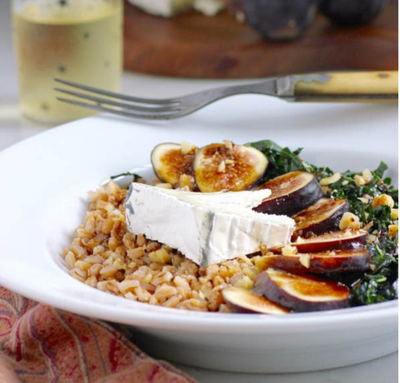
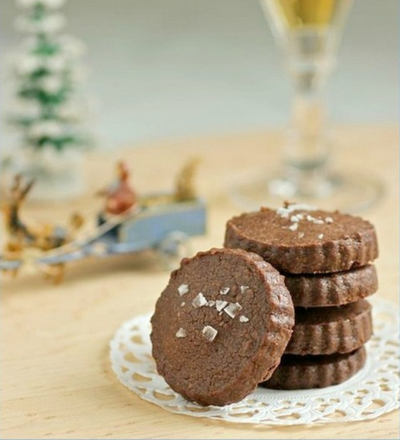
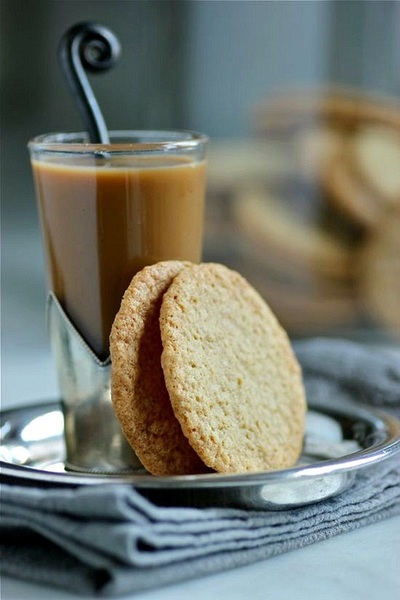
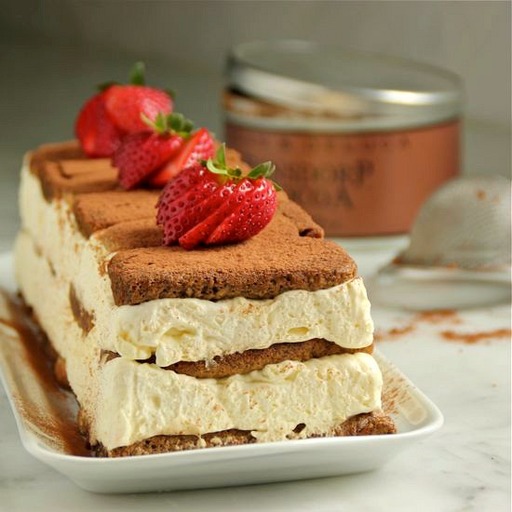
     I'm slowly making my way back into the kitchen.  My husband and I took our first trip in two years without our French Bulldog, Bisous.  We went to a part of the U.S. we love, Sonoma and Napa Valleys, where we were welcomed by temperatures in the low 70's.  If you spent any time in Minnesota during this past winter, you will understand just how much we enjoyed northern California's weather...
     The moment we returned home we headed straight for our veterinary clinic to pick up Bisous, where he had surgery for patella luxation the previous week.  Recovery involves 8 weeks of physical therapy, meds, no stairs, no jumping on furniture, etc.  My biggest fear is, when the 8 weeks are up we will find he still has a damaged knee; keeping Bisous still is not an easy feat.  I never knew a Frenchie could be as physically active as Bisous.  I have known many French Bulldogs through the years and not one has come close to Bisous' energy level.  Right before I started noticing the limp/skip in Bisous' step, I saw him racing circles through our backyard moments before he flew over an entire raised bed in our garden.  His size, weight, and activity level have not been his body's friend.  In the information that was sent home with us from our vet, I read that 30 to 40 percent of dogs that have patella luxation in one knee will eventually have it in the other.  The best thing I can do for Bisous is cut back on the amount of food he eats.  Bisous was given to us by the breeder, at eight weeks of age, with Giardia.  He was on heavy duty, hard on his system, meds for over four months.  During that time we did everything possible to get him to eat, since the drugs killed his appetite.  He now loves his food and sits in front of his empty bowl staring into it and crying.  It's hard not to give him everything he wants.


Picture

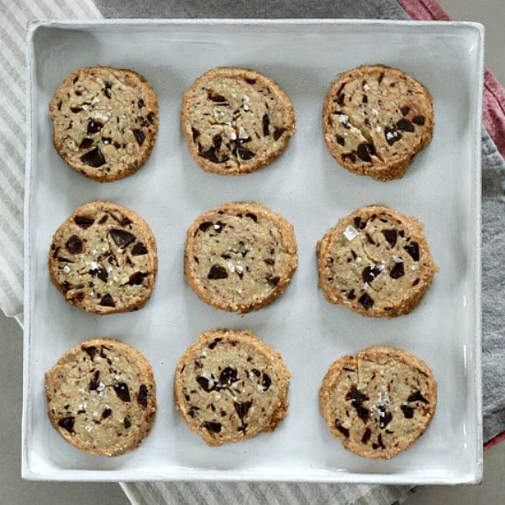
     I have not left our house since we brought Bisous home.  Up until yesterday I have always been here with him.  But we went next door last night for dinner (easy enough to run home occasionally and check on B).  I made an appetizer (one that I need to bake again and photograph) plus, the cookies in this post.  The Salted Chocolate Chunk Shortbread is a recipe by Alison Roman; photos of which are all over Instagram.  NYT Cooking shared the recipe, and... voila! ... dessert last night along with Rudesheim Coffee.  The falling snow outdoors was the perfect backdrop. 

Picture


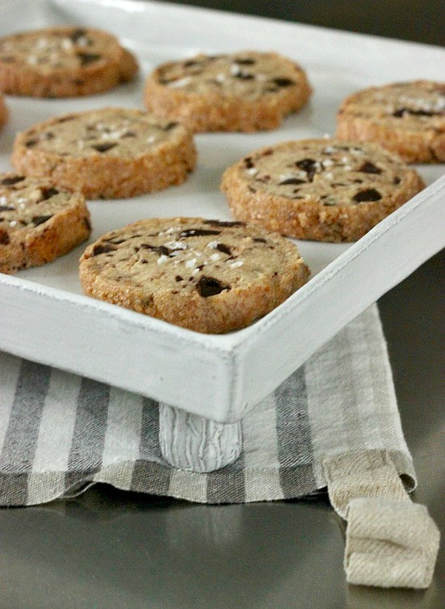
•Salted Chocolate Chunk Shortbread Cookies•

•recipe by Alison Roman, via NYT Cookiing
•yield: 24 cookies

• 1 cup plus 2 tablespoons salted butter, cold (room temp if you're using a handheld mixer), cut into 1/2-inch pieces
• 1/2 cup granulated sugar
• 1/4 cup light brown sugar
• 1 teaspoon vanilla
• 2 1/2 cups all-purpose flour
• 6 ounces semi-sweet or bittersweet dark chocolate chopped (not too fine, you want chunks, not little shards)
• 1 large egg, beaten
• Demerara sugar, for rolling
• Flaky sea salt, for sprinkling

1.  Line two rimmed baking sheets with parchment paper.  Using a stand mixer fitted with the paddle attachment or an electric hand mixer, beat the butter, both sugars, and vanilla on medium-high till it's super light and fluffy (3-5 minutes for a stand mixer; 6-8 for a hand mixer).  Using a spatula, scrape down the sides of the bowl and, with the mixer on low, slowly add the flour, followed by the chocolate chunks, and mix just to blend.  If necessary, knead the dough with your hands to make sure the flour is totally incorporated.  At this point, the dough should be smooth with no pockets of flour.
2.  Divide the dough in half, placing each half on a large piece of plastic wrap.  Use the plastic wrap and your hands to form the dough into a log shape.  Rolling on the counter will help to smooth it out.  Each half should form a 6-inch log, 2 to 2 1/4-inches in diameter (my logs ended up around 7-inches).  Chill until totally firm, about two hours.
3.  Preheat oven to 350˚F.  Brush the outside of the logs with the beaten egg and roll them in the demerara sugar.
4.  This is where I found I needed to let the logs warm up a bit.  When I tried to slice the first cookie, it crumbled into pieces.  I kept my dough in the refrigerator overnight and it was hard.  I probably gave them about 10 minutes before I gently began slicing the dough with the serrated knife.  Position your fingers on the dough where you are slicing.  It's a bit awkward, but I had two fingers on the end of the log with the serrated knife between them and the rest of my hand.  If any of the dough breaks off, gently press it into the cookie once on the baking sheet.  These cookies are very forgiving.  Place them on the prepared baking sheets, spacing 1-inch apart.  Sprinkle with the flaky salt.  Bake until the edges are just beginning to brown, approximately 15 minutes.  Remove from oven and let cool slightly before sitting down with a glass of cold milk and trying not to eat them all!


TAKE a LOOK:


3 Comments

Brown Sugar-Pecan Shortbread

7/12/2017

3 Comments

 
Picture

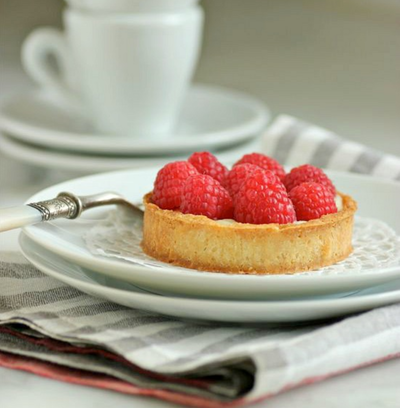
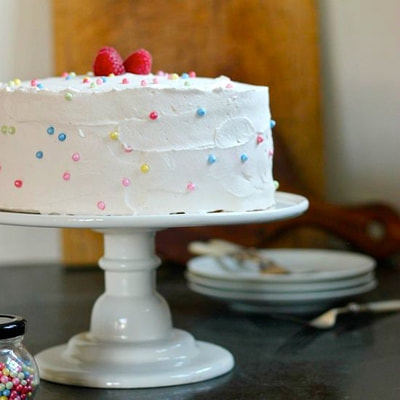
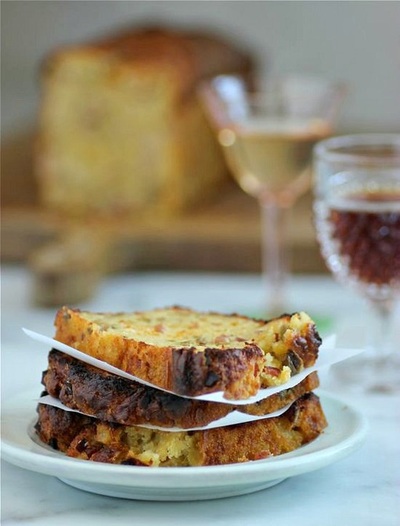
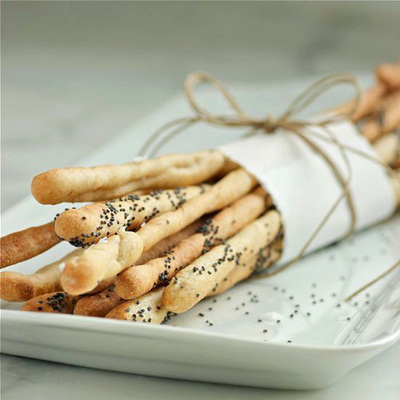
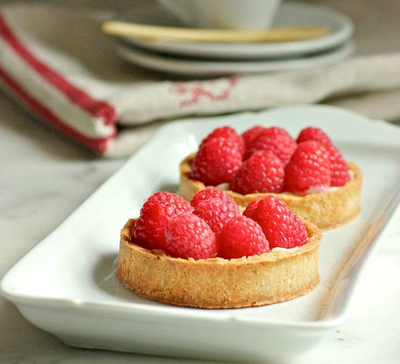
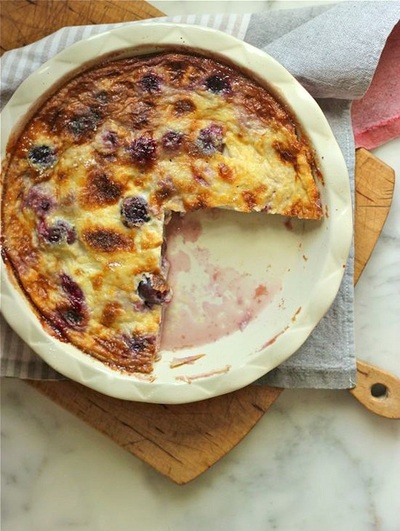
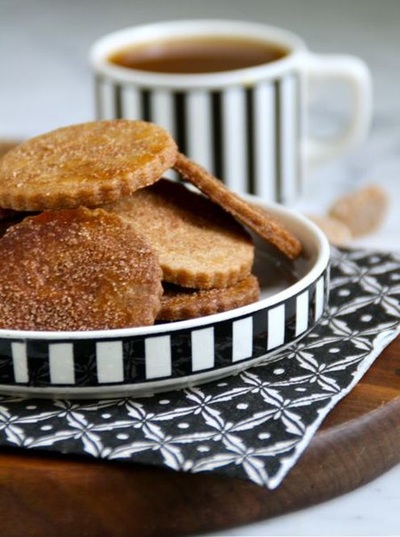
     Two years ago for Father's Day, I bought my husband two raspberry bushes.  He planted them at the back of our yard, next to the strawberries and behind the raised vegetable beds.  I've honestly forgotten about them until this summer, since they're shielded by the tuteurs that hold my tomatoes. Several weeks ago he told me how he needed to build a 6 foot grid frame to support the two plants.  I actually thought that sounded a bit excessive, but I didn't argue (well, maybe a little)... But you know what?  They definitely needed the support of that frame.  They're massive plants.  Now, each morning I go out and pick a pint of raspberries.  I just made a Cherry-Berry Pie (recipe HERE) that is a combination of sweet cherries, blueberries and my garden raspberries.  Tomorrow there's going to be a raspberry cake.  And if they continue to produce berries until the fall, there will be many more raspberry recipes ahead.
     The other day, we were just eating the raspberries as is, with a little pastry sauce drizzled over.  I thought a little shortbread cookie would be perfect with the berries. 


Picture


Picture
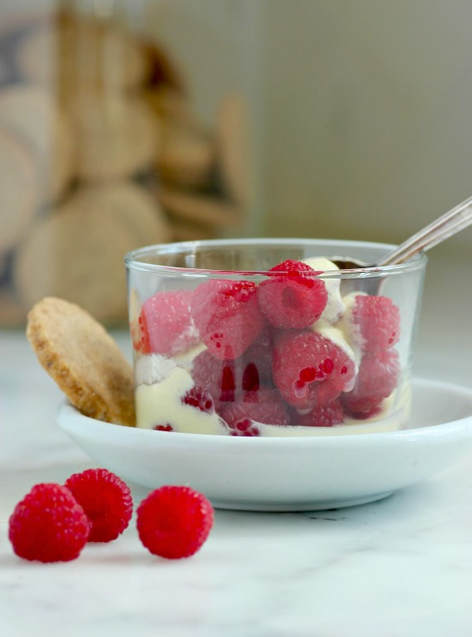
   • recipe from the Silver Palate Good Times Cookbook •
• 2 cups unbleached all-purpose flour
• 1 cup pecan pieces
• Pinch of salt
• 1 cup (2 sticks) unsalted butter, room temperature
• 1/2 cup packed dark brown sugar
1.  Grind the flour, pecans, and salt in a food processor fitted with a steel blade to a fine powder.  Set aside.
2.  Using an electric mixer or a wooden spoon, cream the butter and sugar.  When the mixture is very smooth and creamy, mix in the pecan mixture.
3.  Gather the dough into a ball, wrap in plastic wrap, and refrigerate at least 3 hours or overnight.
4.  Preheat oven to 300˚F.  Line cookie sheets with parchment paper.
5.  Roll out the dough 1/4-inch thick on a lightly floured surface.  Cut into shapes with a 1-inch cookie cutter.  Gather up the scraps, reroll, and cut into as many cookies as possible.  Place on the prepared cookie sheets and bake until colored, 20 to 25 minutes.


TAKE a LOOK:


3 Comments

A Holiday Party

12/10/2016

1 Comment

 
Picture

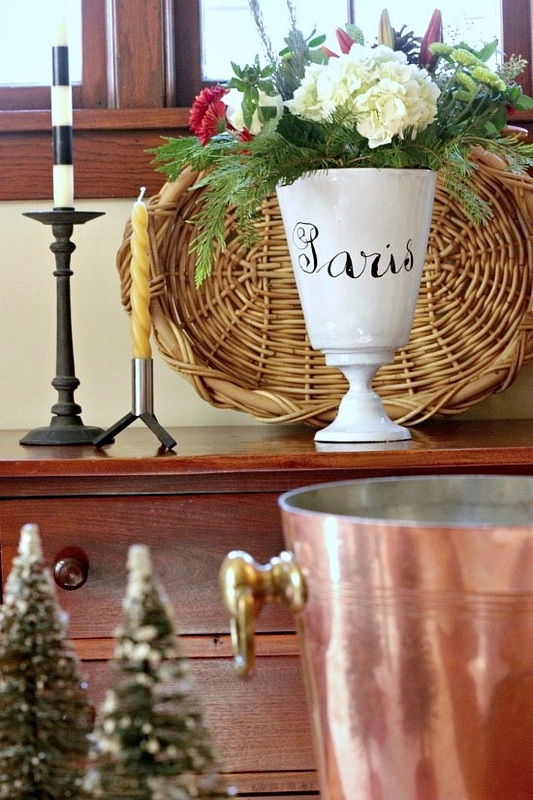
     During the holiday season, our big celebration has always been on New Year's Day.  That is when my husband and I host our annual brunch; an event that now spans 30 years.

Picture

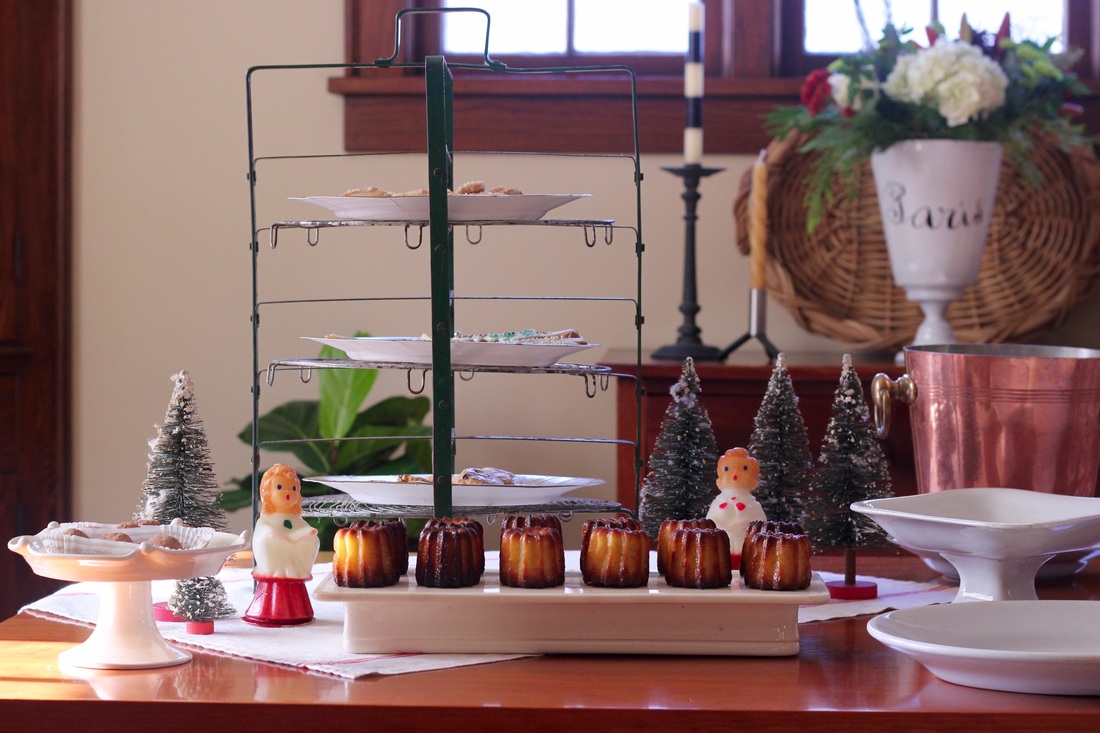
      What I don't do very often, however, is plan an event right before Christmas.  But a week ago, feeling like I had the holidays under control, I asked friends who are in our gourmet "supper club" if they would like to come over for an evening of appetizers and drinks.  Amazingly, during this very busy time of the year, everyone was free!       
  

Picture
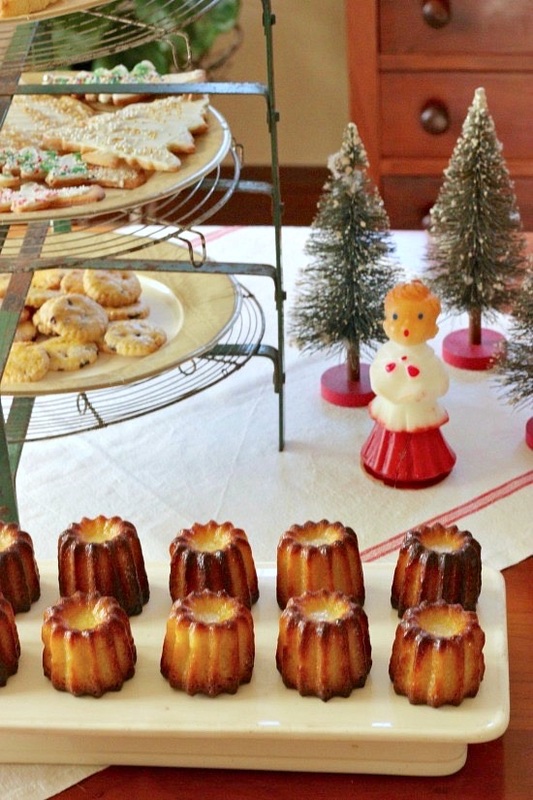
.
     I cooked and baked some of my favorites, and I have links for you below to all of the foods on my menu. 

Picture

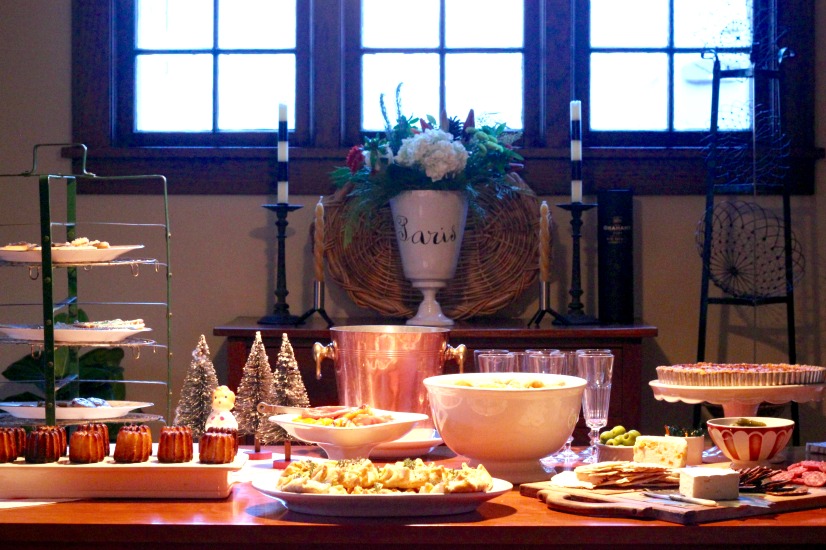
     And the best part, for me anyway, was pulling out favorite serving pieces, stands, and vintage decorations... and sharing it all with family and friends.

Picture


Picture

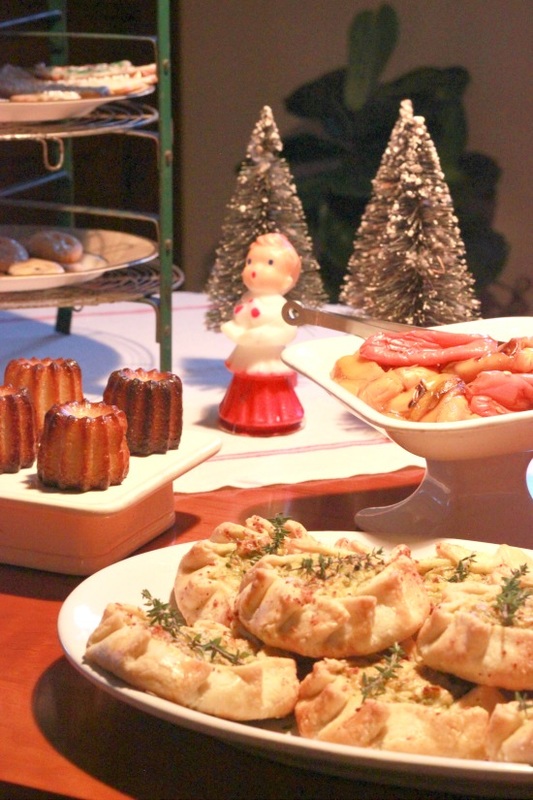
• Tortellini Salad with Snow Peas
• Zucchini Galettes with Fresh Ricotta and Lemon
• Époisses, Ham and Apple Tart
• Rolled Vanilla Christmas Tree Cookies
• Vanilla Shortbread Cookies
• Macademia Shortbread Biscotti
• Sablés à l'Orange et Raisins
• French Canelés
• Chocolat Chaud
... assorted cheeses, olives, salami, crackers, roasted peppers and drinks were also served


TAKE a LOOK:


1 Comment

an uneventful Thursday...

8/11/2016

2 Comments

 
Picture

 
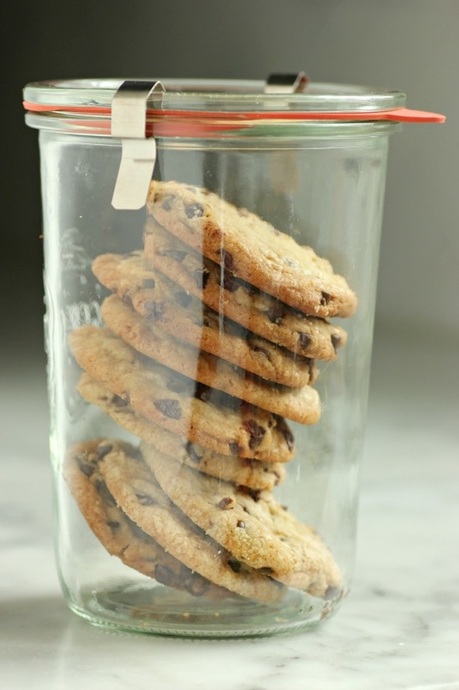
Sometimes, all you need is a cookie and a French Bulldog...


Picture


+ Chocolate Chip Cookies

• recipe from REAL FOOD | fall 2016
• 2 1/4 cups unbleached all-purpose flour
• 1 teaspoon baking soda
• 1 teaspoon kosher or fine sea salt
• 1/2 cup packed light brown sugar
• 1 cup granulated sugar
• 1 cup (2 sticks) unsalted butter, melted and cooled
• 1 teaspoon pure vanilla extract
• 1 large egg
• 2 large egg yolks
• 1  10-ounce bag bittersweet chocolate chips

1.  Preheat oven to 325˚F.  Line baking sheets with parchment paper.
2.  In a medium bowl, whisk together flour, baking soda and salt.
3.  In the bowl of an electric mixer, combine brown sugar, granulated sugar and butter; mix on low.  Add vanilla, egg and egg yolks and mix until incorporated.  Add the flour mixture and mix until a dough forms.  Add the chocolate chips; mix to combine.
4.  Let dough stand 10 minutes to firm up, then use a small ice cream scoop to drop rounded tablespoonfuls onto parchment-lined baking sheets, leaving about 3 inches between each cookie.
5.  Bake until golden around the edges but soft on top, approximately 10 minutes.  Let rest on the baking sheet for 5 minutes before transferring to a wire rack to cool completely. 


TAKE a LOOK:


2 Comments

Lemon - Cornmeal Cookies with Lemon Icing

3/24/2016

0 Comments

 
Picture

     I wanted to do something that felt like spring... since, it is spring.  Even though it snowed most of yesterday, we are finally, officially past winter, and heading in the right direction.  Chives and rhubarb are off to a good start in my garden.  Soon enough, I'll be preparing meals made with produce from my potager. 

Picture

     These Lemon - Cornmeal Cookies with a drizzle of Lemon Icing, are so good and I don't bake them often enough.  This time, I used medium, stone-ground,cornmeal.  If you like coarseness and a little hard crunch in your cookies, go this route.  If not, stick with the regular, finely ground cornmeal. 

Picture

     This is a nice little cookie to have on hand for Easter.  A sprinkling of rainbow sugar over the lemon icing goes nicely with colored Easter eggs and jelly beans!

Picture


Picture
• 1 cup plus 2 tablespoons unbleached flour
• 1 cup yellow cornmeal
• 3/4 cup plus 2 tablespoons confectioners' sugar
• 3/4 teaspoon salt
• 1/2 teaspoon baking powder
• 1/2 cup unsalted butter, room temperature
• 1 large egg
• 1 egg yolk
• 1 teaspoon vanilla
• 2 tablespoons grated lemon zest
• Confectioners' sugar
• Fresh lemon juice
• Colored, decorative sugar

   In the bowl of a food processor, combine the first 5 ingredients and pulse several times.  Cut up the butter and add to the ingredients in the food processor.  Pulse until the mixture resembles a coarse meal.  Transfer the mixture to a large bowl.  Add whole egg, the yolk, vanilla and lemon zest.  Knead, in the bowl, several times or until just blended.  Wrap dough in plastic and chill at least 30 minutes.
   On a lightly floured surface, roll out the dough 1/8-inch thick.  Cut into desired shapes and place on parchment-lined baking sheets.  Bake in preheated 375 degree oven 8 to 10 minutes, or until bottoms are golden brown.  Cool on racks. 
   In a small bowl, fill with Confectioners' sugar.  Add fresh lemon juice, while mixing, until drizzling consistancy.  Using a small spoon, scoop up a little icing and hold above the center of a cookie, allowing the icing to drizzle down onto the cookie.  Sprinkle with colored sugar and place on a plate or rack until icing is dry.


TAKE a LOOK:


0 Comments

Oatella Cookies

4/18/2015

2 Comments

 
Picture

                                                         
     A nice little sweet treat to fill up my cookie jar.  Oatella Cookies -- a mix of oatmeal and chocolate-hazelnut.  Recipe by Dagmara Kokonas.


Picture


• 1 3/4 cups all-purpose flour
• 1 teaspoon kosher salt
• 1/2 teaspoon ground cinnamon
• 1/4 teaspoon baking soda
• 1 cup vegetable shortening
• 1 cup granulated sugar
• 3/4 cup packed dark brown sugar
• 2 large eggs
• One 13-ounce jar Nutella
• 2 cups old-fashioned rolled oats

PREHEAT OVEN to 375˚F
1.  Line 2 large baking sheets with parchment paper. 
In a medium bowl, whisk the flour with the salt, cinnamon and baking soda. In a stand mixer fitted with the paddle, beat the shortening with both sugars at medium speed until light and fluffy, about 2 minutes. Beat in the eggs 1 at a time, scraping down the side of the bowl. Add the Nutella and beat until smooth. Reduce the speed to low and beat in the dry ingredients until just incorporated, then beat in the oats.
2.  Form dough into 1-inch balls and place 2-inches apart on prepared baking sheets. 
Bake for 8 to 10 minutes, until the edges are lightly browned and the cookies are just set; shift the pans from front to back and top to bottom halfway through baking. Immediately transfer the cookies from the pan to racks to cool. Repeat with the remaining dough.


TAKE a LOOK:


2 Comments

Birthday Tiramisù

4/10/2015

5 Comments

 
Picture
    
     I had already planned the cake I was going to make for my daughter's twenty-second birthday and purchased all of the ingredients.  It would be full of fresh, organic strawberries and orange cream.  That was until she told me, at nearly the last minute, that she wanted tiramisù.  Of course that changed everything. I always honor birthday requests, so I put the cartons of strawberries aside and started thinking tiramisù "cake".  I did not want to serve tiramisù from a dish.  I wanted it to look like a cake.  For a birthday you need a cake.  I also had to consider my other daughter.  She cannot eat gluten.  If I was going to make tiramisù the ladyfingers, a key ingredient of Italian tiramisù, could not be a ready-made Italian, grocery store variety.  They needed to be homemade, by me, with my Turkey Red flour,
a heritage flour my daughter can painlessly digest, from Sunrise Flour Mill in Minnesota.
     I chose a tiramisù recipe that included whipped heavy cream, not always a tiramisù ingredient. When combined with the mascarpone cheese and egg yolks, then layered between the espresso-soaked ladyfingers it guaranteed the loaf cake, when unmolded, would hold its shape.  I used a nifty, French loaf pan with sides that collapse, but any pan of similar capacity and lined in plastic wrap will release the cake when inverted.
     The only minor problem I encountered was in making the ladyfingers.  I've realized I need to start measuring my egg whites or purchase medium sized eggs.  The large organic eggs I've recently been using could easily pass for extra-large.  When working with any batter that is piped, if it is too liquid it will spread.  I've lately run into this with choux pastry and some cookies.  I was tempted to remake the ladyfingers that, as you can see above, spread during baking.  But they tasted great and worked beautifully in the making of my tiramisù, so I left them as is... My (sometimes feeble) attempt at not needing everything to always be perfect...
  They were, however, perfect in the end result.

Picture


Picture

Ladyfingers | (adapted) recipe by Emeril Lagasse

• 2 tablespoons butter
• 3/4 cup plus 2 tablespoons all-purpose, unbleached flour
• 4 egg yolks
• 1/2 cup sugar
• 4 egg whites, beaten until stiff, but not dry
• Pinch of salt
• 1 teaspoon vanilla extract
• Confectioners' sugar for dusting

PREHEAT OVEN to 350˚F
1.  Grease two baking sheets with 2 tablespoons of the butter.  Dust each baking sheet entirely with flour.
2.  Combine the egg yolks with the sugar in a large bowl and beat with an electric mixer until the mixture is yellow, thick, and has tripled in volume, about 8 to 10 minutes.  Add to this the whipped egg whites, salt, and vanilla.  Fold the mixture while slowly sifting in the 3/4 cup flour.  Fold the mixture well until smooth.
3.  Fill a large pastry bag, fitted with a 1/2-inch plain tip, with the batter.  Pipe twelve, 4-inch lengths, well spaced, onto each baking sheet.  Dust the lady fingers with the Confectioners' sugar.  Bake until just firm on the outside and light brown in color, about 15 to 18 minutes. 
4.  Remove from oven and transfer ladyfingers to a cooling rack.


Tiramisù Loaf Cake | (adapted) recipe from Renée Kemps

• 250 ml double cream
• 75 gr sugar
• 4 eggs (yolks)
• 500 gr mascarpone cheese
• 5 tbs coffee liqueur (optional)
• 200 ml espresso coffee
• 250 gr ladyfingers (made with recipe above, or purchased)
• Cocoa powder, for dusting

1.  Line an 11-inch-by-3 1/2-inch loaf pan (or any pan of similar capacity) with plastic wrap extending 2-inches over each side.  Set aside while you mix up the tiramisù.
2.  Whip the cream just until stiff peaks form.  Do not over beat.
3.  Separate the egg yolks from the whites.  In a large bowl beat the yolks with the sugar until very light and fluffy, about 10 minutes.  Stir the mascarpone cheese into the egg-sugar mixture.  Fold in the whipped cream.
4.  Mix the espresso and the liqueur (I used Kahlua) in a shallow dish.  Take the ladyfingers and trim them to fit crosswise into the loaf pan. Dip the ladyfingers into the espresso and place a row over the bottom of the loaf pan, using any leftovers, dipped,from the trimmings to cover completely.
5.  Pour half of the filling over the ladyfingers and spread mixture evenly.  Repeat this step one more time, ending with a layer of espresso-dipped ladyfingers on top.  Fold the extending plastic wrap over the top of the tiramisù and refrigerate for at least one day.  If you can allow it to chill for two to three days, that's even better.
6.  To unmold, fold back the plastic wrap and position a serving plate over the top of the tiramisù.  Invert the tiramisù onto the plate and carefully lift off the loaf pan/mold.  Gently remove the plastic wrap.  Dust the top of the tiramisù liberally with the cocoa powder.  Refrigerate until ready to serve. 


TAKE a LOOK:


5 Comments

Chocolate Dipped Coconut Macaroons

3/22/2015

2 Comments

 
Picture

    On any given day, if
I have a choice between a macaron or a macaroon, I will always pick the macaron.  Other than the near identical spelling of their names, however, there are virtually no comparisons to be made between a macaron or a macaroon... except to say that they are both gluten free.  And that's it. 
I am partial to French macarons that offer endless possibilities for colors, flavors, and fillings.  A macaron is considered by some to be a "fussy" cookie that involves piping the almond-meringue batter, often vividly colored, into identical-sized rounds.  Then, after baking, a buttercream, chocolate, or fruit preserve (for starters) is sandwiched between two of the crisp meringue disks.  Fussy perhaps, but the end result rewards you with an amazing little cookie.


     I would see macarons in France, long before I ever noticed them at bakeries here in the United States. Patisserie Ladurée in Paris is well-known for its macarons (Rue Bonaparte, Left Bank location shown at right).  And a Ladurée cart at Charles de Gaulle airport lets travelers grab last minute purchases of macarons before they board their flights.

Picture
    
     But that has all changed.  Now they are  being sold in numerous locations across the U.S., and judging by photo-sharing sites, there are many home bakers making them as well.  I think it would be safe to say that the French Macaron is the "it" cookie at the moment.
Picture
Picture
                   above... Patisserie Ladurée cart at Charles de Gaulle airport, Paris
Picture
                            in Paris above... Grégory Renard – Cacao et Macarons


     But let's get back to the Macaroon...  It is made with coconut and sweetened condensed milk; a very few ingredients that are shaped into small balls, then baked.  There is absolutely no confusing macaroons with the French meringue sandwich cookies -- in looks or taste.  The other day I saw Dan Cohen's recipe and accompanying photo for Chocolate Dipped Macaroons and suddenly, for the first time ever, I had a craving for sweet, toasted coconut dipped in melted bittersweet chocolate.  These cookies go together quickly and you can have them baked and dipped in chocolate in no time.  I can't believe I haven't made these before.  Certainly a nice little (gluten-free) cookie to serve after an Easter brunch.

Picture

Picture


Picture
+ recipe from Dan Cohen

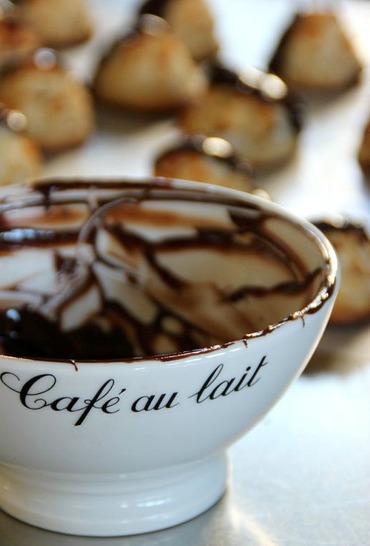
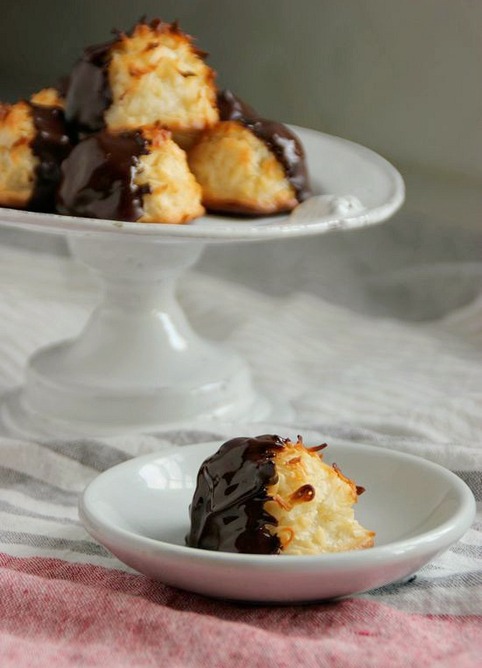
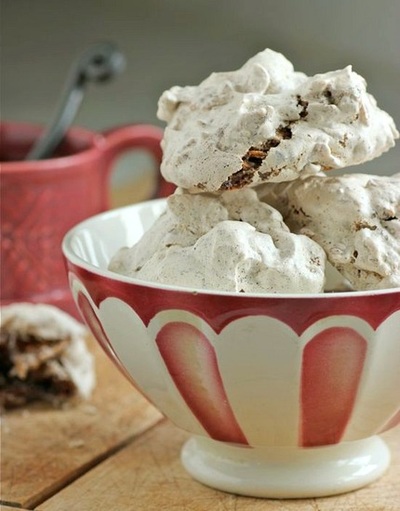
• 1 cup sweetened condensed milk
• 1 teaspoon pure vanilla extract
• 14 ounce package of sweetened shredded coconut
• 1 large egg whites
• 1/4 teaspoon kosher salt

• 6 ounces finely chopped bittersweet chocolate

1.  Preheat oven to 350˚F and position oven racks in the top and bottom third of the oven.  Line two rimmed baking sheets with parchment paper.
2.  In a large bowl, combine the sweetened condensed milk and vanilla.  Stir in the shredded coconut and mix thoroughly.
3.  Using a whisk or a handheld electric mixer,  beat the egg whites and salt until firm peaks form.  Using a spatula, fold the whites into the coconut mixture and finish by pushing mixture together in a mound.
4.  Fill a small bowl with cold water and wet your hands.  Gently form spoonfuls of the coconut mixture into small balls, around 1 1/4-inches in diameter and place on prepared baking sheets, spacing 2-inches apart.
5.  Transfer baking sheets to the oven and bake, rotating and changing out position of pans halfway through, about 25 minutes.  Macaroons should be golden brown in spots on top and underside. 
6.  Cool briefly on the baking sheets, then transfer macaroons to racks to cool completely.
7.  In the meantime, melt the bittersweet chocolate either in a double boiler on the stove, or in a small bowl in the microwave.  Dip half of the macaroon into the chocolate and place on a piece of waxed paper until set. 
8. 
The macaroons will keep, uncovered at room temperature, for up to 3 days, or refrigerated in an airtight container for up to 3 weeks. They can also be frozen for up to 6 months.

Picture


TAKE a LOOK:


2 Comments

Not quite what I expected...

3/14/2015

2 Comments

 
Picture

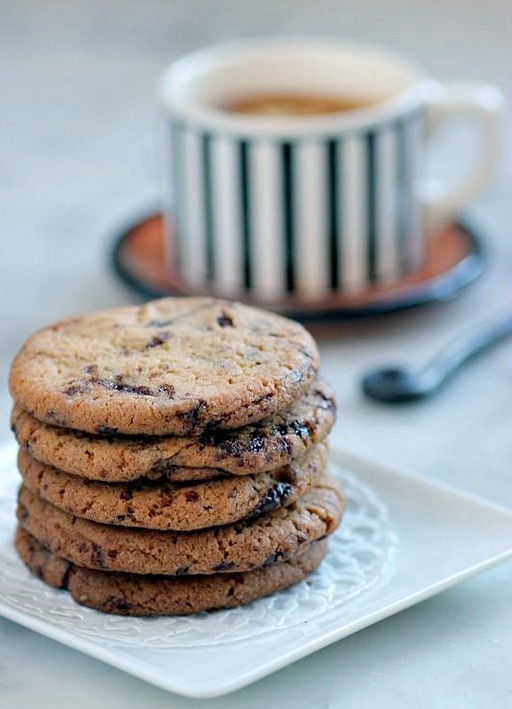
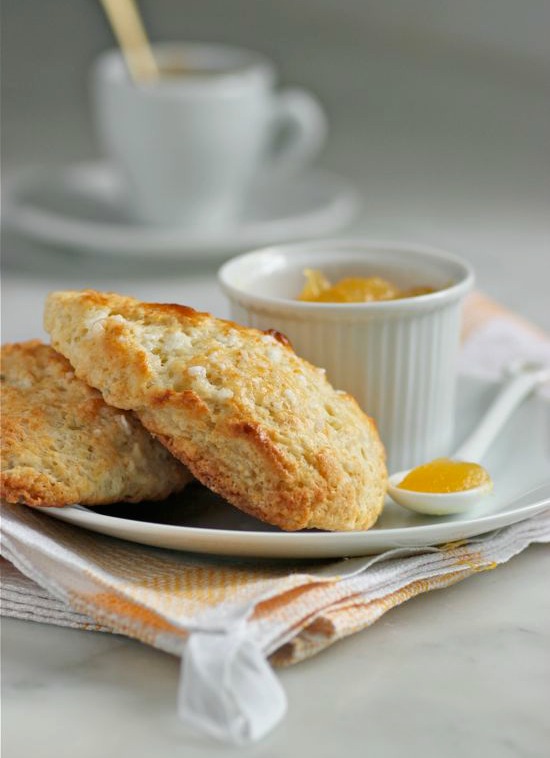
     This week I baked chocolate chip cookies and lavender-lemon scones.  Both were delicious, but with results I had not anticipated.  The cookies and the scones spread while in the oven, more than I ever thought they would.  But hey... they were still good, and I would make both of them again, possibly with a little tweaking.  If you're interested, here are the links...
     And may I suggest... use a smaller round cutter for the cookies than the 2-inch dimension given in the recipe, or do as one reviewer did and cut the dough into small squares. 

Picture

 Chocolate Chip Cookies | Saveur, October 2014

 Sweet Lavender-Lemon Scones | Bon Appetit, May 2012


2 Comments

one more...

12/19/2014

0 Comments

 
Picture

Picture

Picture


Picture
+ a recipe from Saveur | December 2014

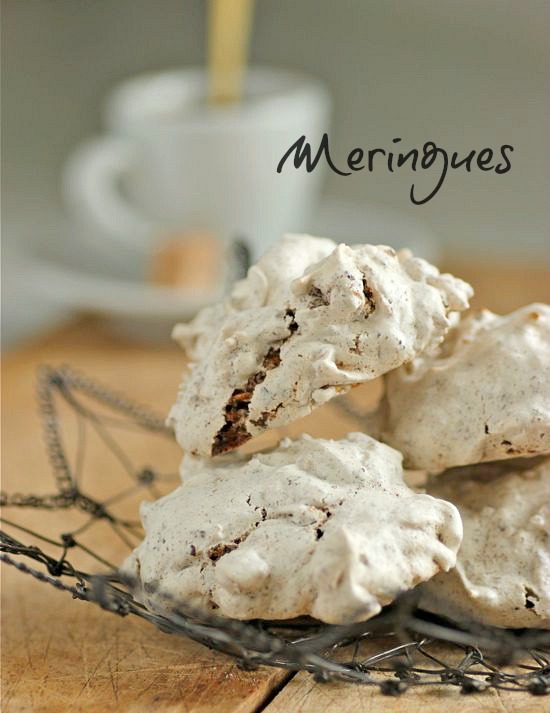
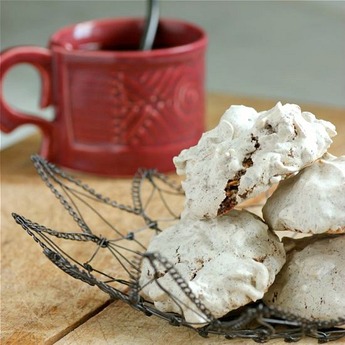
• 4 egg whites (1/2 cup)
• 1 cup granulated sugar
• 4 1/2 ounces semi-sweet chocolate, finely chopped
• 3 cups cornflakes (preferably organic)
• 1 teaspoon pure vanilla extract
1.  Preheat oven to 300˚F and line two baking sheets with parchment paper.
2.  Using a stand or handheld mixer, begin whipping the egg whites at medium speed and when frothy, slowly add the sugar.   Increase speed to high and continue to whip until you have firm peaks.  By hand, fold in the cornflakes, chopped chocolate, and vanilla.
3.  Drop meringues in 1 tablespoon mounds, with 1-inch spaces between, onto prepared baking sheets.  Bake cookies for 20 minutes total, switching baking sheet positions after 10 minutes.
  Remove from oven and cool on a baking rack.


TAKE a LOOK:


0 Comments
<<Previous
    Picture


    Picture
    Picture
    Enter your Email

    Preview | Powered by FeedBlitz


    Categories

    All
    Amana
    Appetizers
    Beef
    Breads
    Breakfast
    Cakes
    Chocolate
    Condiments
    Cookies
    Daring Bakers Challenge
    Desserts And Sweets
    Drinks
    Eggs
    Espresso
    Etcetera
    Fish
    French Bulldogs
    Friday Night Dinner
    Fruit
    Germany
    Gratins
    Great Kitchens
    Grilling
    Ice Cream
    Lamb
    Main Dishes
    Muffins
    My Garden
    My Kitchen Renovation
    New Years Day Brunch
    Paris
    Pasta
    Pork
    Poultry
    Provence
    Restaurants
    Rhubarb
    Rice
    Salads
    Scones
    Seafood
    Side Dish
    Soup
    Sunday Mornings
    Sweet And Savory Tarts
    Thanksgiving
    Tomatoes
    Vegetables
    Vegetarian

  • Home
  • PAINTINGS
  • About
  • Passions-to-Pastry Blog
  • Contact
  • Recipes