Living Tastefully
  • Home
  • PAINTINGS
  • About
  • Passions-to-Pastry Blog
  • Contact
  • Recipes

Raspberry Éclairs

2/11/2019

5 Comments

 
Picture
  
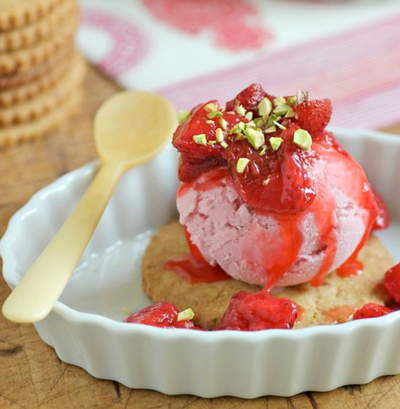
     It would be easy enough to say that I made éclairs à la framboise because Valentine's Day is this week.  All anyone needs to do is look at them to agree that Valentine's is the perfect time to bake and devour this pink pastry. 
Picture

     But it actually had more to do with the dismal weather we've been experiencing here in Saint Paul, Minnesota.  It started with the Polar Vortex.  The cold was a challenge for anyone heading outdoors, but especially difficult for my French Bulldog, Bisous.  I never let him outdoors during the extreme cold unless I accompanied him; a good decision after our first time out together in the backyard.  After two minutes, his feet were already so cold that he fell sideways and couldn't walk.  I scooped up that 30 pound "little man" and ran like hell towards the house.  Since then, it seems like every other day we've had ice or snow, or both.
     We've also been dealing with a very sick, little granddaughter for the past 10 days.  Liv is my culinary dream child... she loves everything that comes out of my kitchen.  But there were several days she wasn't able to eat, and when she finally did start feeling better I wanted to take her something special.  When I saw this New York Times recipe for raspberry eclairs, I knew immediately we all needed this colorful pastry!

Picture


   Raspberry and Cream Éclairs


        by Samantha Seneviratne | New York Times Cooking
recipe slightly adapted


FOR THE RASPBERRY CREAM:
• 1 tablespoon cold water
• 1 teaspoon gelatin
• 1  1/2 cups fresh raspberries
• 8 ounces cream cheese, at room temperature
• 3 tablespoons honey
• 2 tablespoons confectioners' sugar
• 1  1/2 teaspoon vanilla extract
• 1/2 cup freeze-dried raspberries (found at Trader Joe's), ground to a fine powder
• 3/4 cup heavy cream
FOR THE PUFFS:
• 6 tablespoons unsalted butter
• 2 teaspoons granulated sugar
• 1/2 teaspoon kosher salt
• 3/4 cup all-purpose flour
• 3 large eggs
FOR THE GLAZE:
• 1 cup fresh raspberries
• 2 cups confectioners' sugar
• 3/4 teaspoon vanilla extract
• pinch of kosher salt

1.  Make the raspberry cream:  Add 1 tablespoon cold water to a small bowl; sprinkle the gelatin evenly on top.  Let the mixture stand for 5 minutes.  Meanwhile, smash 1/2 cup fresh raspberries in a large bowl.  Add the cream cheese, honey, confectioners' sugar, vanilla and half of the freeze-dried raspberry powder and beat with a wooden spoon until smooth and creamy.  Set aside.
2.  Heat 1/4 cup heavy cream in a small saucepan over medium-high.  Stir in the gelatin mixture and cook until the gelatin is completely dissolved, about 3 minutes.  Set aside to cool slightly, then stir into the cream cheese mixture until combined.  Cover and chill for at least 30 minutes.
3.  Prepare the puffs:  In a medium saucepan, bring the butter, granulated sugar, salt and 3/4 cup water to a simmer over medium heat, stirring with a wooden spoon to help the butter melt.  As soon as it comes to a boil, add all the flour at once; stir constantly until the dough forms a ball and pulls away from the sides of the pan, about 1 minute.  Remove the pan from the heat and let the mixture cool for 3 to 4 minutes, stirring the dough occasionally to cool.
4.  Heat oven to 450˚F.  Off the heat, add the eggs to the pan, one at a time, stirring vigorously with a wooden spoon (this can also be done in a stand mixer using the paddle attachment).  The dough will break apart and slide around in the pot before it comes back together.  Transfer the dough to a piping bag fitted with a large round or star tip.
5.  Line two baking sheets with parchment paper (it helps to place a small dot of the pastry dough on the back of each corner to help secure the parchment to the baking sheet).  Pipe the dough into 4  1/2-inch-by 3/4-inch lengths about 3 inches apart.  With a damp fingertip, flatten any points.  Bake until deep golden brown and puffed, rotating the sheets halfway through, 20 to 24 minutes.  They should be light and crisp.  Turn the oven off.  Poke each éclair on either end with a toothpick to allow steam to escape.  Return the puffs to the oven and prop the oven door open slightly with the handle of a wooden spoon.  Alow the puffs to dry out completely, about 15 minutes.
6  Prepare the glaze:  Mash the fresh raspberries and push them through a fine-mesh sieve, reserving all the juice and discarding the seeds.  Add the confectioners' sugar, vanilla and salt to the reserved juice and whisk until smooth.
7.  Finely chop the remaining 1 cup fresh raspberries.  Whip the remaining 1/2 cup cream to soft peaks.  Gently stir the chilled raspberry cream to loosen it, then fold in the raspberries and whipped cream.  Transfer the cream to a pastry bag fitted with a large tip.  Slice the top third off each éclair and fill the lower portion with cream.  Dip the top of the top piece in the glaze, letting any excess drip off, and replace it.  Sprinkle with the remaining raspberry powder.  Serve immediately.   Éclairs are best eaten the day they are made, but if there are leftovers, cover with plastic wrap and refrigerate. 


5 Comments

Bread Pudding with Strawberry-Rhubarb Sauce

6/19/2018

1 Comment

 
Picture

     In my attempt to keep up with the bounty of strawberries and rhubarb in my garden, I revisited a recipe I've had for 35 years... Did I just write 35 years?  That's almost impossible to believe.  But it's been even longer that I've been clipping, writing down, bookmarking, copying, and tearing out recipes and filing them away -- into BIG files.  And maybe that's why this recipe for bread pudding with strawberry-rhubarb sauce has gotten overlooked the past few years.  Six years, to be exact, since I last made this recipe.  But thanks to the abundance of strawberries (some days yielding 5 pounds) and my endless supply of rhubarb (good thing I like it so much), my attack plan has been to default to a super easy strawberry-rhubarb sauce.  And that reminded me of this simple bread pudding.  When served warm, or at room temperature with the chilled sauce, it is heaven.

Picture

     I have so many strawberries, I added some to the top of the bread pudding before baking.  A sweet little addition.  
     And don't limit the strawberry-rhubarb sauce just to bread pudding... cornmeal waffles, vanilla ice cream, french toast, and yogurt all benefit from a serving of this sauce, just to name a few... 


Picture


Picture
Country Living Magazine | 1982

• 12 to 14 slices from a French Baguette, 1/2-inch thick
• 3 to 4 tablespoons soft butter
• 3 large eggs
• 2 cups whole milk, or half milk-half cream
• 1/3 cup sugar
• 1/2 teaspoon ground cinnamon
• Pinch of sea salt
• Strawberry-Rhubarb Sauce, recipe follows
1.  Heat oven to 350˚F.  Butter a 10-inch round or other shallow 2 quart baking dish.  Butter each slice of bread on one side and arrange, buttered side down, in the dish with sides of the bread touching or overlapping slightly.
2.  Beat together the eggs, milk, sugar, cinnamon, and salt until well-blended.  Pour over the bread slices.  Allow the bread to soak up the custard for about 10 minutes.
3.  Bake on the shelf just above the center of the oven for about 40 minutes, or until golden brown and slightly puffed and crusty.  Serve hot or warm with the Strawberry-Rhubarb Sauce.


STRAWBERRY-RHUBARB SAUCE

• 3 1/2 cups fresh rhubarb, 1-inch pieces
• 1 pound fresh strawberries, sliced in half (quartered if large)
• 1/2 cup sugar
• 1 tablespoon finely grated organic orange peel
1.  In a medium-sized enameled saucepan, combine all the ingredients and let stand 10 minutes.  Stir again, cover, and bring to a simmer over low heat.  Increase heat and bring to a gentle boil, uncovered, over moderate heat.  Cook until rhubarb is tender, but not mushy.


TAKE a LOOK:


1 Comment

Farro with Orange, Avocado, and Arugula

2/28/2018

0 Comments

 
Picture

     I've become a farro fanatic.  I have been making salads lately with farro and whatever  fruits, vegetables, and nuts are available in my kitchen.  Last night's dinner consisted of farro with Cara Cara oranges, avocados, arugula... etc.  I will show -- with approximate amounts used -- my recipe below.  It's hard to go wrong creating your own signature salad.  Just fill it full of combinations you love.  From January until spring, my diet contains large amounts of citrus.  I just crave it this time of year.  If I'm eating a green salad, it most likely contains oranges (blood orange + CaraCara being my favorites), very thinly sliced red onion, and almonds... and a vinegrette using the juice of the oranges and a peppery olive oil; basically how I made my farro salad. Tonight, possibly a farro risotto!

Picture


Feel free to change the amounts of the ingredients to your liking...
• 1 cup farro
• 3 cups water
• Salt & pepper
• 2 cups shredded rotisserie chicken
• 3 large oranges, supremed, and any juices (from the cutting and squeezing of supremed oranges) reserved
• 2 avocados, sliced
• 1/2 cup (more or less) thinly-sliced red onion
• 2 handfuls arugula
• Good quality extra-virgin olive oil
• 1/2 cup toasted, slivered almonds
• 3/4 cup Feta cheese, crumbled

1.  Toast the farro in a dry saucepan over medium-high heat, stirring frequently, until it smells nutty, about 3 minutes. Add the water and 1 teaspoon salt and bring to a boil. Reduce heat to medium-low, cover partially, and cook until the farro is tender but still chewy, about 40 minutes.  Drain farro in a colander.
2.  In a large serving bowl, combine the farro, chicken, orange segments (see above to learn how to supreme an orange), avocados, red onion, and arugula.
3.  Using the reserved orange juices, make a vinegrette with equal amounts of juice and olive oil whisked together.  Add salt and pepper to taste.  Add vinegrette to the farro mixture and toss gently.
4.  Top the salad with the crumbled Feta and toasted almonds.


TAKE a LOOK:


0 Comments

Farro Salad with Kale, Figs, and Goat Cheese

9/13/2017

16 Comments

 
Picture

     I often think, I'm taking all this time to photograph a meal I have never eaten before.  What if once I taste it, I don't like it -- time wasted!  But instead I am wondering... will figs still be available to me in the coming weeks so I can make this salad over and over again?
     My husband started on his salad long before I did mine, and I was probably rolling my eyes when he kept telling me how good it was.  I usually put a lot more effort into our evening meals and thought this might be his way of telling me -- I like a good lunch; make a hearty salad more often!  But it didn't take me long once I started eating to agree with him and wonder... who do I thank first?  Sylvia Fountaine for the recipe?  Trader Joe's for the beautiful figs I've had trouble locating all summer?  Cypress Grove for my favorite goat cheese, Humboldt Fog?  Actually, I probably made this salad because I have more kale in my garden than I know what to do with...  So, thanks, Eileen!


Picture

     It all comes down to the ingredients.  Purchase the freshest figs that are firm and wrinkle free.  Toast the farro grains in a dry pan for about 2 minutes before you add the water.  Bypass the logs of goat cheese and get some Humboldt Fog by Cypress Grove -- you will love it!  Most of the groceries around me sell the Humboldt Fog for $29.00./lb.  COSTCO has Humboldt Fog at $17.00/lb.  I hope they never discontinue carrying it because I will always continue to buy it. 

Picture

     I've been thinking long and hard lately about the future of LivingTastefully.  This fall it will be 10 years since I started my blog.  Back then, there weren't many food blogs compared to the number there are now worldwide.  Is LivingTastefully even relevant any longer?  Several people I have mentioned this to seemed very disappointed. I really appreciate everyone that has followed LivingTastefully over the years. The one comment that has stayed with me (and I do not remember the exact words) was, "It's still relavent.  We all need beauty, style, and good taste", (was that close A. R.?).  Knowing it means a lot to someone else, means a lot to me.  Maybe all I needed was a little time off.  There are just so many other things I want to do, but I suppose I can do a little of each.  As of now, I will continue with L.T and see where it goes...


Farro Salad with Kale, Figs and Goat Cheese
recipe by Sylvia Fountaine, adapted

SERVES 2
• 1  1/2 cups cooked farro
• 2 large handfuls of chopped lacinato kale
• 4 figs, sliced
• 2-3 tablespoons chopped, toasted walnuts
• 2  2-ounce slices goat cheese, preferably Humboldt Fog

BALSAMIC MAPLE MUSTARD DRESSING
• 2 tablespoons extra-virgin olive oil
• 2 tablespoons balsamic
• 2 teaspoons maple syrup
• 1 teaspoon whole grain mustard
• 1/2 teaspoon kosher salt
• 1/4 teaspoon freshly ground pepper

1.  Whisk dressing ingredients together in a small bowl
2.  Divide farro among two bowls.
3.  In a mixing bowl, massage lacinato kale to tenderize it with a pinch of salt and drizzle of olive oil until coated and pliable, about 1-2 minutes.
4.  Divide kale among the bowls.  Top with the figs and the goat cheese.  Spoon the dressing over the farro, figs, and kale.  Sprinkle with the walnuts.  Serve with some good, crusty bread!


TAKE a LOOK:


16 Comments

end-of-summer Peach and Raspberry Galette

9/12/2017

2 Comments

 
Picture

     There are still fresh peaches in the grocery stores.  Go buy several and make this galette.  It's the best dessert I've baked this summer...

Picture


Peach Raspberry Galette

   recipe from Martha Stewart
• 1 disk Galette Dough (recipe below)
• 2 tablespoons unbleached all-purpose flour, plus more for parchment
• 2 1/2 pounds peaches (about 5), halved, pitted and cut into 1/2-inch wedges
• 1 teaspoon fresh lemon juice
• Pinch of coarse salt
• 3/4 cup plus 1-2 tablespoon granulated sugar, divided
• 6 ounces fresh raspberries
• 1 tablespoon unsalted butter, cut into small pieces
• 1 large egg, lightly beaten
• 1/4 cup sliced almonds
• 2 tablespoons turbinado sugar
• 1 cup plain yogurt or full-fat sour cream
1.  Roll the galette dough to an 18-inch round on lightly floured parchment.
2.  Combine peaches, lemon juice, flour, salt, and 3/4 cup granulated sugar.  Gently stir in the raspberries and mound the mixture in the middle of the pastry, leaving a 3-inch border.  Dot the top of the fruit mixture with butter.  Pleat the edges of the pastry around the fruit filling and brush pastry with eggs wash.  Sprinkle with almond and turbinado sugar.  Slide the galette and parchment onto a rimmed baking sheet.  Refrigerate until dough is firm, about 30 minutes.
3.  Meanwhile, preheat oven to 425 degrees.  Bake galette 30 minutes.  Reduce heat to 375 degrees and bake until pastry is golden and juices are bubbling, another 30 minutes (or more, depending on your oven).  Let cool completely on a wire rack, about 2 hours.
4.  Stir together yogurt or sour cream and remaining 1-2 tablespoons granulated sugar, for serving.

NOTE:  If there is a hole or crack in the dough, you will have seepage of juices.  Using a spoon, occasionally scoop up juices and drizzle over the fruit while baking.

GALETTE DOUGH
•  2 sticks cold unsalted butter, cut into small pieces
•  2 1/2 cups unbleached all-purpose flour
• 1 teaspoon coarse salt
• 1 teaspoon sugar

• 1/2 cup ice water
1.  Place about 3/4 of the butter onto a parchment-lined baking sheet and freeze until hard (about 30 minutes).  Meanwhile, refrigerate remaining butter.
2.  Combine flour, salt, and sugar in a food processor.  Add refrigerated butter and pulse to combine.  Add frozen butter and pulse until mixture is coarse with some pea-size pieces. 
3.  Slowly, add ice water while pulsing.  You may not need all of the water.  Squeeze a small amount of dough to make sure it holds together.  Add more water and pulse a few more times, if necessary.
4.  Transfer dough to a piece of plastic wrap.  Bring edges of plastic together and gather dough, pressing into a mass.  Form the dough into a 1/2-inch disk, wrap in the plastic and refrigerate at least 45 minutes (and up to 2 days). 


TAKE a LOOK:


2 Comments

Summer Panzanella Salad

7/7/2017

5 Comments

 
Picture

     This Summer Panzanella Salad was perfect for dinner last night.  I'll be making it often while stone fruits and garden tomatoes are available.

Picture


SUMMER PANZANELLA SALAD
recipe for Summer Panzanella shared by The Judy Lab

• 1 pint cherry tomatoes, cut into half
• 1 large shallot, finely sliced on a mandoline
• 2 garlic cloves, finely minced
• 1/4 cup red wine vinegar
• Extra-virgin olive oil
• Flaky sea salt
• Cracked black pepper
• 1 small loaf rustic Italian bread, torn or cubed into bite sized pieces (I used a baguette)
• 2 peaches, or any stone fruit, pitted and finely sliced
• 1 cup sliced strawberries
• 1/4 cup chiffonade of basil, plus additional sprigs of fresh basil for garnish
1.  Preheat oven to 375˚F.  Line rimmed baking sheet with parchment paper.
2.  In a large bowl, gently toss together tomatoes, shallots, garlic, red wine vinegar, 1/2 cup olive oil, 1 teaspoon salt and 1/2 teaspoon black pepper.  Set aside.
3.  Place bread in a bowl and drizzle well with olive oil.  Fold bread cubes with a rubber spatula to distribute olive oil all over the bread.  Add additional oil if bread seems at all dry.  Spread the bread in an even layer on the sheet pan and season with salt and pepper.  Bake until golden brown and crispy.  Set aside to cool.
4.  Add peaches, strawberries, chiffonade of basil and toasted croutons to the tomato mixture.  Gently fold together.  Top with sea salt, black pepper and additional basil.  Serve at room temperature.  
NOTE:  Croutons can be made in advance. 


TAKE a LOOK:


5 Comments

Baby Shower Luncheon

6/14/2017

7 Comments

 
Picture

     This past weekend my daughter Claire hosted a baby shower for her sister, Whitney, along with Whitney's close friend, Allison.  Yes... I'm going to be an Oma.  The event took place in my home, and my contribution for this gathering was lunch.  The plan (for months) had been a luncheon outdoors on the patio and in the garden, of course!  But the weather turned against us with 90+ degree heat and unbearable dew points that forced everyone attending inside; not ideal in our minds, but we made it work...

Picture

     Appetizers were placed in the living room. 

Picture
Picture

 Tomato tarts (recipe HERE) and main course salad were served in the kitchen.

Picture

     I have been making my version of this chicken, corn and avocado salad (recipe below) since eating it at a local restaurant this spring.

Picture
Picture

    Dessert was 3 Rhubarb and Almond Cakes and Chocolate Bouchons (recipe HERE)  Yes... I always prepare more than we need.
    Drinks consisted of Mimosas made with Prosecco, Rosé, and non-alcoholic Watermelon-Ginger Spritzers (recipe HERE), which were just the thing on a hot, sultry day.
     The baby girl is due in September... a sister for Midge the French Bulldog.


Picture

CHICKEN, CORN, and AVOCADO SALAD
The ingredients of the salad below are approximate
Serves 4
• 1 Rotisserie chicken, skin removed and meat from the bones cut into bite-size pieces
• 16-ounce can organic corn, drained
• a handful of Medjool dates, pitted and diced
• 1-2 avocados, cut into 1/2-inch dice
• 5-ounce bag of Italian greens (or combine romaine, butter lettuce, and radicchio)
• 1/4 cup sliced or slivered almonds, toasted
• goat cheese, as much as you like for tossing on top of salad
• apple cider vinegar
• extra-virgin olive oil
• salt and freshly ground pepper

1.  In a large bowl, gently combine the chicken, corn, dates, avocado and greens. 
2.  In a small bowl, whisk together equal amounts of apple cider vinegar and olive oil.  Add salt and pepper to taste.  Poor dressing over salad and gently toss.  Add additional salt and pepper if needed.
3.  Sprinkle almonds and goat cheese over the top of the salad and serve.


RHUBARB and ALMOND CAKE
adapted recipe from The Floating Kitchen
10 servings

• 1 cup sugar
• 1/2 cup unsalted butter, at room temperature
• 2 large eggs
• 1 cup plain Greek yogurt
• 1 tablespoon grated orange zest
• 3/4 teaspoon vanilla extract
• 1/4 teaspoon almond extract
• 1 1/2 cups unbleached all-purpose flour
• 1/2 cup almond meal
• 1 teaspoon baking powder
• 1/2 teaspoon baking soda
• 1/2 teaspoon ground cardamom
• 1/4 teaspoon salt
• 3/4 pound rhubarb
• 1 tablespoon turbinado sugar
• 1/3 cup sliced almonds
• Confectioners' sugar for serving

1.  Preheat oven to 350˚F.  Line the bottom of a 9-inch springform pan with a round of parchment paper.  Generously coat the parchment paper and the sides of the pan with non-stick cooking spray.  Set aside.
2.  In the bowl of a stand mixer and using the paddle attachment, beat 1 cup of the sugar and the butter together on medium speed until light and fluffy.  Add the eggs, one at a time, mixing after each addition.  Add the yogurt, orange zest and extracts and beat until just incorporated. 
3.  In a medium bowl, combine the flours, baking powder, baking soda, cardamom and salt.  Add dry ingredients to the cake batter, adding in one-third at a time, mixing on low speed until none of the white streaks remain.  Set aside. 
4.  Trim rhubarb of leaves and if the stalks are wide, slice them in half lengthwise.  Cut the rhubarb stalks into pieces 1 1/2-inches in length.
5.  Spread about half of the cake batter evenly over the bottom of the prepared springform pan.  Layer about half of the rhubarb over the batter in a single layer, leaving a half-inch space uncovered around the edges of the pan.  Spread the remaining cake batter over the rhubarb and arrange rhubarb pieces on top.  You may not need all of the rhubarb.  Sprinkle the sliced almonds and turbinado sugar over the cake.
6.  Place the cake on the middle rack of the preheated oven.  Bake for approximately 50-60 minutes, or until a toothpick inserted into the middle comes out clean.  Remove cake from the oven and set it on a wire rack to cool.  Once cooled, run a knife around the outer edge of the cake and release the sides of the springform pan.  Cut into slices and dust with the Confectioners' sugar.
• The cake can be stored at room temperature in an airtight container for up to 2 days.


TAKE a LOOK:


7 Comments

Chocolate-Orange-Olive Oil Cake

1/27/2017

4 Comments

 
Picture

     I just ate this... right after I finished taking photos, I sat down and devoured it.  And what I found was, this Chocolate-Orange Olive Oil Cake made with almond flour, is even better the second day!  That's because all of the zested orange added to the batter has additional time to infuse the baked cake.  And for me, there has never been a more delicious combination than chocolate and orange.
     I've recently baked several breads and cakes with almond flour exclusively (no wheat flour added) and with some of them, I have run into trouble when using the oven temperatures and baking times that are called for in the recipes.  This cake was no exception.  In the recipe below, I show my adjusted time and temp.  I recommend observing your cake closely towards the last 15 minutes of baking and testing frequently with a skewer for doneness.  Ovens vary and pan size can also change the cooking time.


Picture
Picture
• adapted recipe | Mary Luz Mejia

• 5 tablespoons unsweetened cocoa, sifted
• 1 1/4 ounce bittersweet chocolate, chopped
• 1/4 cup whole milk
• 1 vanilla bean, split lengthwise and seeds scraped
• 1 3/4 cups fine almond meal/flour
• 1/2 teaspoon baking soda
• 1/4 teaspoon sea salt
• 1/2 teaspoon cinnamon
• Pinch of freshly ground nutmeg
• 1 cup cane sugar
• 2/3 cup mild extra-virgin olive oil, plus extra oil for greasing pan
• 2 tablespoons freshly squeezed orange juice
• Zest of 2 large or 3 small organic oranges
• 3 large eggs
• Whipped heavy cream or crème fraîche, for serving
• Candied orange rind, for serving


1.  Preheat oven to 350˚F. 
2.  Grease an 8 1/2-inch to 9-inch springform pan with olive oil and line bottom of pan with parchment paper.
3.  Combine the cocoa and chopped chocolate in a bowl.  Bring the whole milk to a boil and add to the chocolate, whisking until smooth.  Stir in the vanilla bean seeds; set aside.
4.  In a medium bowl, combine the almond meal/flour, baking soda, salt, cinnamon and nutmeg.
5.  Place the sugar, olive oil, orange juice, zest and eggs in the bowl of an electric stand mixer.  Beat until the mixture is smooth and thick.  Scrape the cocoa mixture into the egg mixture and beat until combined.  Slowly add the dry ingredients to the mixing bowl and mix until well combined, scraping down the sides of bowl if necessary.
6.  Pour the batter into the springform pan and bake for 40 minutes.  To test doneness, use a wooden skewer to pierce into the center of the cake.  If there is moist batter or crumbs on the skewer when removed, continue to bake until the skewer tests dry, possibly another 15 minutes.  (I baked my cake for 40 minutes, then turned on the convection for an additional 15 minutes before my cake was done.  Adjust accordingly to your oven and pan size). 
7.  Remove cake and cool for 10 minutes before running a thin knife around the edges and removing the ring.  Serve with whipped heavy cream or crème fraîche and top with a slice of candied orange rind.


TAKE a LOOK:


4 Comments

Fresh Ricotta Tart

1/13/2017

6 Comments

 
Picture
 
     How could I resist baking this tart?  It's full of all the things I love... and ingredients that I usually have on hand, making it very easy to assemble for last night's dinner.  This recipe is from the book, Pie by Angela Boggiano.  I found the book at a local discount/used bookstore and purchased it originally for the "noble" or "raised" pie recipes that are baked in tall, decorative pans or molds.  They are works of art, and although I can't see myself searching for pigeon breasts or pigs feet, that are called for in some of the fillings, I'm instead envisioning layers of roasted vegetables and hard-boiled eggs encased in walls of golden pastry... more to my liking.

Picture
Picture

     But, back to the ricotta tart...  If you follow LivingTastefully, you already know that I love using my homemade fresh ricotta (recipe HERE) in just about everything.  And, although it's easy to make, don't feel like you must do that.  Purchased fresh ricotta is absolutely fine.  I also have candied orange rind (recipe HERE) on hand most of the time... for my favorite cookies and alongside an afternoon espresso!
     The author compares this filling to Sicilian cannoli pastry desserts and that is exactly the memory I have when eating this ricotta tart.  Plus, Boggiano recommends always preheating a baking sheet to place your pies and tarts on; a little trick than ensures a well-baked bottom crust.


Picture

     I did several things differently than in the original recipe.  • I used a favorite tart pastry.  It was enough dough to line the deep tart pan, but wasn't enough for a lattice topping.  If you would like lattice on the top of your pie, increase the pastry recipe, below, by half.  The white looking dots on the top of the filling are from a piece of the pastry dough that remained and I cut into small circles... wouldn't do that again. • The recipe called for 3 extra-large eggs, which I did not have.  I substituted 4 of the smallest large eggs I could find.  • And, the last thing, I increased the oven temperature by 25 degrees which was perfect. 
 

Picture
Picture

PASTRY DOUGH

• 1 1/2 cups unbleached, all-purpose flour
• 1/2 teaspoon kosher salt
• 4 teaspoons sugar
• 8 tablespoons cold, unsalted butter, cut into 1/2-inch cubes
• 4 tablespoons ice water
• extra flour for rolling pastry

FILLING
• 1 pound fresh ricotta (recipe HERE)
• 1/3 cup superfine sugar
• 1 teaspoon vanilla extract

• 3 extra-large or 4 large eggs (see • above in text)
• 1/2 cup candied orange rind (recipe HERE)
• 1/4 cup semi-sweet chocolate chips
• 1/3 cup currants
• Grated zest of 1 lemon
• Confectioner's sugar for dusting
TO MAKE THE PASTRY
1.  Pulse 1  1/2 cups unbleached, all-purpose flour, the salt and sugar in a food processor.  Add butter; pulse until pea-size lumps form.  Drizzle 3 tablespoons ice water over the mixture.  Pulse until moist clumps form, adding more ice water by drips if dry.  Gather dough into a ball and flatten into a disk.  Wrap in plastic; chill 2 hours. 
2.  Roll out dough on a lightly floured surface.  Transfer to a 9-inch x 1 3/4-inch fluted tart pan with a removable bottom.  Gently press onto bottom and up sides of the tart pan. Trim.  Refrigerate until needed.
TO MAKE THE FILLING
1.  Preheat oven to 375˚F.  Place a baking sheet on bottom shelf of oven to preheat.
2.  Place the ricotta in a large bowl and whip with a wire whisk until smooth.  Beat in the sugar, vanilla extract and eggs, one at a time, until combined.
3.  Stir in the candied orange rind, chocolate chips, currants and lemon zest.  Pour into the pastry shell. 
4.  Place tart pan on the preheated baking sheet on the lowest oven shelf and bake for 55 minutes until golden.  Set aside for 15 minutes to cool in the pan before transferring to a wire rack to cool completely.  Dust with confectioner's sugar before serving. 


TAKE a LOOK:


6 Comments

Apple Kuchen with Honey and Ginger

10/13/2016

7 Comments

 
Picture

     I follow New York Times Food on Instagram.  And when a drool-inducing photo of this kuchen... or cake... appeared on the site, I immediately got to work with the apples I had just purchased at a local farm. 
     I was tempted to cut back a bit on the amount of ginger, fresh and candied, that was called for in the recipe; but I'm glad I didn't.  Everything about this cake, from chef and cookbook author, David Tanis, is pretty perfect.
     The only thing I changed was the oven temperature and baking time.  The original recipe calls for 325˚F.  I baked my cake at 350˚, plus an additional 10 minutes longer.  That may just be my oven, although I've had the Viking repair man tell me it's calibrated perfectly.  May have to bake this kuchen along with my pumpkin pies for Thanksgiving this year -- or at least have it alongside our coffee in the morning.


Picture


Picture
FOR THE CAKE:
• 1/2 cup unsalted butter, softened, plus additional butter for greasing pan
• 1 1/2 cups unbleached all-purpose flour, plus flour for dusting pan
• 1/2 cup sugar, plus 1 tablespoon for sprinkling apples
• 1/4 cup raw honey
• 3 large eggs
• 1 tablespoon grated fresh ginger
• 2 ounces candied ginger, finely diced
• 1/2 teaspoon grated lemon zest
• 1/2 teaspoon salt
• 2 teaspoons baking powder
• 3 medium apples, peeled and quartered
FOR THE GLAZE:
• 1/4 cup sugar
• 1/4 cup honey
• 3 tablespoons honey
1.  Heat the oven to 350˚F and position a rack in the middle of the oven.  Butter and flour a 9-inch springform pan (I used a 10 1/4-inch springform, since it was all I had). 
2.  With an electric mixer, cream the butter and sugar, then add the honey and whip for 1 minute, until fluffy.  Beat in eggs, one at a time, until well incorporated, then whip for 2 minutes.  Stir in grated ginger, candied ginger and lemon zest.
3.  Whisk together flour, salt and baking powder and add to bowl, mixing briefly to make a stiff batter.  Pour batter into prepared pan.
4.  With a paring knife, cut slits in each of the apple quarters on the rounded, outer side of each apple wedge.  Slice partway through at approx. 1/8-inch intervals.  Arrange apple quarters slit-side-up over the batter (I used all but one quarter, which my French Bulldog greatly appreciated).  Sprinkle surface with 1 tablespoon sugar.
5.  Place cake pan on a baking sheet and put on middle rack of oven.  Bake for about 45-55 minutes, or until an inserted skewer emerges dry (I baked my cake for a total of 55 minutes).  If cake browns too rapidly, tent with foil until done.  Cool on a rack, then carefully unmold.
6.  Make the glaze:  Put sugar, honey and lemon juice in a small saucepan over medium heat, stirring until sugar is dissolved and mixture bubbles.  Brush surface of  cake and apples with warm glaze.  Cake will keep for several days, tightly wrapped at room temperature.


TAKE a LOOK:


7 Comments
<<Previous
    Picture


    Picture
    Picture
    Enter your Email

    Preview | Powered by FeedBlitz


    Categories

    All
    Amana
    Appetizers
    Beef
    Breads
    Breakfast
    Cakes
    Chocolate
    Condiments
    Cookies
    Daring Bakers Challenge
    Desserts And Sweets
    Drinks
    Eggs
    Espresso
    Etcetera
    Fish
    French Bulldogs
    Friday Night Dinner
    Fruit
    Germany
    Gratins
    Great Kitchens
    Grilling
    Ice Cream
    Lamb
    Main Dishes
    Muffins
    My Garden
    My Kitchen Renovation
    New Years Day Brunch
    Paris
    Pasta
    Pork
    Poultry
    Provence
    Restaurants
    Rhubarb
    Rice
    Salads
    Scones
    Seafood
    Side Dish
    Soup
    Sunday Mornings
    Sweet And Savory Tarts
    Thanksgiving
    Tomatoes
    Vegetables
    Vegetarian

  • Home
  • PAINTINGS
  • About
  • Passions-to-Pastry Blog
  • Contact
  • Recipes