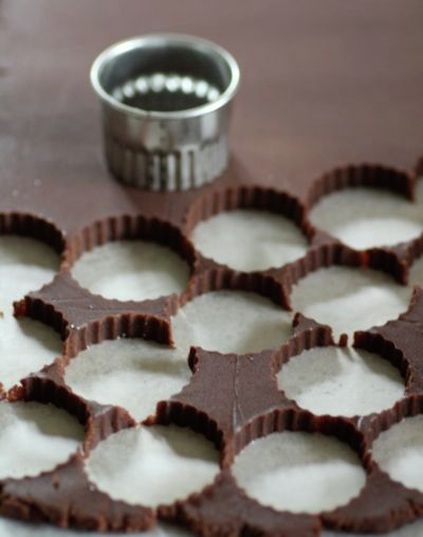
 I'm making rolled cookies again; something I will not do during the heat of the summer. 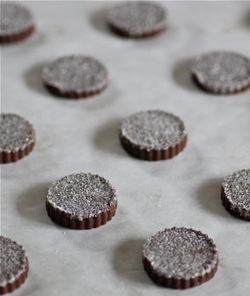  These Mexican Chocolate Shortbread Cookies are great with a cappuccino or a glass of ice cold milk!  Mexican Chocolate Shortbread Cookies from Cooking For The Weekend by Michael McLaughlin • 2 cups unbleached all-purpose flour • 2/3 cup lightly packed unsweetened cocoa powder • 1/2 teaspoon cinnamon • 1/2 teaspoon finely ground fresh black pepper • 1/2 teaspoon salt • 2 sticks (8 ounces) unsalted butter, softened • 1/2 cup plus 2 tablespoons sugar, plus additional for coating the cookies • 2 teaspoons vanilla extract 1. Sift the flour, cocoa, cinnamon, pepper, and salt together twice onto a piece of waxed paper. In a medium bowl cream together the butter and sugar until light and fluffy. Mix in the vanilla, then stir in the flour mixture. Stir and knead the dough (it will be dry and crumbly at first) until it is moist, dark and supple. Between 2 sheets of waxed paper, roll the dough 1/4-inch thick as evenly as possible. Chill for 30 minutes. 2. Position a rack in the middle of the oven and preheat the oven to 275˚F. Line 2 baking sheets with parchment paper. 3. Cut out the cookies with a 2-inch round cutter. Spread the coating sugar on a plate. Lightly press the top of each cookies in the sugar, so that the sugar clings to the dough. Arrange the cookies, sugar side up, on the prepared sheets, spacing them well apart. 4. Bake the cookies 40 to 45 minutes, until crisp and firm, exchanging the position of the sheets on the racks from top to bottom and from front to back at the halfway point. After taking from the oven, transfer cookies to a cooling rack. YOU MIGHT ALSO LIKE:
7 Comments
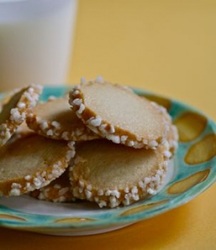
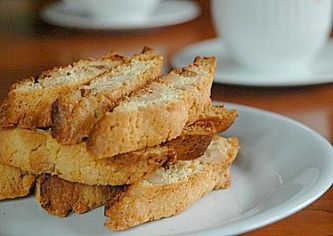
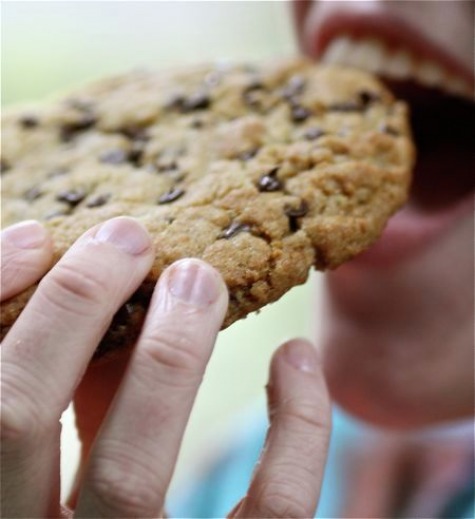 My daughter walked in the door after a day at school and asked, "Can I make cookies?" My response was, sure! (I was really thinking... Great, I'll have a post!) She went through several of my cookbooks, but eventually decided on a Chocolate Chip Cookie that she found on allrecipes.com using oil along with the butter. Oil is something I just don't put into my cookies, except for a biscotti I occasionally make with pistacios, dried cranberries and olive oil. I said nothing and left my daughter alone. When I finally peeked inside the oven, I saw 10 giant chocolate chip cookies, nothing near the yield of 36 written into the recipe. Because of the size, they did take longer to bake. And, you know... they were pretty good cookies even though they weren't all butter. My Favorite "GIANT" Chocolate Chip Cookies adapted from a recipe on allrecipes.com • 1 cup packed brown sugar • 1 cup white sugar • 1 cup butter, softened • 1 cup canola oil • 2 large eggs • 2 teaspoons vanilla extract • 4 cups all-purpose unbleached flour • 4 teaspoons cream of tartar • 2 teaspoons soda • 1 teaspoon salt • 2 cups mini semisweet chocolate chips 1. Preheat the oven to 350˚F. 2. In a medium bowl, beat together the white sugar, brown sugar, oil and butter until smooth. Stir in eggs and vanilla, beating well after each addition. Combine the flour, cream of tartar, baking soda and salt and stir into the sugar mixture. Finally, fold in the chocolate chips. Drop by heaping spoonfuls onto a parchment paper lined baking sheet and shape into GIANT round cookies. 3. Bake for approximately 14-15 minutes or until desired doneness (shorten baking time if making smaller cookies). Remove from the oven and transfer to a wire rack to cool. Makes 10 GIANT Chocolate Chip Cookies YOU MIGHT ALSO LIKE: 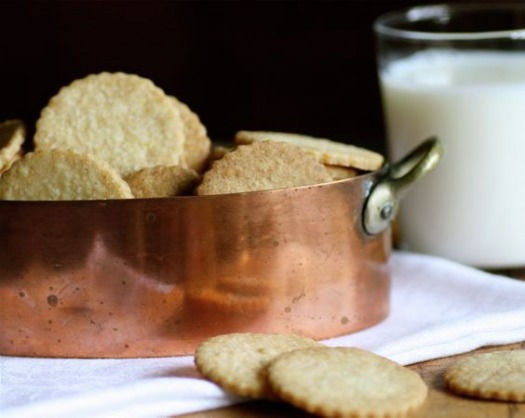 I should not have spent the morning baking cookies. I have more rhubarb in my garden than I know what to do with and I should have been thinking rhubarb tarts or cobblers. But I also thought that these Vanilla Bean Thins would be a great little cookie to serve alongside a Rhubarb Compote doused with a rich Crème Anglaise, one of the rhubarb desserts I've been contemplating. 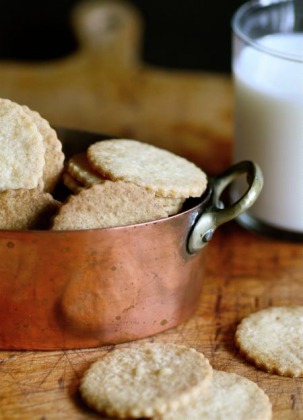 I'm serving the cookies unadorned, but they would also accept a thin vanilla glaze nicely. The aroma while baking and after removing from the oven is intoxicating. It's hard to beat the smell of butter and vanilla. These are delicate cookies that are rolled very thin. I suggest investing in the thinnest metal spatula you can find, if you don't already own one. It will make transferring the cut cookie dough to the parchment-lined baking sheet that much easier. Also... watch closely when baking. I left my cookies in oven just slightly over 10 minutes. * Vanilla Bean Thins * adapted from a recipe in Gourmet | December 2002 • 1 fresh vanilla bean, split lengthwise • 3/4 cup confectioners sugar • 1 3/4 cup all-purpose flour • 1/2 teaspoon salt • 1/2 teaspoon baking powder • 1 stick (1/2 cup) plus 5 tablespoons unsalted butter, softened • 1 large egg yolk Special equipment: a 2-inch cookie cutter Make Vanilla Sugar: Scrape vanilla seeds from pod with tip of a knife into confectioners sugar. Halve pods crosswise and bury in sugar. Cover tightly and let stand at least 24 hours and up to 1 month. Make Cookies: Discard pods and transfer vanilla sugar to a food processor. Add flour, salt and baking powder and pulse to combine. Add butter and pulse just until mixture is in pea-size lumps. Add yolk and pulse just until a dough forms. Gather dough into 2 balls, then flatten into 2 disks and chill, each disk wrapped in plastic wrap, until firm, at least 1 hour. 1. Preheat over to 325˚F. 2. Roll out 1 disk (keep the other chilled) to less than 1/8-inch thick on a lightly floured surface with a floured rolling pin. Cut out shapes with floured cookie cutter and arrange cookies 1/2-inch apart on a parchment-lined baking sheet. Make more cookies with remaining dough, rerolling scraps as little as possible. 3. Bake cookies in middle of oven until edges are pale golden, 10 to 12 minutes. Transfer to cooling rack. YOU MIGHT ALSO LIKE:  I am one lucky person. I have a sister (yes, Antique-of-the-Week sister) who has, for as long as I can remember, been extremely generous to me and others. Because of Susan I have traveled to Paris and the south of France more often than I would have on my own. She has been extremely mindful of all that I love, and if she ever runs across any of those things that I love while at a garage sale, an estate sale, on ebay or scavenging flea markets here and abroad, she will snap it up for me.  This wonderful, old black and white coffee set by the German company Waechtersbach is my sister's latest find. She thought it would look great in my new kitchen. She may have been "jumping the gun" a bit with this purchase. We are still waiting for that scary bid for our remodel... but if things go as planned, this coffee set will eventually set on a soapstone counter. 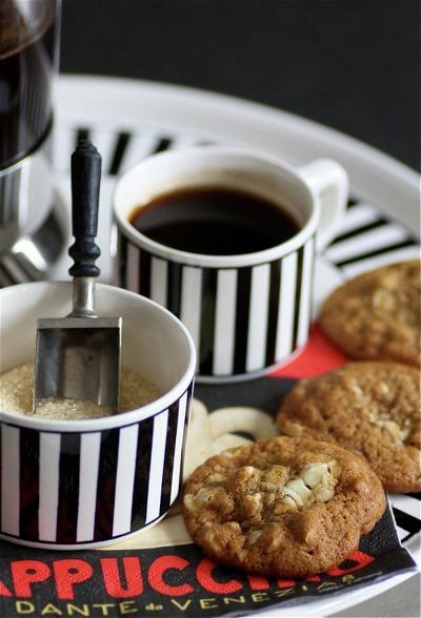 I thought the Cashew-White Chocolate Cookies were a pretty great treat to serve alongside French-press coffee in my new cups. Feel free to add more white chocolate and cashews than called for in the recipe (some of my cookies had a lot; others, not so much... and I really liked the ones with a lot !). I also think pecans could be a great substitution for the cashews, if so desired. Cashew-White Chocolate Cookies found and jotted down in 1990 • 2 1/2 cups flour • 1 teaspoon baking soda • 1/4 teaspoon salt • 1/4 teaspoon nutmeg • 2 sticks (16 tablespoons) unsalted butter, room temperature • 1 cup sugar • 1/4 cup unsulfured molasses • 2 large eggs • 1 teaspoon vanilla • 1 1/2 cup roasted unsalted cashews (about 7 1/2 ounces), chopped • 1/2 cup white chocolate chips 1. Sift first 4 ingredients into a medium bowl. Using an electric mixer, cream butter, sugar and molasses in large bowl until fluffy. Beat in eggs and vanilla. Mix in dry ingredients. Add cashew and white chocolate chips. Refrigerate 1 hour or overnight. 2. Preheat oven to 350˚F. Line cookie sheets with parchment paper. Drop dough by rounded tablespoons onto sheets 2-inches apart. Bake until golden brown - about 10-12 minutes. Cool on sheets for 2 minutes; transfer to rack and cool completely. 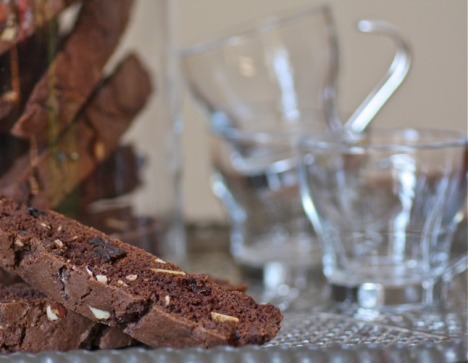 I always try to have something sweet in my kitchen, for that cappuccino in the morning or the espresso in the afternoon. And what better than biscotti? I make many different biscotti, but the ones that disappear the fastest are those made with chocolate. This twice-baked cookie is filled with almonds and dried cherries, but feel free to use the basic dough recipe and add your favorite nuts and/or dried fruit. Chocolate Biscotti with Almonds and Dried Cherries adapted from a recipe in Gourmet Magazine | December 1994 • 2 cups all-purpose unbleached flour • 1/2 cup unsweetened cocoa powder • 1 teaspoon baking soda • 1 teaspoon salt • 6 tablespoons unsalted butter, softened • 1 cup sugar • 2 large eggs • 1/2 cup slivered almonds • 1/2 cup dried cherries • 3/4 cup semisweet chocolate chips 1. Preheat the oven to 350˚F and butter and flour a large baking sheet, OR line with parchment paper (secure paper with tape while forming the dough; remove tape before baking). 2. In a bowl whisk together flour, cocoa powder, baking soda and salt. In another bowl with an electric mixer, beat together butter and sugar until light and fluffy. Add the eggs and beat until combined. Stir in flour mixture to form a stiff dough. Stir in the almonds, dried cherries and chocolate chips. 3. On the prepared baking sheet, with floured hands, form dough into two slightly flattened logs, each approximately 12-inches long and 2-inches wide. Bake logs for 30 to 35 minutes, or until slightly firm to the touch. Cool the biscotti on the baking sheet for 5 minutes. 4. On a cutting board, cut the biscotti diagonally into 3/4-inch slices. Arrange biscotti, cut sides down, on the baking sheet and bake until crisp, about 10 minutes. Cool biscotti on a rack. 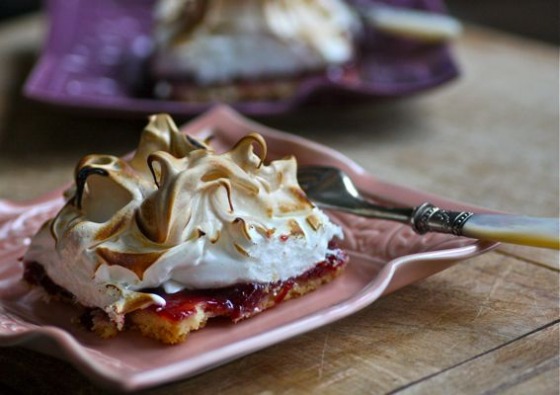 These Raspberry-Shortbread Cookie Tarts are a sweet little treat. I've been eying this recipe, that can be attributed to Nancy Silverton, for several years now. The only change I would make is the portion size. The shortbread dough is pressed into a 9-inch-by-13-inch pan and scored into 12 individual servings. A little goes a long way. A suggestion would be to score the dough, before baking, into 18 or even 24 squares, enough to feed a large group! Another thought... press the dough out onto a work surface and use a 2 to 3-inch diameter cookie cutter and transfer shortbread onto a baking sheet lined with parchment. Bake the individual cookies and then spoon or pipe the meringue on top. Really, what's better than buttery shortbread spread with raspberry jam? 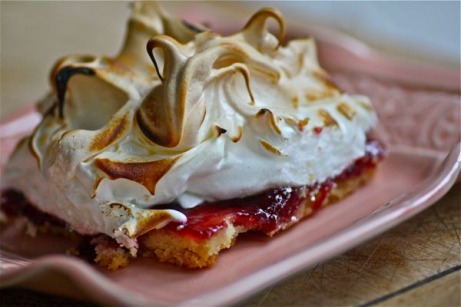 + Raspberry-Shortbread Cookie Tarts + a recipe by Nancy Silverton • 2 sticks (1/2 pound) unsalted butter, softened • 1/2 cup granulated sugar • 2 cups all-purpose flour • 1/8 teaspoon salt • 3/4 cup seedless raspberry jam • 8 large egg whites • 1 1/2 cups granulated sugar • Confectioners' sugar, for dusting 1. Preheat the oven to 350˚F. Line a 9-by-13-inch baking pan with foil, leaving a 4-inch overhand on each end. 2. In a medium bowl, using an electric mixer, beat the butter with 1/2 cup of the granulated sugar at high speed until fluffy, 3 to 5 minutes. Reduce the speed to low, add the flour and salt and beat just until blended, 2 to 3 minutes. Press the dough into the baking pan in an even layer. Score the shortbread lengthwise into thirds, then score crosswise 4 times to make 12 squares. Bake for 20 to 25 minutes, or until lightly browned. Transfer the pan to a rack and let the shortbread cool completely, about 1 hour. 3. Lift the shortbread out of the pan. Spread the jam evenly over the shortbread. Using a serrated knife, cut the shortbread into 12 squares following the score lines. Transfer the shortbread squares to a large baking sheet. 4. In a large stainless steel bowl set over a pan of simmering water, stir the egg whites with the remaining 1 1/2 cups of granulated sugar until the sugar dissolves, about 1 minute. Remove the bowl from the heat. Using an electric mixer, beat the whites at medium speed until frothy. Increase the speed to high and beat until a stiff, glossy meringue forms, about 5 minutes longer. 5. Spoon 1/2 cup of the meringue onto each of the squares. Using the back of a spoon, pull up the meringue to form high spikes. Bake for 20 to 25 minutes, or until the meringue is golden brown. Let cool for 10 minutes minutes on the baking sheet on a rack, then transfer tarts to the rack and let cool completely. Sift confectioners' sugar over the tops before serving, if desired. 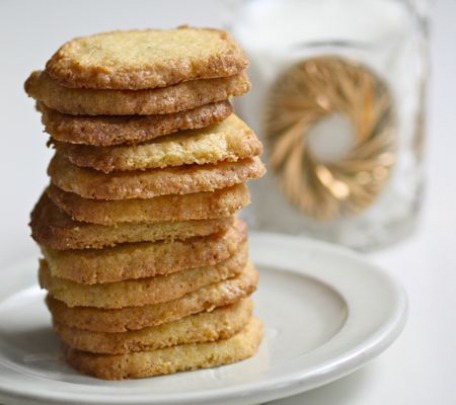 I've noticed a worrisome trend lately. I eat a lot of my desserts while I'm making them. It was quite obvious the other day when I made the Peanut Butter & Chocolate Tart. I licked every bowl clean. Today, after I pulled these cookies from the oven, I tried one.... and then I tried another. I can't tell you how many I finally finished off, but this is one good cookie. If you like lemon you will love these. The lemon is intense and I always like cookies or crusts that incorporate cornmeal for its crisp grittiness. The black pepper is an interesting addition. It's not obvious, but it certainly adds another dimension. The dough for this cookie is shaped into a log and sliced. They spread quite a bit while baking so make sure to leave enough space on the baking sheet between the cookies. • * • * • * • * • * • * • * • Lemon-Black Pepper Cornmeal Cookies a recipe from Luscious Lemon Desserts by Lori Longbotham • 1 1/4 cups all-purpose flour • 1 cup yellow cornmeal • 3/4 teaspoon fresh, coarsely ground black pepper • Pinch of salt • 1 cup unsalted butter, at room temperature • 1 cup sugar • 1/4 cup finely grated organic lemon zest (I used 6 small organic lemons) • 2 large egg yolks 1. Whisk the flour, cornmeal, black pepper and salt together in a medium bowl. 2. Beat the butter, sugar and zest in a medium bowl with an electric mixer, starting on low speed and increasing to medium-high until light and fluffy. Add the egg yolks and beat to combine. Reduce the speed to low, add the flour mixture and continue to beat on low speed until just blended; the dough will be somewhat crumbly. 3. Press the dough together with your hands and divide it in half. Place each half on a sheet of plastic wrap and form each piece into a log approximately 10-inches by 1 1/4-inches. Chill, wrapped in the plastic, until firm; about 3 hours. 4. Preheat the oven to 400˚F. Line 2 large baking sheets with parchment paper. 5. Using a sharp knife, cut each log into 1/4-inch-thick round and arrange the rounds 2 inches apart on the baking sheets. On the middle rack of the oven, bake, 1 sheet at a time, for approximately 10 minutes. Watch closely. Bake until the edges of the cookies are golden. Transfer the cookies to a wire rack and cool.  I just returned from Iowa yesterday. We picked up my father and he is spending Christmas with us in St. Paul. It sounds as though there is a big winter storm heading our way, so I will be dashing about madly today making sure we have all of the food (and coffee beans) we will need to get us through the week. I will leave you with this recipe for Gingerbread Cookies, a recipe I posted a couple of Christmases ago. They were our dessert last night, along with freshly made custard. And, my family is expecting that Buche de Noel on Christmas Eve. Hopefully I will get some good photos of that and will post it (sometime). If you don't hear from me in the next two weeks, I should be back with photos and recipes from our annual New Year's Day brunch. Have a splendid holiday!
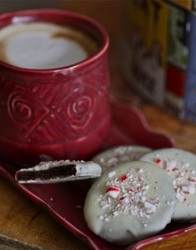
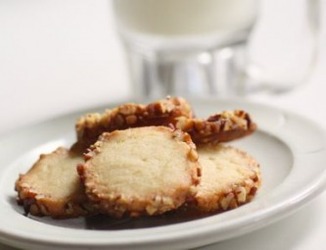
GingerbreadCookies • 1/2 cup butter • 1/2 cup sugar • 1/2 cup molasses • 1 1/2 teaspoon vinegar • 1 egg, beaten • 3 cups unbleached flour • 1/2 teaspoon baking soda • 1/2 teaspoon cinnamon • 1/2 teaspoon ginger • 1/4 teaspoon salt In a large heavy saucepan, mix together butter, sugar and molasses with the vinegar. Bring to a boil. Cool. Add egg. Sift together the flour, baking soda, cinnamon and ginger. Add the salt. Add dry ingredients to the molasses mixture. Mix well and chill. Roll out to 1/8-inch thickness. Cut out shapes. Bake at 375˚F for 8 to 12 minutes. • The cookies above were iced with confectioners' sugar mixed with cream to a spreading consistency. I have also dipped gingerbread cookies in semi-sweet chocolate that has been melted with butter to make a good dipping consistency. 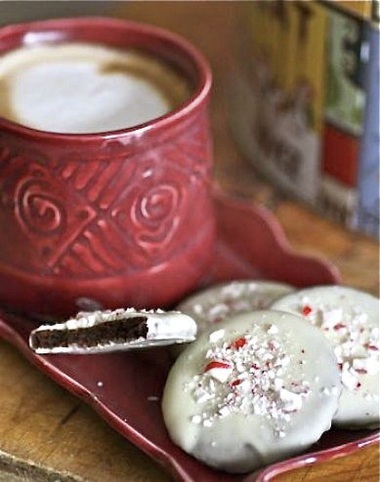 How do I know when something I baked is really, really good? First - I'm unable to stop eating it. Second - I hide it from others. Yes, I'm embarrassed to admit this, but in this season of giving, sharing and doing onto others, I have squirreled away these Chocolate Peppermint Cookies dipped in white chocolate and sprinkled with crushed peppermint candies. Oh... I will bring them out eventually, but my fear is if I put them out now and everyone else realizes how good they are, these cookies will be gone well before Christmas. And, I'm afraid I won't have time to make any more. 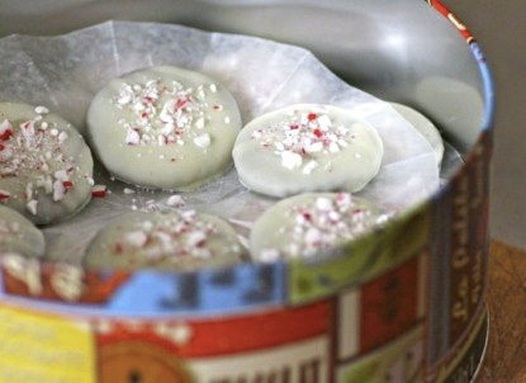 Martha Stewart Living created a winner with this recipe for Chocolate Peppermint Cookies which was featured in the December 2008 issue of the magazine. After the look on my husband's face when I gave him one (yes, just one), I know this cookie will be on the top of my cookies-to-bake-for-Christmas list again next year and for years to come. ChocolatePeppermintCookies adapted from a recipe in Martha Stewart Living, December 2008 • 1 cup all-purpose flour, plus more for rolling • 1/2 cup unsweetened cocoa powder • 1/2 teaspoon baking soda • 1/2 teaspoon baking powder • 1/2 teaspoon salt • 5 tablespoons unsalted butter, softened • 3/4 cup sugar • 1 large egg • 1 large egg yolk • 3/4 teaspoon pure peppermint extract • 8 large candy canes or 30 peppermint candies, crushed • 2 pounds white chocolate, coarsely chopped 1. Preheat the oven to 325˚F. Sift flour, cocoa powder, baking soda, baking powder, and salt into a bowl. Beat butter and sugar with a mixer on medium-high speed for 1 minutes. Reduce speed to medium-low, and add the egg, then the yolk, beating well after each addition. Beat in peppermint extract. Slowly add flour mixture, and beat until just incorporated. Shape dough into 2 disks, wrap each in plastic, and refrigerate until firm, at least 1 hour. 2. Roll out 1 disk of dough on a lightly floured surface to 1/8-inch thickness. Using a 1 1/2-inch round cutter, cut out circles and place 1-inch apart on parchment-lined baking sheets. Freeze cookies until firm, about 15 minutes. Repeat with remaining disk. 3. Bake until cookies are dry to the touch, about 12 minutes. Transfer cookies to wire racks and let cool. (Undecorated cookies will keep, covered, for up to 3 days.) 4. Melt chocolate in a heatproof bowl set over a pot of gently simmering water. Remove from heat. Dunk cookies into melted chocolate. Using a fork, turn to coat, let excess drip off, and gently scrape bottom against edge of bowl. (I found it necessary to occasionally put the chocolate back over the simmering water to give it a good dipping consistancy.) Place on parchment-lined baking sheets, and sprinkle with crushed candy pieces. Refrigerate until set and store in a tin in a cool place. Makes 5 Dozen Cookies  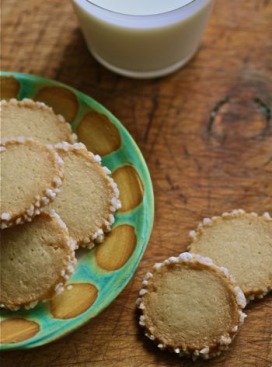 I don't go overboard in my holiday baking. I hear of those who make 25 or 30 varieties of cookies... Not me. I limit myself to five, maybe six. They are cookies that I very rarely make any other time of the year and the only criteria I use, in deciding which cookies to bake, is they must be exceptional. 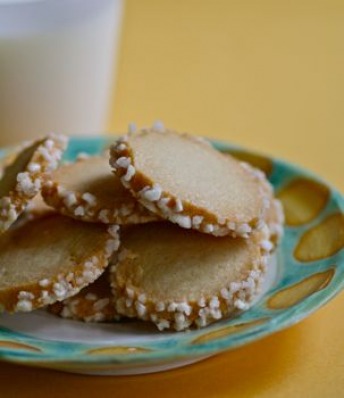 Two cookies that always make the cut and are greatly-anticipated by my family are Vanilla Rolled Cookies and Rolled Gingerbread Cookies, both of which are either dipped in chocolate after baking, or iced. The other three or four cookies are favorites that rotate each year, or a new recipe that has caught my eye. What they all have in common is - they are delicate cookies with lots of butter. This Vanilla Shortbread Cookie reminds me of the buttery French Bretons I load up on whenever I visit France. You bite into it and you taste, well... butter... and lots of it! The recipe actually calls for European-style butter, but I have made it with a range of butters, from European to an unsalted, U.S.-made butter sold at Costco; all with exceptional results. Whatever you choose, the cookie will be extremely good. I like to dress-up the cookies a bit with coarse sugar. This time around, I used my German Hagel Zucker. Other times I've edged the cookies in coarse red or green sugar. And they are certainly acceptable left unadorned. Vanilla Shortbread Cookies adapted from a recipe in Bon Appetit • 2 cups all-purpose unbleached flour • 3/4 cup powdered sugar • 1/4 cup cornstarch • 1/4 teaspoon salt • 1 cup (2 sticks) unsalted European-style butter, room temperature • 1/4 cup granulated sugar • 1 teaspoons vanilla extract 1. Sift flour, 3/4 cup powdered sugar, cornstarch, and salt into medium bowl. Using electric mixer, beat butter in large bowl until fluffy. Gradually beat in granulated sugar and vanilla. Stir in dry ingredients in 3 additions, mixing until just blended each time. Gather dough into ball; divide in half. Roll each half into a 6-inch-long log; wrap each log in plastic wrap and refrigerate at least 2 hours or overnight. 2. Position racks in top third and center of the oven. Preheat to 325˚F. Cut each log crosswise into 1/3-inch-thick slices (see NOTE below). Arrange slices on 2 heavy large baking sheets lined with parchment, spacing cookies 1/2-inch apart. Bake cookies 9 minutes. Reverse baking sheets; bake just until cookies turn golden brown at edges, about nine minutes longer. Watch cookies closely at this point. Cool cookies on sheets 1 minutes, then transfer to racks to cool. NOTE: If you decide to roll the cookies in sugar, mix 1 egg white with 1 teaspoon cold water; brush over the entire log before slicing. Fill a small dish with the coarse sugar and rotate the edge of the sliced cookie in the sugar completely coated; place on cookie sheet and proceed the same way with the remaining cookie slices. |


Categories
All
|