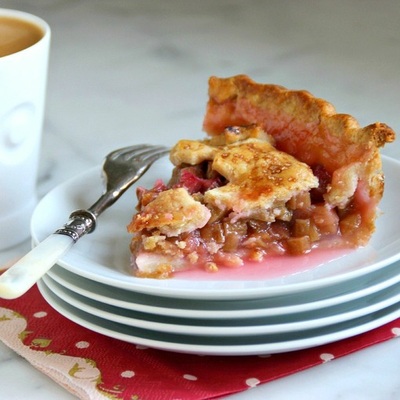
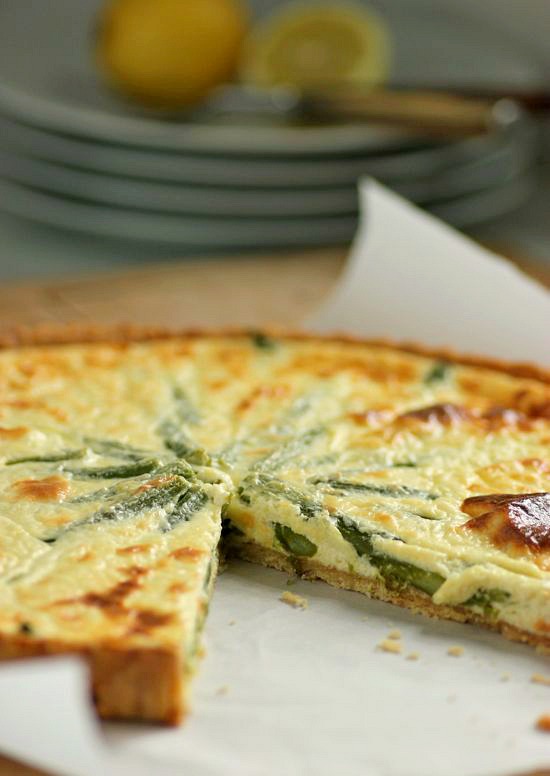
 I would never consider myself a picky eater, but growing up I was not fond of asparagus and refused to eat it. I vaguely remember my mother boiling the life out of the tender spears... maybe that was the reason I couldn't stomach it. I'm crazy about asparagus now, however, due in part to these recipes. And I have my fingers crossed that three times a charm. Having struggled for years to grow asparagus in my vegetable garden, I made my third (and final) attempt to plant last year. I'm now waiting to see if it pokes through the ground this spring. 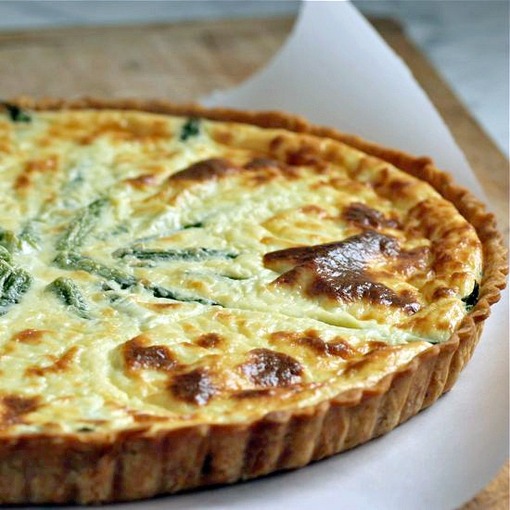 This Lemony Ricotta Tart with Asparagus is perfect for a spring bunch. Invite some friends over to celebrate the end of winter! And consider doing what a restaurant in Prague does to welcome asparagus season. Plan each course around the vegetable. It's a meal my husband had several years ago when he was in Prague on business. His dessert? Asparagus sorbet.   • Pâte Brisée for 11-inch tart pan (recipe below) • 1 pound asparagus • 2 large eggs • 1/2 pound fresh ricotta (if necessary, drained of any liquid) • 1/2 cup freshly grated Parmesan • Grated zest of 1 small organic lemon • 1 tablespoon fresh lemon juice • 1/2 cup heavy cream • 1/2 teaspoon salt 1. Prebake tart shell following recipe below. Reduce oven temperature to 375˚F. 2. In a large sauté pan, gently boil asparagus until just tender, approximately 4 minutes. Drain and wrap asparagus in a dish towel. Set aside. 3. In a medium-size bowl, combine the eggs, ricotta, Parmesan, lemon zest, and lemon juice. Whisk by hand until mixture is smooth. Stir in the heavy cream and salt. 4. Trim asparagus to roughly 4 1/2-inches and arrange in a spoke pattern on the crust. Use leftover trimmings to fill spaces inbetween the spears. Pour the cheese mixture over the asparagus and transfer tart to the middle rack of preheated oven. Bake for 25 to 30 minutes, or until tart is set. Remove from oven and allow to rest for several minutes. Unmold and serve warm or at room temperature. Pâte Brisée • 1 1/2 cups flour • 1/2 teaspoon salt • 8 tablespoons very cold unsalted butter, cut into cubes • 4 tablespoons ice water 1. Place the flour and salt in the bowl of a food processor and pulse to combine. Add the cold butter and pulse until you have tiny pieces of butter about the size of peas throughout. Pour the ice water in slowly and pulse just until the dough starts to come together. You may need a bit more or a bit less ice water. 2. Turn the mixture out onto a piece of plastic wrap and press into a disc. Wrap and chill for at least 2 hours. 3. Roll dough thinly to fit into an 11-inch tart pan with a removable bottom. Wrap in plastic and place in your freezer while you are preheating the oven. 4. Preheat the oven to 400˚F. When the oven is hot, line the pastry shell with foil and fill with rice or dried beans to keep the pastry from puffing-up during baking. Place the tart shell on a baking sheet and bake on the middle rack of the oven for 15 minutes. Remove the foil and rice or beans and return the tart shell to the oven and continue to bake until golden brown. (Watch closely) TAKE a LOOK:
10 Comments
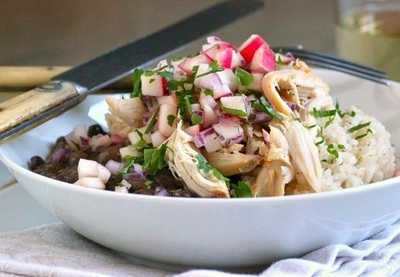
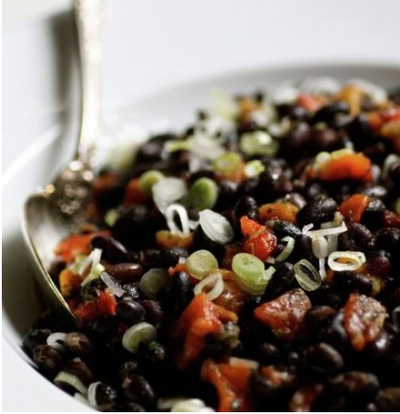
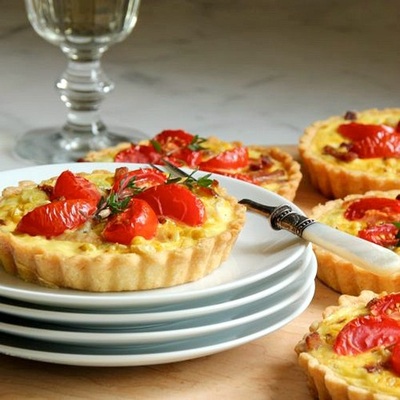
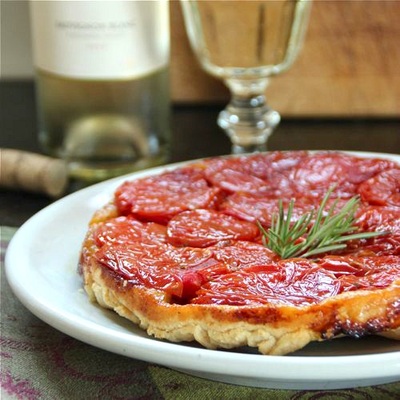
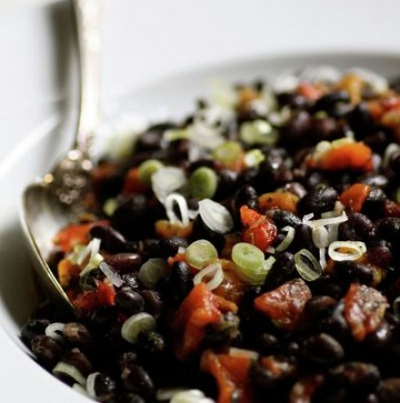
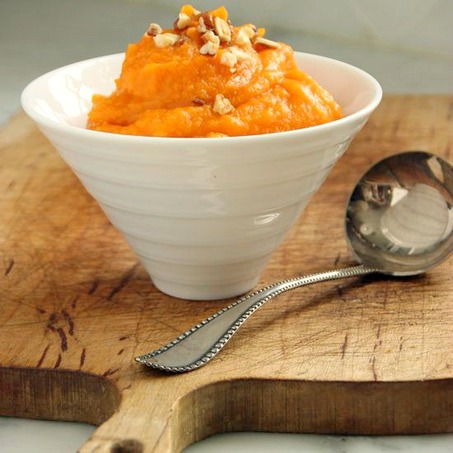  Simple and delicious... Bake 2 large yams at 400˚F until tender. Meanwhile, peel 5 apples (I had Gala on hand, so that's what I used). Thinly slice the apples and place in a large sauté pan. Add 1/4 cup water, cover, and over low heat cook the apples until tender. In the bowl of a food processor, combine 1/4 of the apples with 1/4 of the yams. Squeeze the juice of 1/2 of an orange over the mix and process until smooth. Transfer to a medium saucepan. Repeat with the remaining apples, yams, and orange juice. Rewarm over low heat, adding salt to taste. Serve. TAKE a LOOK: 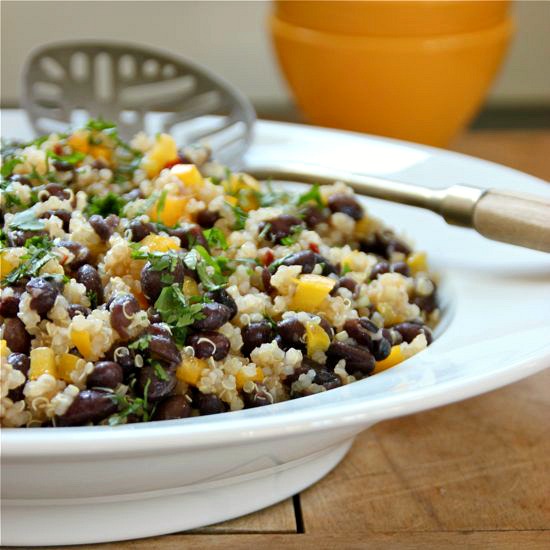 I spent the weekend indoors. A winter storm that left roads and sidewalks with a thick coating of ice has left me with no desire to venture out. A quiet few days were spent reading, baking, and cooking. Dinner last night... roast chicken along with a salad of black beans and quinoa.  a recipe by Ken Oringer for Food & Wine, slightly adapted • 1 cup quinoa • 3 tablespoons sherry wine vinegar • 1 tablespoon soy sauce • 1 tablespoon fresh lime juice • 1 chipotle in adobo, minced * 3 16-ounce cans black beans, rinsed and drained • 1/4 cup plus 2 tablespoons extra-virgin olive oil • 6 scallions, white and light green parts only, finely sliced • 1 small red onion, finely diced • 1 yellow bell pepper, finely diced • 1/4 cup chopped cilantro 1. In a medium saucepan, combine the quinoa with 2 cups of water and a pinch of salt and bring to a boil. Cover the saucepan and simmer the quinoa over low heat until the water has been absorbed, about 15 minutes. Spread the quinoa on a plate and let cool. 2. In a large bowl, whisk the vinegar, soy sauce, lime juice and chipotle. Add the olive oil in a thin stream, whisking until blended. Add the black beans, quinoa, scallions, red onion, yellow pepper and cilantro. Season with salt, toss to combine and serve. • The salad can be made ahead and refrigerated overnight. Midge catching snowflakes TAKE a LOOK: 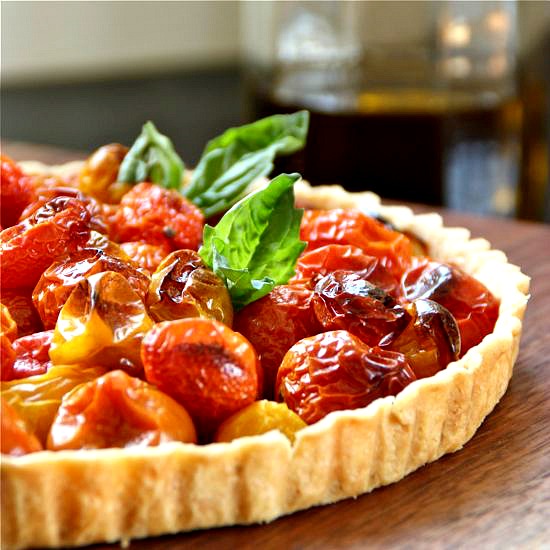 Honestly, this is a tart that should really be made at the height of tomato season. Since cherry tomatoes are all that fill this buttery tart shell, having the best-tasting ingredients possible will really make it shine. After the winter we have endured, and with more snow and below zero temps predicted, I am just so desperate for the warmth and tastes of summer. Ignoring my better judgement, I succumbed to temptation and made a tart with cherry tomatoes. Large tomatoes are something I never purchase out of season, but cherry tomatoes will have a sweetness to them even this time of year, and the long slow roast in the oven concentrates the flavor and sweetness of these little tomatoes even more. This tart is certainly the way to go if you are craving fresh tomatoes like me. I am showing the recipe below just as it appeared in Food & Wine magazine. In the tart I made, I veered a bit from the recipe below by substituting a favorite tart dough recipe from Alice Waters (recipe HERE)... Bon Appétit  • 1 1/2 cups all-purpose flour • Salt • 7 tablespoons unsalted butter, cubed • 1/2 cup cold heavy cream • 2 pints cherry or grape tomatoes • 2 tablespoons shredded basil leaves
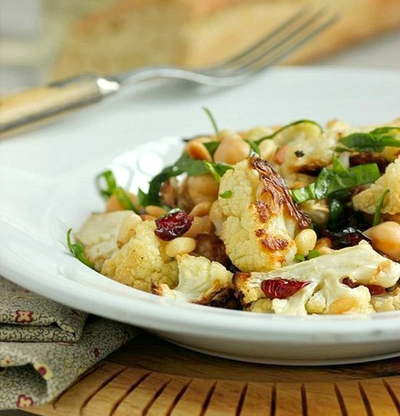
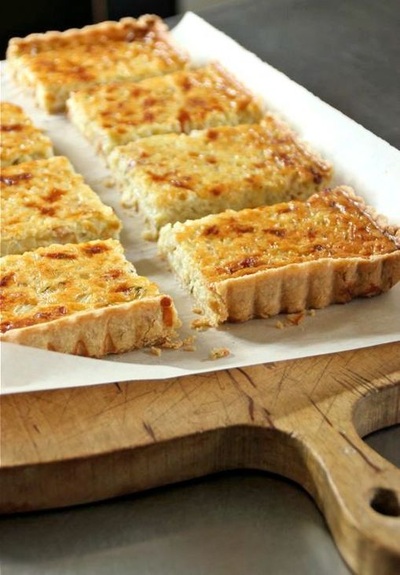
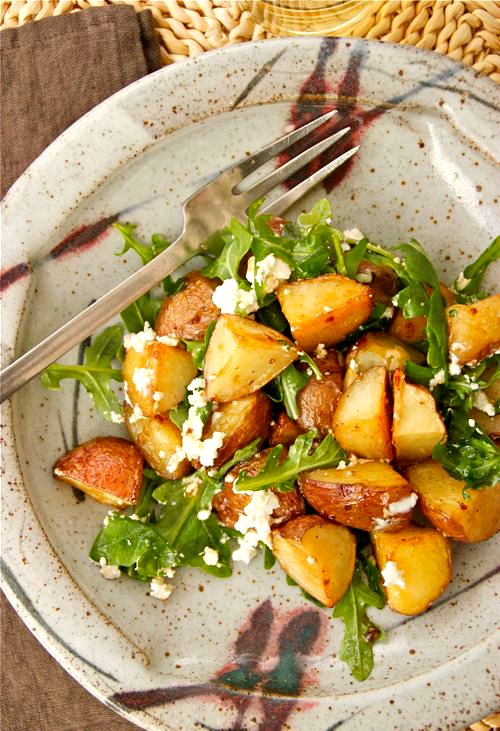
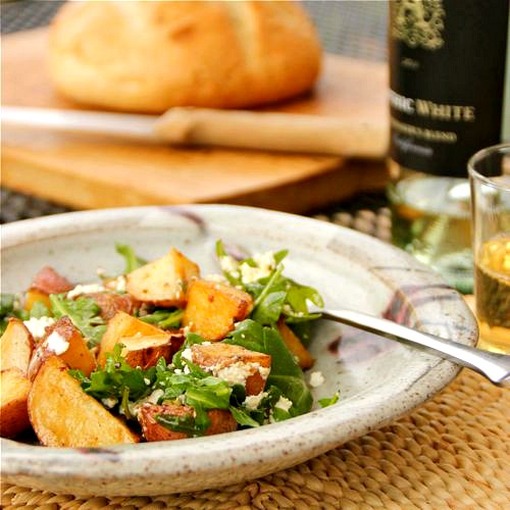
TAKE a LOOK:  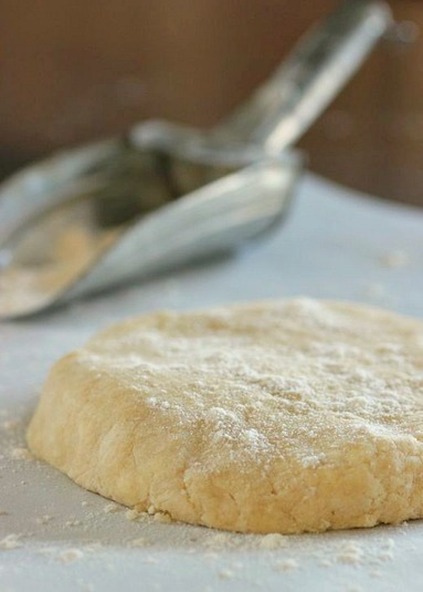 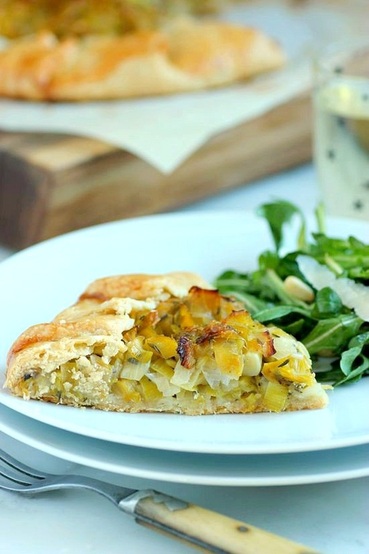 Was this ever good! Dinner tonight was a Leek Tart; recipe from Alice Waters. The leeks were meltingly sweet. The crust was buttery and flaky. Pretty perfect. I served it with a simple green salad. The tart dough "galette" recipe makes enough for two crusts and this coming weekend I will make the Leek Tart again as an appetizer. 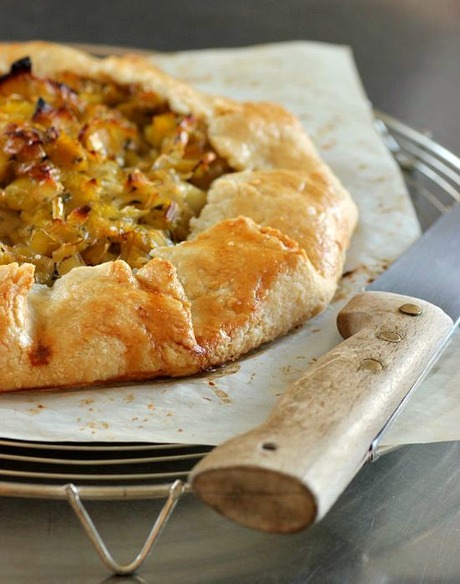 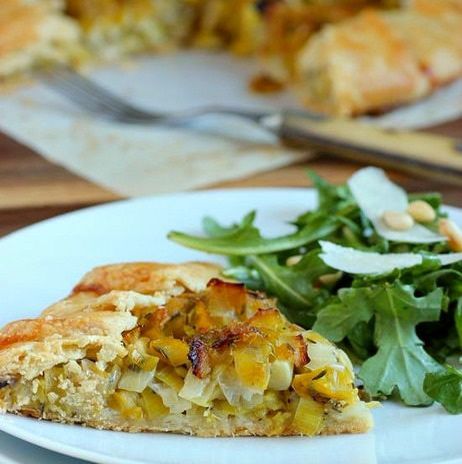  adapted recipe from Chez Panisse Vegetables by Alice Waters • 3 pounds leeks • 3 tablespoons unsalted butter • 1 1/2 tablespoons water • 8 sprigs thyme (I substituted about 2 teaspoons dried thyme leaves) • Salt and pepper • 1/2 recipe Galette Dough (recipe follows) • 1 tablespoon flour • 1 egg beaten • 1 tablespoon cream 1. Trim ends and using just the white part of the leeks, cut in half lengthwise. Slice leeks crosswise into 1/4-inch pieces. Place sliced leeks into a colander and rinse under cold water to remove all dirt. Shake off excess water. 2. Heat a large sauté pan over medium-low heat. Add the butter and water. Once the butter has melted, add the leeks and thyme; season with salt and pepper. Stir the mixture and cook, covered, for 10 minutes or until the leeks become soft and tender, stirring occasionally. Add a little more water if you find they are drying out. Set leeks aside to cool. 3. PREHEAT OVEN to 400˚F. 4. Place the tart dough on a piece of parchment paper that has been dusted with flour. Sprinkle the top of the dough lightly with flour and cover with a sheet of plastic wrap. Roll the dough into a 12-inch circle. Slide the parchment paper and rolled tart dough onto a baking sheet. Transfer to the refrigerator for about 5 minutes. 5. When ready to assemble, dust the top of the dough with 1 tablespoon of flour. Spoon the leeks onto the dough to within 1 1/2-inches of the edge. Pleat the uncovered edge of dough over the leeks. Mix the egg with the cream and brush over the the pleats. BAKING TIP: When brushing on the egg, make sure to get it underneath each "pleat". This helps to keep the edge from sliding down during baking. 6. Bake the tart on the lowest shelf of the oven for 20 to 30 minutes, or until the crust is golden. I found it necessary to cut a round of foil to place over the leeks two-thirds of the way through baking to prevent burning. GALETTE DOUGH • 2 cups flour • 1/2 teaspoon salt • 1/4 teaspoon sugar • 6 ounces unsalted butter (butter should be cool, not cold and hard) • 1/3 cup ice water 1. Combine the flour, salt, and sugar either in a mixing bowl or in the bowl of a food processor. Divide the butter in half. Work it into (or pulse if using food processor) the flour mixture until the texture of coarse cornmeal. Cut the remaining butter into cubes and incorporate into the flour mixture until the size of small peas. Slowly add the ice water and mix (or pulse) just until uniformly moistened. Transfer the dough to plastic wrap and press into 2 smooth disks. Refrigerate the dough for at least an hour before rolling. (Dough can be kept in refrigerator for one day and frozen longer.) Allow dough to warm slightly when removed from refrigerator so it is soft enough to roll. • makes dough for two 10-inch tarts TAKE a LOOK: 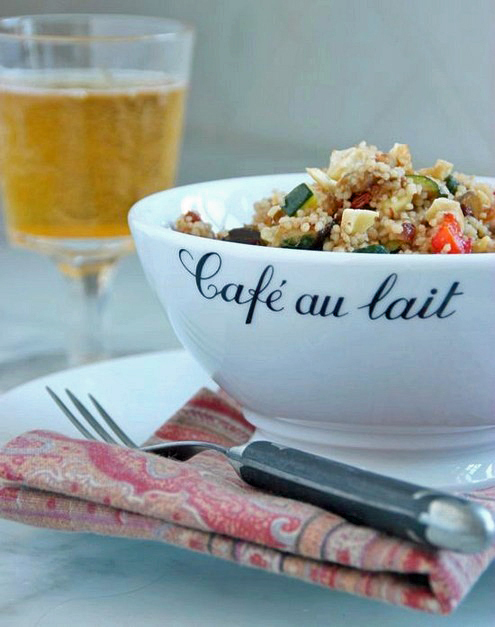 Lately, I've been planning my days around very limited outdoor exposure. I dress the Frenchies in their winter coats and make a mad dash into the sub-zero air. Coaxing the dogs to do what they have to do as quickly as possible, we then run back inside. After an extremely short trip to visit family in southwest Iowa this past weekend (and to see the Wabash Wine Company's who-done-it mystery, "The More The Murderer" written by our friend Bill Danforth), we left sunny skies and highs temps predicted in the 50's, only to end up driving through white-out blizzard conditions by the time we reached the Minnesota border. Hard to believe that two years ago in January I was out riding my bike in record warmth. It's just crazy... Because of the cold, I'm also limiting trips to the grocery. Many of our meals have not been planned ahead; I just buy anything that looks good and find a use for it once I'm back home. Fortunately, I happened to have all of the ingredients I needed for this Couscous Salad of Roasted Vegetables and Sun-Dried Tomatoes. It was delicious alongside baked salmon. 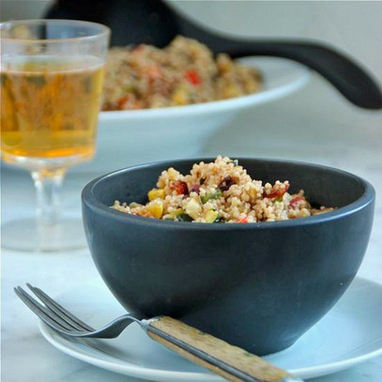 + Couscous Salad of Roasted Vegetables and Sun-Dried Tomatoes adapted recipe from Once Upon a Tart by Frank Mentesana and Jérome Audureau • 1 1/2 cups couscous • 1/4 cup dried currants • 1 1/2 cups boiled, unsalted water for the couscous • 1/4 cup olive oil • 1 small eggplant cut into 1/2-inch cubes • Kosher salt (for sweating the eggplant) and freshly ground pepper (for roasting the vegetables) • 1 zucchini, diced fine • 1 yellow squash, diced fine • 3 garlic cloves, peeled and minced • 1 red bell pepper, cut into 1/2-inch squares • 1 red onion, diced fine • 1/3 cup balsamic vinegar • 10 Marinated Sun-Dried Tomatoes, julienned • 1/2 cup walnuts, toasted, then coarsely chopped • 1/2 cup fresh basil, cut into thin strips (or PRESERVED BASIL) 1. Combine the couscous and currants in a large bowl. Pour the boiling water along with 1 tablespoon of the olive oil over the couscous. Cover the bowl tightly with plastic wrap and steam the couscous in the hot liquid for 15 to 20 minutes. Remove the plastic wrap and fluff the couscous with a fork; set aside. PREHEAT OVEN to 450˚F. 2. In the meantime, place the eggplant in a colander and sprinkle with a thin coating of salt, about 1 tablespoon. Stir the eggplant gently and set aside for 20 minutes to "sweat" its bitterness. 3. Combine the zucchini and yellow squash in a medium bowl along with 1 minced garlic clove, 1/4 teaspoon salt, and a grinding of pepper. Drizzle with 1 table of the olive oil and mix gently. Spread the vegetables onto a non-stick sheet pan and roast on the middle rack of the oven for about 8 to 10 minutes (stirring occasionally) or until just beginning to brown -- Do not overcook the vegetables or they will fall apart when tossed with the couscous. When finished roasting, add to the couscous. 4. Toss the bell pepper and onion, a minced garlic clove, 1/4 teaspoon salt, and a grinding of pepper with 1 tablespoon olive oil. Spread onto the sheet pan and roast for 10 to 15 minutes (stirring occasionally) or just until the vegetables are beginning to blacken. Scrape vegetables into the bowl of couscous. 5. Over a sink, shake the colander to remove as much liquid as possible from the eggplant. Toss eggplant with remaining minced garlic, a grinding of pepper, and 1 tablespoon olive oil. It is not necessary to add any additional salt to the eggplant. Spread onto the sheet pan and roast for 15 to 20 minutes, stirring occasionally, until eggplant browns and the flesh has softened. Scrape the eggplant mixture into the bowl of couscous and vegetables. 6. Add the balsamic vinegar, sun-dried tomatoes, walnuts, and basil to the couscous and stir very gently to combine. Serve at room temperature. Salad will keep for several days in the refrigerator. TAKE a LOOK: 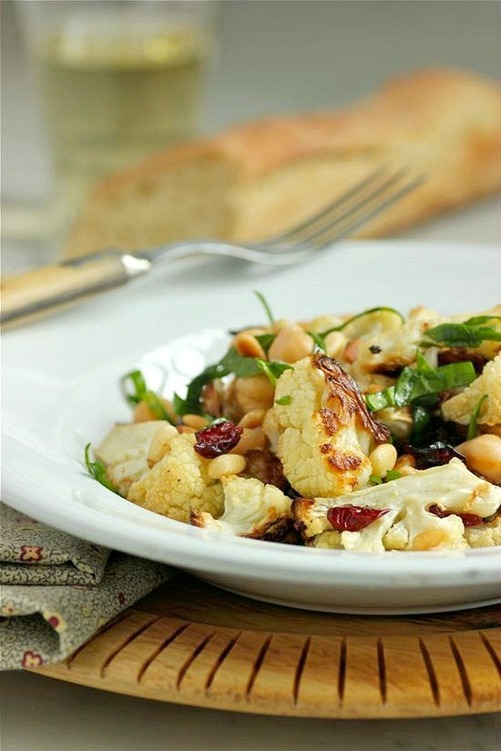 We have friend and fellow blogger Stacey of Stacey Snacks to thank for this delicious salad. Following the indulgences of the holiday season, Stacey begins the new year with "Detox" recipes for healthy salads and abstains (at least for now) from posting desserts on her blog. I say, when salads are this good, who needs dessert? I absolutely loved it. I ever-so-slightly changed it out a bit, adding julienned fresh spinach and substituting dried cranberries for the raisins.  • Large head of cauliflower, cut into florets • Olive oil, divided • 1 can chickpeas (garbanzos), rinsed and drained • 1/4 cup pine nuts, toasted • 1/3 cup dried cranberries • Handful of fresh, baby spinach, thinly sliced • 1 1/2 tablespoons red wine vinegar • Kosher salt and freshly ground black pepper 1. Preheat oven to 400˚F. Spread cauliflower florets onto a non-stick sheet pan; drizzle with olive oil and sprinkle with kosher salt. Roast cauliflower for about 25 minutes, stirring occasionally. 2. Combine roasted cauliflower in a large bowl with the chickpeas, pine nuts, dried cranberries, and spinach. Add the red wine vinegar and 1 1/2 tablespoons olive oil. Toss gently. Season to taste with salt and pepper. Serve at room temperature. YUM! TAKE a LOOK: 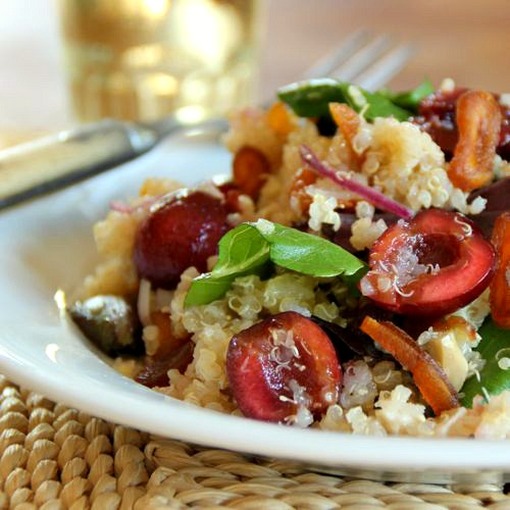
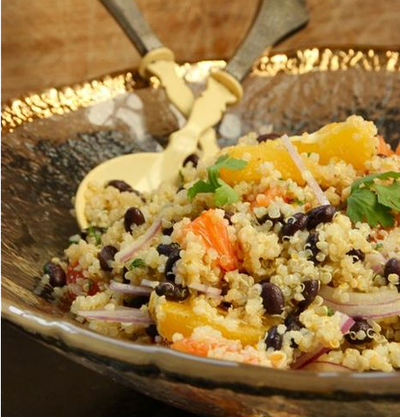
I didn't plan to post onto LivingTastefully this month. I've just returned from one out-of-town trip and am leaving on another shortly. But I made this Quinoa Salad with Cherries and Cashews before I left and I also have some photos from Glacier National Park; so why not just combine the two before I leave town again? First off... a little bit about Glacier. It's beautiful. Breathtakingly beautiful. I have never been there before, and after spending a week traveling through the park, I feel photos do it little justice (but I took them anyway, because that's what you do on vacation). You need to be there to fully understand and appreciate the enormity of it all. And because of its size and scope, forget newspapers, wifi, or cell phone use at the historic lodges that lie within the park's boundaries; something I struggled with daily. It's just you and the bears -- something that caused my anxiety level to soar. Here are just a very few photos... 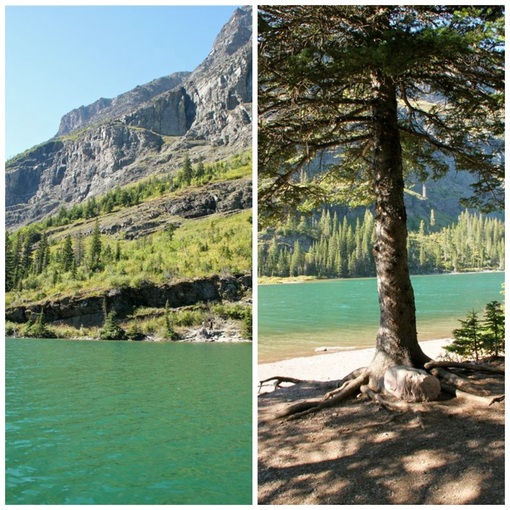
1. Yes, the lakes really are that color (when fed by the silt of a living glacier). We were told that once the glaciers are gone, the water will become a dark blue. 
2. My favorite "landscape" photo along Waterton Lakes. (Also the deepest lake in Canada.) 
3. Grinnell Glacier, as seen from the Many Glaciers Hotel. I feel bad for my husband. He really wanted to hike the 1600 feet in elevation up to the glacier, but I just couldn't. A grizzly bear was sited that morning at the base of the mountain where we would have started hiking. This is where my bear fear came into play (big time). 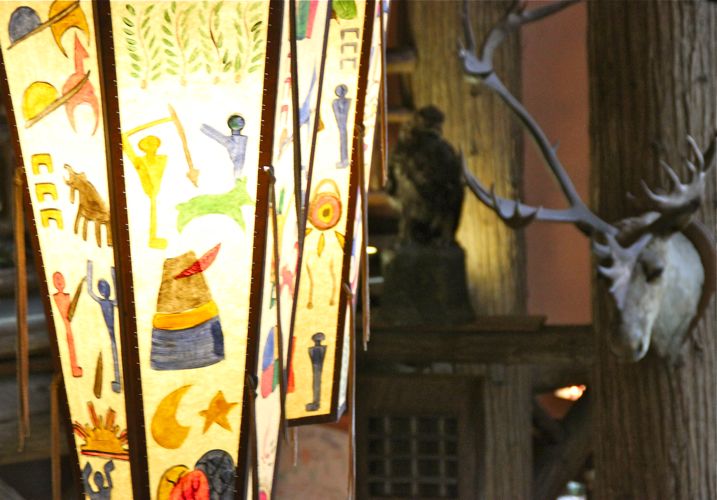
4. Hand-painted parchment shades, original to the 1914 lobby of the Lake McDonald Lodge in Montana. 
5. Early morning photo taken by my husband from the deck of the Many Glaciers Hotel. (I slept in :) 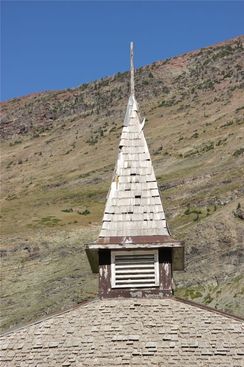

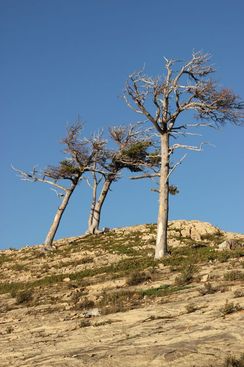
6. My three favorite photos that have nothing to do with mountains. 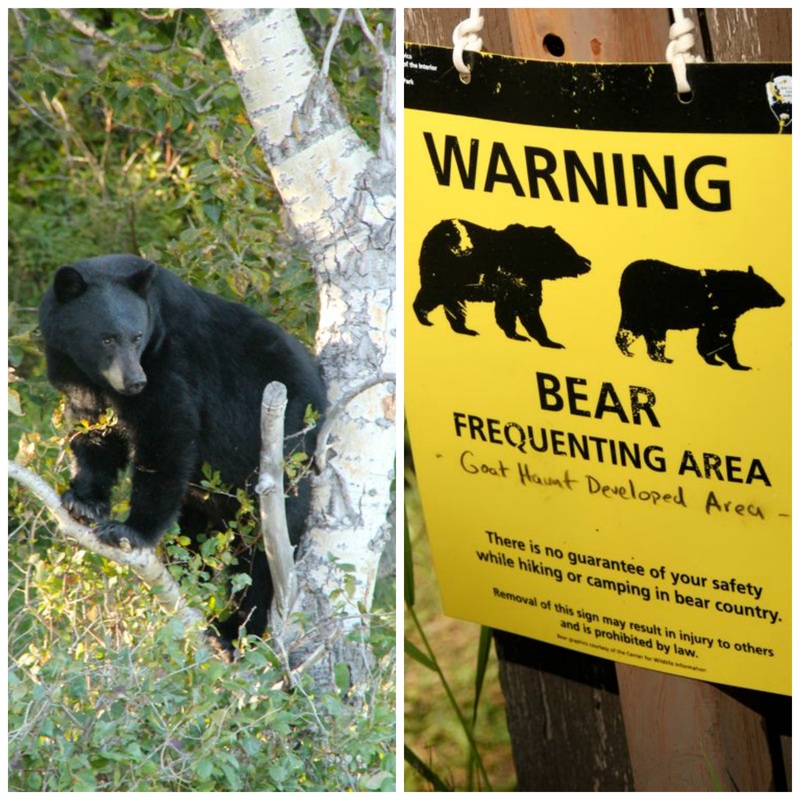
7. Twenty yards from a black bear (our rental car was right behind me). We soon discovered, upon entering Glacier National Park, that September is a VERY active time for bears. They are eating massive amounts of berries down in the lower regions to hold them over while hibernating during the winter months... just what I needed to hear :( 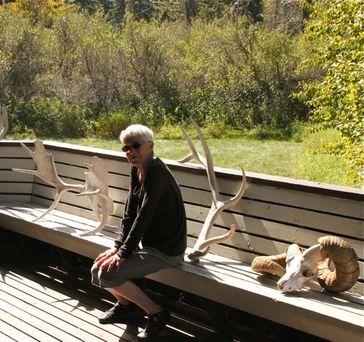
8. My daughter asked me why I didn't smile in any of the photos. I told her that in this one (our last day of hiking!), it was because we just walked head-on into a large black bear idling down the trail deep in Canadian back country. When we came around a curve on the path of the dense brush and saw the bear walking towards us... he stopped... we stopped... and slowly stepped backwards while nervously making noise, until we were out of the bear's sight. Try as I may, I could not think of anything to sing but the national anthem. My husband said the bear must have thought he was going to see a baseball game. After five minutes, we again headed down the trail (with bear pepper spray in hand). The bear had disappeared! I ran that last quarter mile to the ranger's outpost, ahead of my husband. I guess we were just lucky not to have come upon a grizzly. My understanding is, you don't stand much of a chance (grizzlies will eat black bears). The morning we caught the train for home we had access to wifi and my husband downloaded the Wall Street Journal for me to read on our 22 hour train ride. One of the first articles I read was "Quinoa Faces a Backlash" that told of bloggers finally admitting they hate this ancient grain. I started using quinoa a little over two years ago when my eldest daughter found she was gluten intolerant. Many times I substitute quinoa for dishes using small pastas (like orzo), and have come to really like it. I guess it's for you to decide... We all like this salad!
|


Categories
All
|