Living Tastefully
  • Home
  • PAINTINGS
  • About
  • Passions-to-Pastry Blog
  • Contact
  • Recipes

MORNINGS at MY HOUSE... peach & cherry breakfast cake

8/26/2012

4 Comments

 
Picture

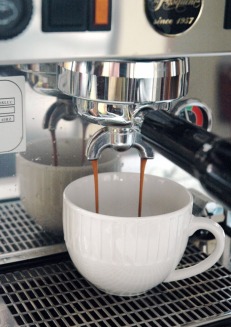
     I have been without my espresso machine twice this summer.  The first time it was for two weeks.  The machine needed a new solenoid valve which had to be ordered.  I was too cheap to have the new valve air-expressed to the repair shop.  I will never be too cheap again.  I was miserable.  I can no longer drink coffee.  I attribute that to the high amount of acid that is typically in a drip coffee.  During the slow brewing process more of the acidic parts of the coffee bean are released than with an espresso where hot water is quickly forced through a fine grind.
     When I bought my Pasquini over four years ago, I was told that it's like an Italian sports car and would need the occasional tune-up.  After the repairs earlier this summer, I figured I was good-to-go for at least a couple of years -- not the case.  Last week, I again took my Pasquini to the shop.  When I turned the machine on, it immediately shut off.  After several attempts I gave up, assuming it needed a new switch -- not at all.  The repair shop had my machine for over a week, turning it on daily and finding nothing wrong.  I brought it back home and hold my breath every morning when I flip the switch.  So far all is good, but I have a feeling it's just a matter of time before it's back in the shop.


Picture

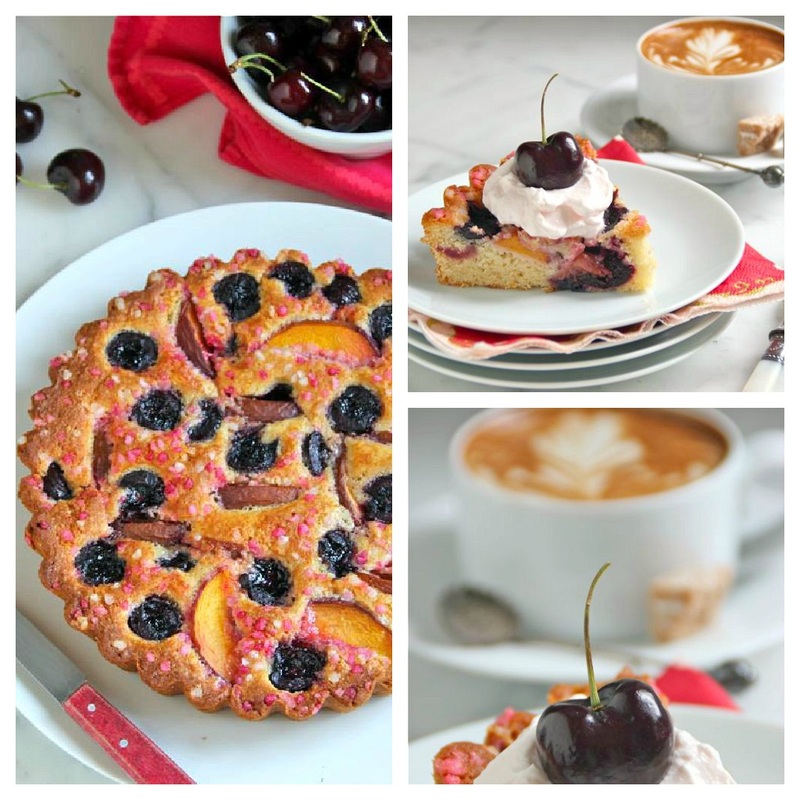
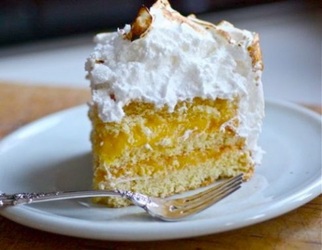
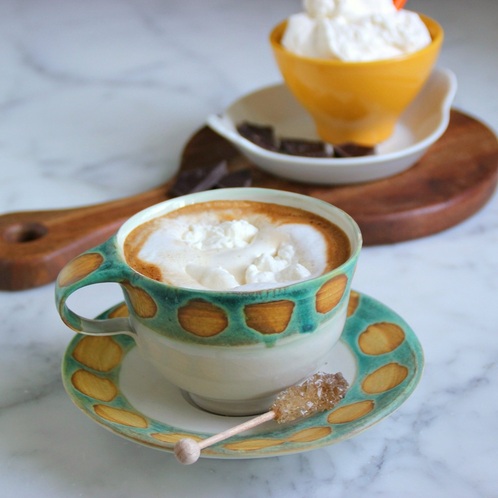
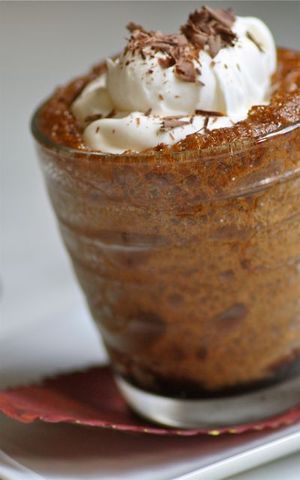
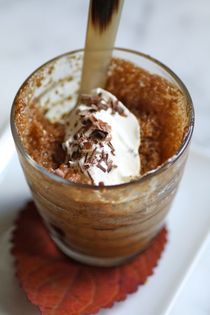
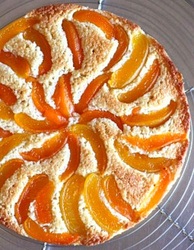
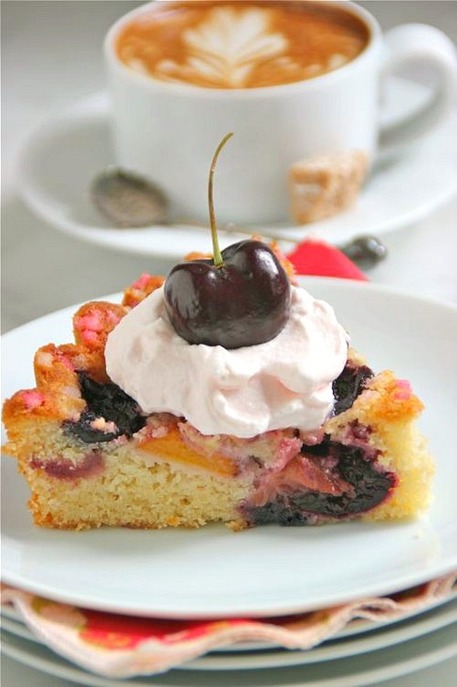
     I made the Peach & Cherry Breakfast Cake to serve this morning alongside my sacred cappuccino! 


Picture
• 6 tablespoons unsalted butter at room temperature, plus more for buttering the cake pan
• 1 1/2 cups unbleached, all-purpose flour
• 1 1/2 teaspoon baking powder
• 1/2 teaspoon fine sea salt
• Slightly less than 1 cup, plus 2 additional tablespoons, granulated sugar
• 1 large egg
• 1/2 cup milk
• 1 teaspoon vanilla extract
• Fresh peach slices and halved sweet cherries, approximately 2 cups total
1.  Preheat oven to 350˚F.  Butter a 9-inch cake pan.  I brushed melted butter over the bottom and sides of a 9-inch fluted tart pan with removable bottom and 2-inch sides.
2.  Whisk together the flour, baking powder, and salt in a small bowl; set aside.  In the bowl of an electric mixer, combine the 6 tablespoons butter with the slightly less than 1 cup of sugar; beat until light and fluffy.  Add the egg, milk, and vanilla and beat until just combined.  Gradually pour in the dry ingredients and beat just until the mixture is smooth.  Do not over-beat.
3.  Pour the cake batter into the prepared pan and stud the surface with the peach slices and halved cherries.  Sprinkle the fruit with the remaining 2 tablespoons sugar.  I used a very coarse strawberry-flavored sugar I purchased in Paris.  You can either use granulated sugar, or coarse turbinado sugar.
4.  Place the cake on the middle shelf of the oven and bake for 10 minutes.  Reduce heat to 325˚F, and continue to bake for an additional 50 minutes, or until the top is browned and a toothpick inserted into the center of the cake comes out clean.  Cool on a rack before unmolding.
5.  Serve slices of the cake with sweetened whipped* cream and a cherry.
* I added strawberry sugar to my whipping cream.  Flavored Monin Sirop would be a good substitution.
                       • a Martha Stewart recipe adapted by Call Me Cupcake •


TAKE a LOOK:


4 Comments

Espresso Con Panna with Cornmeal-Walnut Biscotti

8/9/2012

3 Comments

 
Picture

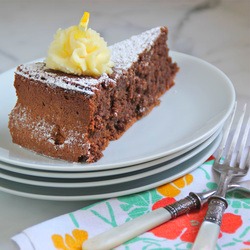
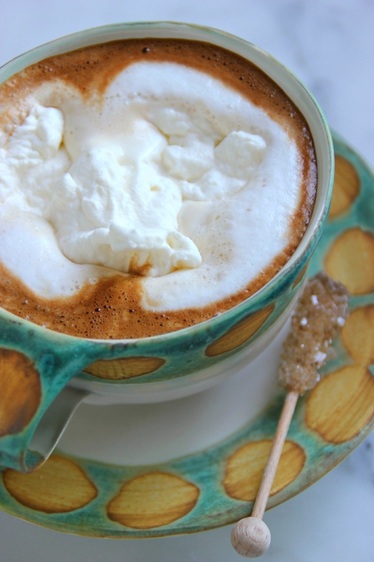
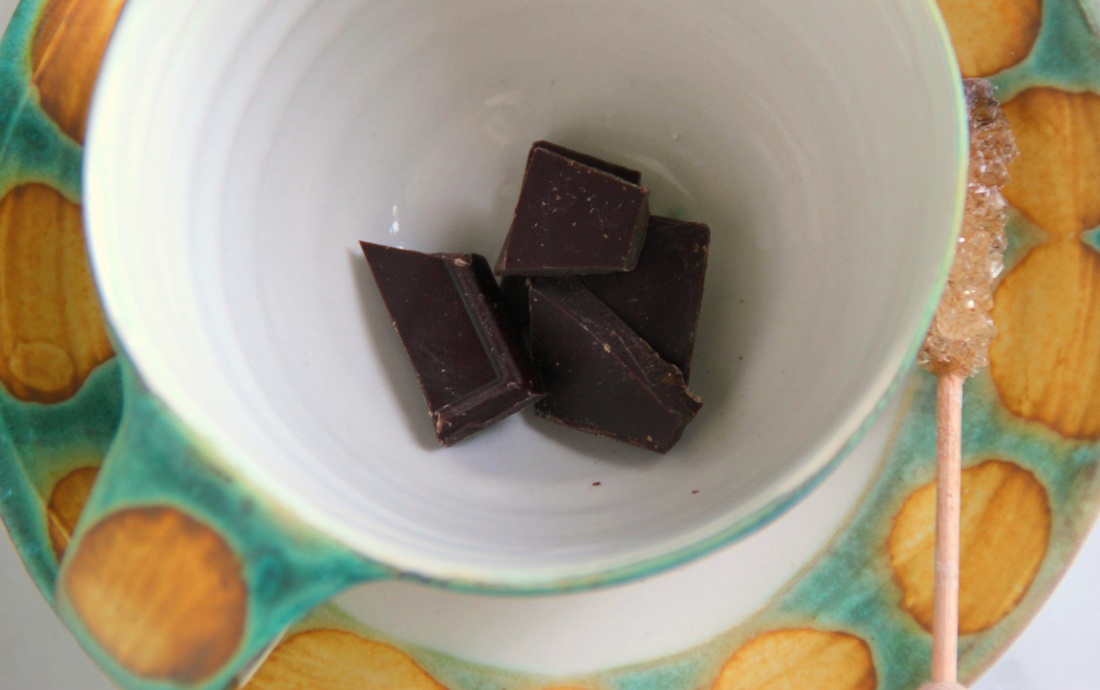
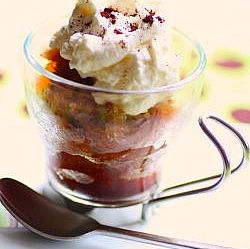
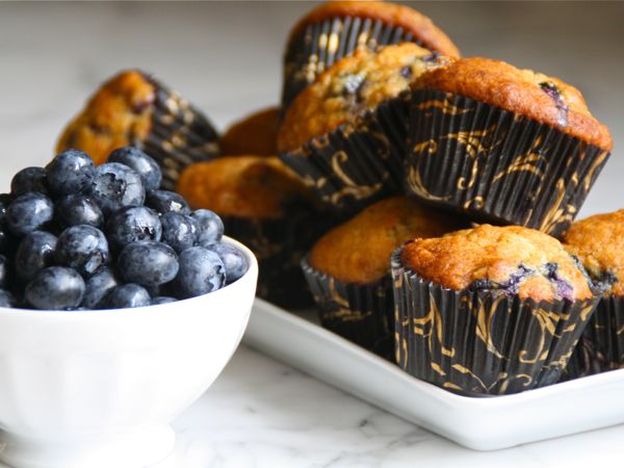
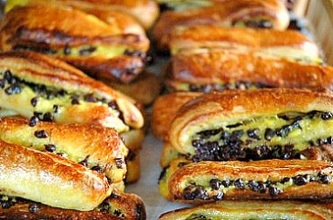
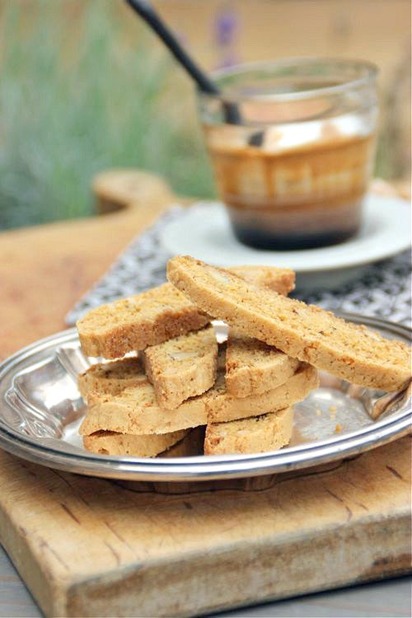
     I have to say, I was thrilled when I woke up to rain.  It was the perfect excuse to stay indoors.  Our weather this summer has been hot and dry, which means that most of my days have been spent recently, working on outdoor projects.  I'm good at projects for a while, but these have gone on far too long -- they have to end!
     With the luxury of time in my kitchen today, I caramelized onions, roasted red peppers, and baked Cornmeal-Walnut Biscotti.  The vegetables were for a Pissaladière -- a Provencal "pizza".  And the Cornmeal-Walnut Biscotti -- well, I made those for a little treat with espresso in the afternoon, and as a mid-morning snack, but most importantly, to pair with a cappuccino when I first get up in the morning!  I'm a big fan of cornmeal and walnuts, so these biscotti are pretty perfect as far as I'm concerned.  The recipe is from Field Guide to Cookies by Anita Chu and I found it through David Lebovitz -- David's adapted recipe here.
     
 
Picture

     And after the Cornmeal-Walnut Biscotti came out of the oven, I made an Espresso Con Panna.  I've been hooked on these recently...  TO MAKE:  Pour about 1/4 cup cold, heavy cream into a small bowl.  Using a small whisk, beat the cream until it starts to thicken -- you do not want it whipped into peaks, just thickened. Place the bowl of cream in the refrigerator to keep chilled and make a double espresso.  Spoon the cream on top.  I love the contrast of the hot espresso with the cold, thickened cream floating on top -- delicious!  And be sure to serve  a cornmeal biscotti alongside.

TAKE a LOOK:


3 Comments

Torta Caprese with Espresso and Lemon Mascarpone

6/19/2012

3 Comments

 
Picture

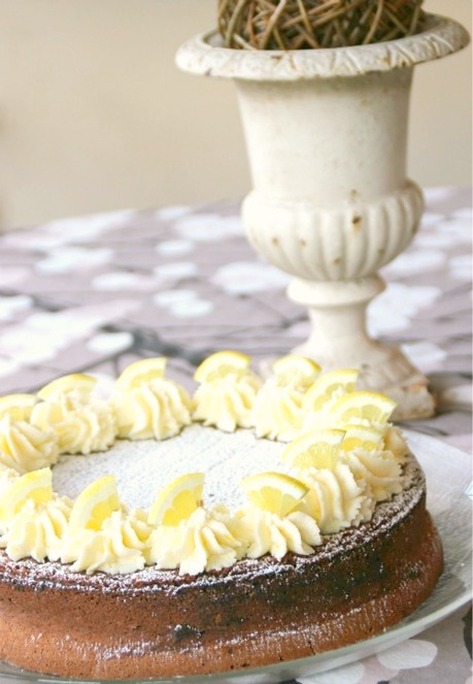
                     Dinner at our neighbor's.  I was asked to bring dessert.

Picture

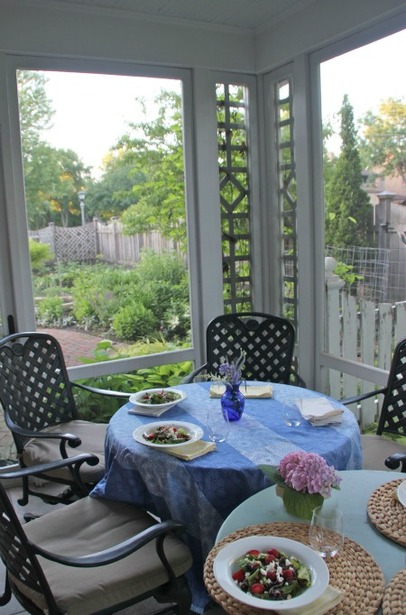
     A screened porch is a cherished possession in Minnesota, protecting you from mosquitoes and the elements.  Fortunately, the rain and storms had ended by the time we sat down for dinner.  It turned out to be a beautiful evening.

Picture
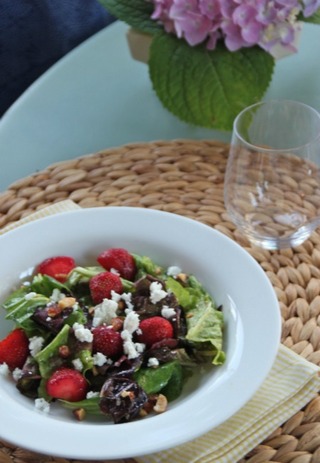
     A salad with Fraises du bois, tiny alpine strawberries picked by our neighbor at a local strawberry farm.
Picture
Picture
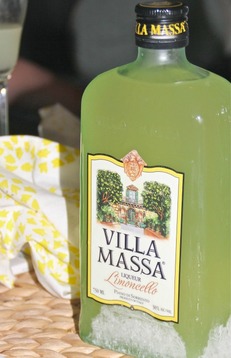
     Limoncello pulled from the freezer and served alongside the Torta Caprese with Espresso that I brought for dessert.
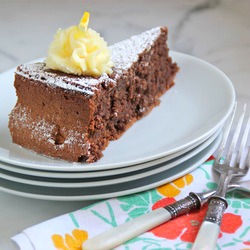
Picture

                 
            ::  Torta Caprese with Espresso  ::
                     and Lemon Mascarpone
a recipe from Arthur Schwartz's book, Naples at Table, and adapted by Rosanne Gold

• 16 tablespoons unsalted butter
• 8 ounces semi-sweet chocolate
• 12 ounces almonds
• 1/4 teaspoon almond extract
• 1 tablespoon espresso powder
• 6 extra-large eggs, separated
• 1 cup sugar, divided
• salt
• 6 tablespoons confectioners' sugar
• 8 ounces mascarpone
• 1 large lemon, addition lemons for garnish
1.  Preheat the oven to 325˚F; position an oven rack in the bottom third of your oven.  Use one tablespoons of the butter to grease the sides and bottom of a round, 10-inch cake pan with a removable bottom.  (I used a 10 1/4-inch springform pan.)  Line the bottom of the pan with parchment paper and butter the paper; set aside.
2.  Melt the remaining 15 tablespoons butter and the semi-sweet chocolate in a small saucepan over low heat, stirring often.  When the chocolate is melted and smooth, remove from the heat.   Divide the almonds in half.  In the bowl of a food processor, grind both halves, along with 2 tablespoons sugar each, until powdery.  Place ground almonds in a large bowl and stir in the espresso powder.  Set aside.
3.  With a mixer, beat the egg yolks until light in color and very thick.  Add 1/2 cup sugar and continue to beat for 2 minutes.  Add the melted chocolate and the almond extract, mixing well.  Stir in the ground almonds and mix until fully incorporated.
4.  In a medium bowl, beat the reserved egg whites with a pinch of salt until foamy, then add the remaining sugar and beat until stiff.  Take half of the beaten egg whites and stir into the chocolate-almond mixture until well-combined.  Repeat with the remaining egg whites.  Pour into the baking pan and place in the lower third of the oven.  Bake for 1 to 1 1/4 hours, or until the top of the cake is firm and a toothpick inserted into the cake comes out clean.  Remove from the oven and cool completely.  Unmold the cake and invert onto a serving plate.  Dust with 2 tablespoons of the confectioners' sugar.
5.  To make the lemon mascarpone:  Beat the mascarpone with the remaining confectioners' sugar.  Grate the lemon zest and add to the mixture, along with 2 (or more) teaspoons of lemon juice.  Decorate the cake with the lemon mascarpone.  NOTE:  While beating the mascarpone, I thinned it a little bit with heavy cream -- totally optional.


TAKE a LOOK:


3 Comments

A Memorable Indulgence

5/12/2012

1 Comment

 
Picture

     When we moved to St. Paul, Minnesota some 26+ years ago, there was a French bakery in our neighborhood named Napolean's.  It was good.  Really good.  Actually, no...I'd have to say it was exceptional.  So exceptional, that even though it's been gone now for some 20 years, I still think about it whenever I pass by its incarnation (of which there have been many).  To this day, there has not been a bakery in St. Paul that even comes close to producing the same quality of French pastries.
     One winter when my daughter was about 4 years old, we had a huge snow storm.  Suffering some cabin fever, I was desperate to get out and decided to go to Napolean's for a cappuccino and a treat, with promises to my daughter of hot chocolate.  Of course, with the heavy snows, there was no way I was going to get in a car and drive. The chances of getting stuck were too great.  I bundled up my daughter and myself, put her on a sled, and pulled her the approximate mile to Napolean's.  After trudging through knee-deep snow with frigid, whipping winds, we arrived, only to find that it was closed -- due to the weather.  (It never occurred to me to call first... duh!)  The pastries and coffees served at Napolean's were worth risking life and limb (or at least frostbite).
      
Picture

     One thing I always purchased on a visit to Napolean's was a cappuccino.  But the cappuccino made there didn't consist of just espresso and steamed milk.  There also happened to be a big chunk of chocolate at the bottom of the cup; plus... whipped cream on top!  A café mocha, actually.  And, it was divine!

Picture

     It's what I've been making recently at home.  Not every day, of course.  Only when I feel I need a little treat.
Picture
                                           • big chunk of chocolate
                                           • double-shot of espresso
                                           • hot steamed milk
                                           • sweetened, whipped heavy cream

                            Serve with croissant aux amandes if possible


TAKE a LOOK:


1 Comment

God in a cup?

9/7/2011

2 Comments

 
Picture

     "God in a Cup", a book by Michaele Weissman on "The Obsessive Quest for the Perfect Coffee" are the words I will use to describe this amazing Espresso Mousse.  The recipe by Michel Richard (yes, the equally amazing Yellow Tomato Tart Michel Richard) was created as a "breakfast sweets" item on his dessert menu and can be found in his book, Sweet Magic.

Picture

     After beating the chilled ingredients, the mousse has a velvety, butterscotch-colored consistency, and is light as air.  If you must hold the mousse for several hours, or up to one day, it will start to separate and become darker and more "foamy", but is still delicious.  Use the best ingredients you can when making this.  For my espresso I use a combination of half Kenya and half Sumatra beans, freshly roasted and freshly ground which result in a strong, slightly sweet brew.  Top with a rich, organic, whipped heavy cream.
     This Espresso Mousse will most definitely be on my New Year's Day menu!

Picture


:: ESPRESSO MOUSSE | recipe by Michel Richard

Picture
• 1/2 cup freshly brewed espresso or strong coffee, cooled to room temperature
•1 tablespoon plus 1 teaspoon sugar
• 1 tablespoon dark rum ( I didn't have rum and used Cognac)
• 1/2 teaspoon unflavored gelatin
• 6 tablespoons chilled heavy cream
1.  Stir together espresso, 1 tablespoon sugar, and rum in a large metal bowl.  Sprinkle gelatin over mixture and let stand 1 minute to soften.
2.  Set bowl over a saucepan of simmering water and heat espresso mixture, stirring, until sugar and gelatin are dissolved.  Set bowl into a larger bowl of ice and cold water and beat with a handheld electric mixer at high speed until mixture is pale brown and just holds stiff peaks, 8 to 12 minutes ( mixture will resemble foam).  Spoon mousse into 4 glasses or coffee cups and chill at least 15 minutes.
3.  Just before serving, beat cream with remaining teaspoon sugar until it just holds soft peaks.  Spoon whipped cream over mousse.
:: Mousse can be chilled (loosely covered after 15 minutes) up to 1 day.  Let stand at room temperature about 15 minutes before serving.


TAKE a LOOK:


2 Comments

Sablés à l'Orange et Raisins (a.k.a. orange and raisin cookies)

6/27/2011

2 Comments

 
Picture

     I was up before 5 a.m. this morning.  The papers were being delivered, I started thinking about a cappuccino, and I just plain couldn't sleep any longer.  The problem with that... it was Sunday morning!  All week I anxiously look forward to Sundays and being a bit lazy, and laziness to me  includes sleeping a little longer.  By the time it was 10 a.m. I felt the urge to go back to bed, but instead, I made myself a second cappuccino, grabbed a few magazines, and headed outdoors for the patio.
    One of the magazines, a 2008 issue of Gourmet magazine titled, PARIS ON A BUDGET, has an article on "Every Parisian's Favorite Cookie".  No surprise, the favorite cookie is considered to be a French macaron.  Oh yes, a display case full of colorful macarons can take your breath away when you enter a French patisserie; a macaron's taste, plus the texture of the crisp meringue and flavorful, chewy center can again, take your breath away... but my favorite French cookie, or maybe overall favorite cookie, sans French, happens to be this Sablé à l'Orange et Raisins (currants, in this case). 
     I have been making this orange and raisin cookie for several years, but it did not immediately steal my heart.  The cookie can be made two ways -- either with the grated zest of one orange, or, with candied orange peel.  It is much easier when making them on the spur-of-the-moment to grab an orange and simply grate the rind.  This was what I had always done.  Making candied orange peel is not at all difficult, but you do need to plan ahead if you intend to use it when making this cookie.  The candied orange peel, however, is what finally won me over.  Sablés à l'Orange et Raisins is not an overly sweet cookie (another reason I love it... my tastes have changed), and when you bite into the candied orange peel and get that intense jolt of pure orange flavor... well, for me, there's nothing better.


                                     Sablés à l'Orange et Raisins
                      adapted from Paris Boulangerie Patisserie by Linda Dannenberg
                                                       
•  1/2 cup plus 2 tablespoons unsalted butter, softened
• 1/3 cup sugar
• 1 large egg
• 1 large egg yolk
• 2 tablespoons ground almonds
• 1 2/3 cup all-purpose flour
• 1 teaspoon baking powder
• 1/2 cup raisins or currants (I always use currants)
• 1/4 cup chopped, candied orange peel (recipe follows)
• 1 large egg beaten with 1 teaspoon water, for glaze
1.  In a large bowl with an electric mixer, cream the butter with the sugar until light.  Add the egg, egg yolk, and almonds in turn, mixing after each addition until well blended.  Sift the flour with the baking powder and add to the butter mixture, mixing just until partially incorporated.  Add the currants and orange peel and finish mixing the dough with a large rubber spatula just until blended.  Be careful not to overmix.  Divide dough in half, and place each half on a sheet of plastic wrap.  Roll each piece of dough into a log 1-inch in diameter.  Wrap entirely in the plastic and refrigerate at least 1 hour.
2.  Preheat the oven to 350˚F.  Line 2 baking sheets with parchment paper.  Remove the dough from the refrigerator and slice each log in 1/8 to 1/4-inch pieces; place on prepared sheets.  Brush the cookies lightly with the egg wash.  Bake until light golden, about 13 minutes.  Watch carefully so the cookies do not overbake.
3.  Cool the pan briefly, then carefully transfer the cookies from the pan to the rack with a spatula.  Cool completely.  These cookies keep well, stored in an airtight container, up to 2 weeks, or frozen.

• I think the cookies taste better a day after baking, after the orange peel has time to infuse its flavor in the cookie.


                                           Candied Orange Peels
                                 adapted from Four-Star Desserts by Emily Luchetti

• 3 organic navel oranges
• 2 1/4 cups granulated sugar
• 1 1/2 cups water
• 1 tablespoon freshly squeezed lemon juice
1.  Thinly slice both ends from the oranges, and starting at one end, take a sharp knife and slice the entire length of the orange, taking off a piece that includes some of the white pith (about 1/4-inch thick).  Continue, until all of the oranges have been peeled.  Lay the pieces on a cutting board and slice them lengthwise into 1/4-inch pieces
2.  Fill a medium saucepan with water.  Over high heat bring the water to a boil.  Add the orange peels and boil for 5 minutes.  Strain the peels and discard the water.  Fill the saucepan with fresh water and again bring it to a boil.  Add the peels and boil for 5 minutes.  Strain.  Repeat this process of boiling the orange peels 2 more times, each time with fresh water.  This will remove the bitter flavor from the peels.
3.  In a clean medium saucepan dissolve 2 cups of the sugar in the 1 1/2 cups water and the lemon juice over medium-low heat.  Add the orange peels and cook until all the peels are translucent, about 1 to 1 1/2 hours.
4.  Strain the orange peels and place them, so they are not touching, on a wire rack.  Let sit overnight to air-dry.
5.  Toss the citrus peels in the remaining 1/4 cup sugar, coating them thoroughly.

• Store peels in an airtight container at room temperature.


TAKE a LOOK:


2 Comments

Another Birthday Party | Another Cake

11/16/2010

6 Comments

 
Picture
     I am finished, I think, with planning birthday parties and baking birthday cakes -- at least for the month of November.  After having my father here for his 90th birthday celebration early in the month, I just undertook a very big surprise party for my husband's birthday. (Also a big one.) 
     You reach a point where you cannot eat any more buttercream frosting.  I am now at that point.
Picture
     This is, in my mind at least, the best buttercream frosting on the face of the earth -- Mocha Buttercream from Francois Payard's cookbook, Simply Sensational Desserts. It is very difficult for me to keep my fingers out of this buttercream while mixing, and then frosting the cake. 
Picture
     I can't imagine using this buttercream on any type of cake other than chocolate -- and that's not saying you can't do otherwise.  I just happen to love the combination of chocolate and coffee and wouldn't consider serving it any other way.
     The dark chocolate cake recipe I go to frequently (find it here) is from the September 1996 issue of Gourmet Magazine.  I like it because... it's very, very GOOD!  and... it will make three 9-inch round cakes -- great if you're planning a party and are inviting a lot of people.
     The recipe for the Mocha Buttercream is shown below.  Upcoming posts will show how I used the remaining dark chocolate cakes ( I mixed up enough batter to give me six 9-inch rounds to work with!)  This 2 layer cake was decorated with copper-colored sugar stars and silver dragées that I brought back from Paris' La Grande Epicerie.  Toasted, sliced almonds are also extremely delicious sprinkled on this buttercream.      

                                    Mocha Buttercream
                    recipe from Simply Sensational Desserts by Francois Payard

• 5 large eggs
• 2 cups (400 grams) sugar
• 1 1/4 pounds (5 sticks) (567 grams) unsalted butter, softened
• 1 teaspoon (4 grams) pure vanilla extract
• 2 tablespoons (4 grams) instant espresso powder dissolved in 1 tablespoon (15 grams) hot water.

1.  In the large bowl of an electric mixer, using the whisk attachment, begin beating the eggs on medium speed.
2.  Meanwhile, combine the sugar and 1/3 cup (78 grams) water in a medium saucepan.  Bring to a boil over medium-high heat, stirring to dissolve the sugar.  Insert a candy thermometer into the pan and cook until the syrup reaches 243˚F.  With the mixer running, immediately pour the hot syrup down the side of the bowl into the eggs (avoid pouring the syrup onto the whisk, or it will splatter).  Increase the speed to medium-high and continue beating until the eggs are cool and have doubled in volume, about 7 minutes.
3.  Beat in the softened butter 1 tablespoon at a time (see note).  Increase the speed to high and beat until the buttercream is shiny and smooth, about 2 minutes.  Beat in the vanilla extract and the dissolved instant espresso.  The buttercream can be used right away or placed in an airtight container and refrigerated.  Bring to room temperature and beat with a whisk until smooth before using.
NOTE:  Buttercream sometimes has a tendency to curdle.  Here is a way to rescue it if the buttercream mixture should appear to separate at any point while you are adding the butter.  Stop beating the buttercream and heat 2 tablespoons (29 grams) of heavy cream in a small saucepan.  Whisk the hot cream into the buttercream to bring it together, then continue adding the butter.


  TAKE a LOOK:


6 Comments

SUNDAY MORNINGS at MY HOUSE - chocolate and ginger scones

3/20/2010

5 Comments

 
Picture
      I met two friends at my favorite coffee shop this past week.  Kopplin's is the only place I'll go in Saint Paul to drink a cappuccino if I'm not making myself one at home. Kopplin's cappuccinos are what I use as a benchmark when I make espresso and steamed milk every morning at 6 a.m.  And when I'm at Kopplin's, I'm probably also enjoying a pastry from Rustica, a bakery in Minneapolis that supplies Kopplin's with all of its delicious treats.
Picture
     This week I purchased a Chocolate and Ginger Scone that I ate long before my cappuccino was ready for pick-up at the counter.  You could say I "wolfed-it-down" in lighting speed.  This scone was so good it had me thinking about Chocolate and Ginger Scones all week.  When I found this recipe by Nancy Silverton, I knew the scones I'd make would rival the one I had eaten from Rustica Bakery. 
     
Picture
      In fact, right now my husband is having his morning cappuccino with one of the Chocolate Ginger Scones and said, "these are too good ".  He never raves about anything he's eating while drinking coffee and attempting to wake-up.  A comment like that is rare indeed.  That alone, tells you how good these scones taste.  I've made a few changes to the original recipe, reducing slightly the amount of crystallized ginger and adding chocolate chips.  Also, the dough seemed a bit dry to me after adding the 3/4 cup whipping cream so I added an additional 1 tablespoon cream.  The crystallized ginger was purchased at Whole Foods and I chopped it into a fine dice, then tossed with a sprinkling of sugar to help avoid clumping of the moist, sticky ginger before adding to the dough.

                               • Chocolate AndGingerScones •
                                      adapted from a recipe by Nancy Silverton
                                                 Bon Appétit  | January 2000


Yield: Makes 12 Scones
• 2 1/4 cups all purpose flour
• 1/3 cup sugar
• 1 tablespoon baking powder
• 1/4 teaspoon grated lemon peel
• 11 tablespoons chilled unsalted butter, cut into small pieces
• 3/4 cup plus 1 tablespoon whipping (heavy) cream
• 1/2 cup finely diced crystallized ginger
• 1/2 cup mini semi-sweet chocolate chips
• 2 tablespoons whipping (heavy) cream, additional for brushing on top of scones before baking

1.  Preheat oven to 400˚F.  Line a baking sheet with Silpat or parchment paper.
2.  Blend flour, sugar, baking powder and lemon peel in a food processor.  Add butter and pulse until mixture resembles coarse meal.  Transfer mixture to a large bowl.  Make well in the center; add the 3/4 cup cream.  Using a fork, stir until just moist.  If the dough seems dry, add the additional 1 tablespoon whipping cream.  Mix in the crystallized ginger and chocolate chips.  Gather the dough together and gently knead until smooth.  About 8 turns.  Divide dough in half; pat each portion into a 3/4-inch-think round.  Cut each round into 6 wedges and transfer to prepared baking sheet, spacing 1 inch apart.  Brush tops with remaining 2 tablespoons cream.
3.  Bake scones until light brown, about 18 minutes.  (Can be made 1 day ahead.  Cool completely.  Store in an airtight container at room temperature.  Rewarm in 350˚F oven before serving.)


5 Comments

Espresso Ice -- for hot summer days

6/29/2009

1 Comment

 
Picture

   If you are a frequent visitor of Passions to Pastry, you are probably aware of my great love of espresso.  I start off each and every morning with a strong, flavorful and rich cappuccino.  This Espresso Ice is another wonderful way to enjoy coffee -- especially on a hot summer day.  I top it off with freshly whipped cream that is sweetened with confectioners' sugar and a touch of brandy.

                                             Espresso Ice
                                    adapted from a recipe by Lee Bailey

• 3 cups of hot, freshly brewed, strong coffee
• 3 tablespoons sugar
• 5 strips of organic orange peel

   In a medium bowl, combine the hot coffee with the 3 tablespoons sugar.  Stir to combine.  Add the strips of orange peel; cool.  Cover the bowl and refrigerate until cold.  Freeze in an ice cream machine.  Serve with whipped cream that has been flavored with brandy, Grande Marnier, or Kahlua.

Picture


1 Comment

MY FAVORITE ESPRESSO

2/22/2009

2 Comments


I can't imagine starting my day without a cappuccino.  Two years ago I invested in a Pasquini Livia, an Italian espresso machine.  It is a purchase I thought long and hard about, and one I have never regretted.  The preferred way to drink my cappuccino is alone with the newspaper.  Occasionally I break down and make myself one while I am still running around the house in the morning, making sure the "Frenchie" is fed and my daughter has everything she needs before leaving for school.  That is a mistake.  The cappuccino is gone and I have little memory of it.  I sampled and researched for months and have finally come up with a blend of beans I consider perfect.  I am fortunate to live close to DUNN BROS COFFEE, a local roaster, in St. Paul.  I initially went there for their "espresso" blend, but for me it was too strong and burnt-tasting.  A young man was working the bean counter one day when I mentioned this and he suggested I try combining the same beans he does for his espresso -- half Kenya and half Sumatra.  The Kenyan bean flavor is described as "rich with black currant, licorice, and ripe apricot tartness; the Sumatran, "rich deep and lasting, slight sweetness and warm earthiness complete the finish".  I haven't changed this combo in over a year, and unfortunately, I have never seen the young man again to let him know how much I liked his suggestion.  In my mind, it's the perfect mix.


2 Comments
<<Previous
Forward>>
    Picture


    Picture
    Picture
    Enter your Email

    Preview | Powered by FeedBlitz


    Categories

    All
    Amana
    Appetizers
    Beef
    Breads
    Breakfast
    Cakes
    Chocolate
    Condiments
    Cookies
    Daring Bakers Challenge
    Desserts And Sweets
    Drinks
    Eggs
    Espresso
    Etcetera
    Fish
    French Bulldogs
    Friday Night Dinner
    Fruit
    Germany
    Gratins
    Great Kitchens
    Grilling
    Ice Cream
    Lamb
    Main Dishes
    Muffins
    My Garden
    My Kitchen Renovation
    New Years Day Brunch
    Paris
    Pasta
    Pork
    Poultry
    Provence
    Restaurants
    Rhubarb
    Rice
    Salads
    Scones
    Seafood
    Side Dish
    Soup
    Sunday Mornings
    Sweet And Savory Tarts
    Thanksgiving
    Tomatoes
    Vegetables
    Vegetarian

  • Home
  • PAINTINGS
  • About
  • Passions-to-Pastry Blog
  • Contact
  • Recipes