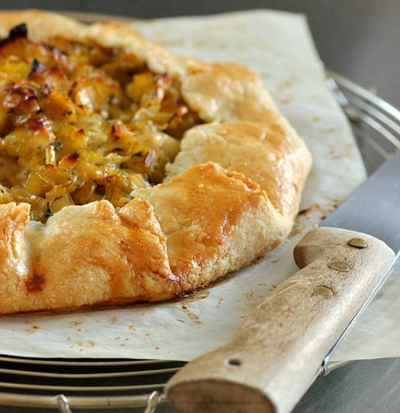
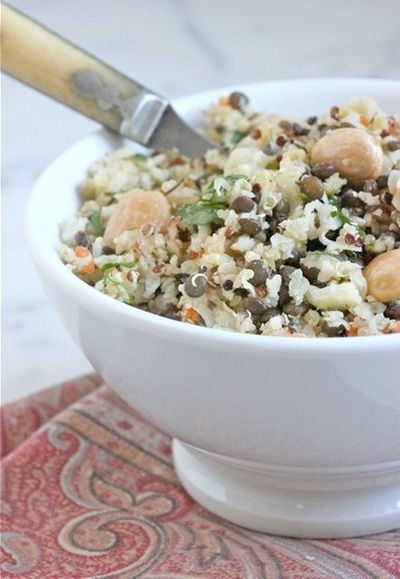
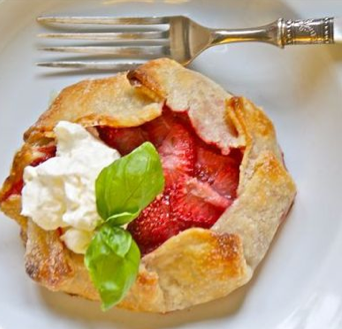
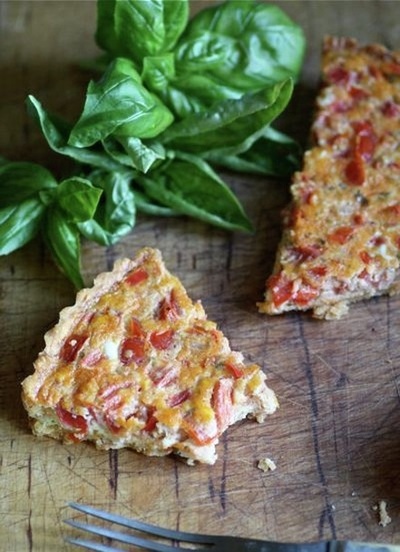
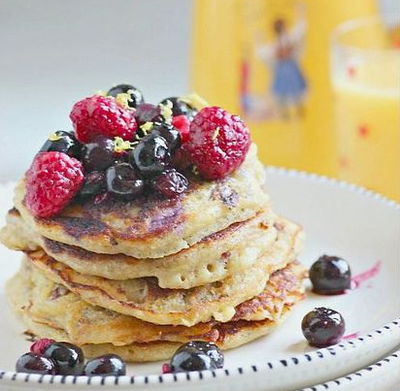
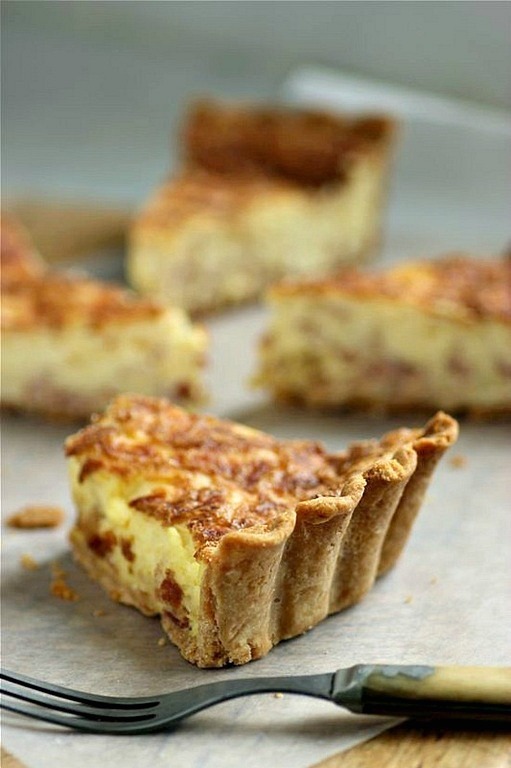
 I am extremely fond of all things custard; possibly fueled by my aunt's baking of sweet custard pies for me when I was very young. If I order dessert after a restaurant meal, I will choose Crème Brulée over anything else on the menu -- always. 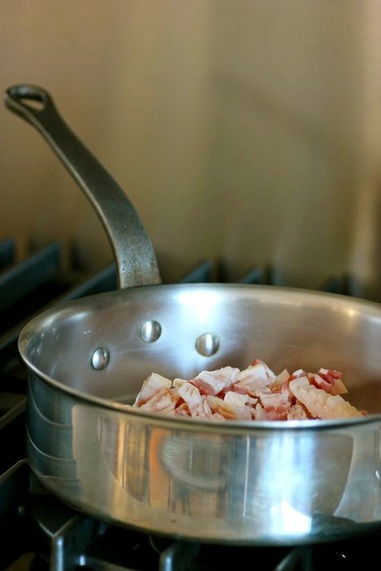 When I made my favorite Quiche Lorraine recipe the other night, I pleaded with my daughter to take a bite. Pleaded and begged, because my daughter is not a bacon eater. She did, however, give it a try and agreed... it's the best. The custard filling in this classic Quiche Lorraine is the creamiest you could ever imagine. I started joking about opening a small (and certainly successful) café called Quiche. My daughter countered with, Just Quiche. I ended with, Just One Quiche... this one, and nothing more. 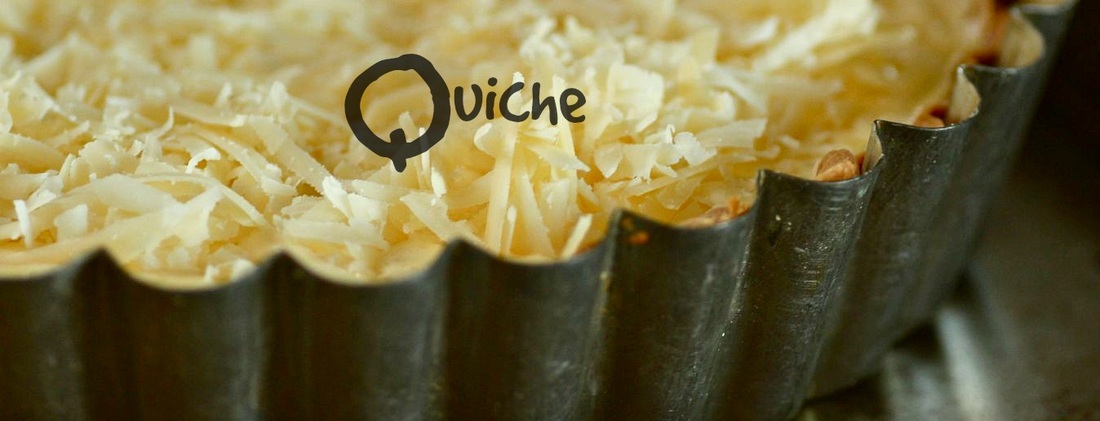 Quiche Lorraine • 1 partially baked deep, 9-inch tart crust, recipe follows • 12 ounces apple-smoked bacon, cut into 1/2-inch pieces • 6 large, organic eggs • 2 8-ounce jars of crème fraîche, recipe follows • 1/2 teaspoon kosher salt • 1/8 teaspoon freshly grated nutmeg • 5 ounces grated Gruyère cheese 1. Preheat the oven temperature to 375˚F. 2. In a medium skillet, cook the bacon until just crisp. Transfer to a paper towel and drain. 3. In a medium bowl, whisk the eggs; add the crème fraîche, salt, and nutmeg and whisk to blend. Slowly pour the egg custard into the partially baked tart crust. Sprinkle the cooked bacon on top and then cover with the grated Gruyère. 4. Place the tart pan on the middle rack of the oven and back for 40 minutes, or until the filling is just barely set. 5. Allow the quiche to rest for about 5 minutes before slicing. 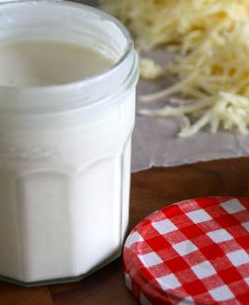 Crème Fraîche • 1 pint heavy cream (do not use ultra-pasturized) • 4 tablespoons buttermilk Using 2 jars with lids (I like the French Bonne Maman jam jars), divide the buttermilk and then the heavy cream equally between the two. Secure the lids, then set the jars on your kitchen counter at room temperature for 24 hours; refrigerate. You will need to plan ahead and begin the Crème Fraîche at least 2 days ahead of making the quiche. Tart Crust • 1 1/2 cups unbleached, all-purpose flour • 1/2 teaspoon kosher or sea salt • 8 tablespoons very cold, unsalted butter, cubed • 4 tablespoons ice water 1. In the bowl of a food processor, pulse the flour and salt. Add the butter and pulse until the butter is the size of small peas. Slowly add the ice water, pulsing the mixture until the dough just comes together. Transfer the mixture to a large piece of plastic wrap, press the dough into a disc and wrap. Refrigerate for about 2 hours. 2. Remove the dough from the refrigerator and place on a sheet of waxed paper dusted lightly with flour. Dust the top of the dough lightly with a bit more flour, then cover with plastic wrap. Roll the tart dough into a large circle. Transfer the dough to a 9-inch deep dish tart pan with a removable bottom, and gently press the dough into the bottom and up the sides. Using the rolling pin, trim the dough along the edge of the tart pan. (If you have any breaks in the tart crust, use remnants of dough to patch holes). Place the dough-lined tart pan in the freezer while you preheat the oven to 400˚F. 3. When ready to bake the crust, remove the tart pan from the freezer and line with foil. Fill the tart pan with dried beans or rice and place the pan on the middle rack of the oven. Bake for 15 minutes; carefully remove the foil and beans or rice. (Check again for any small cracks before adding the custard and baking and patch before the final bake). Return the tart crust to the oven and continue to bake until it is dry and light golden. Remove from the oven. It is now ready to fill with the custard. TAKE a LOOK:
1 Comment
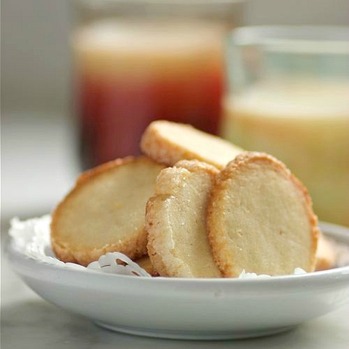
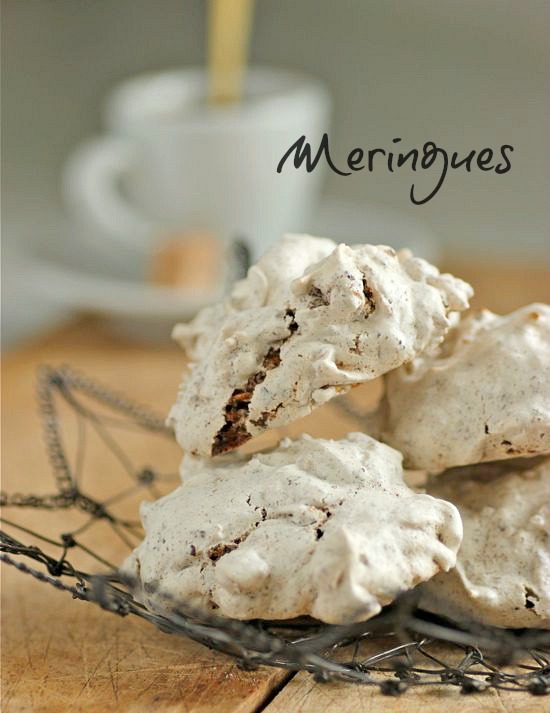 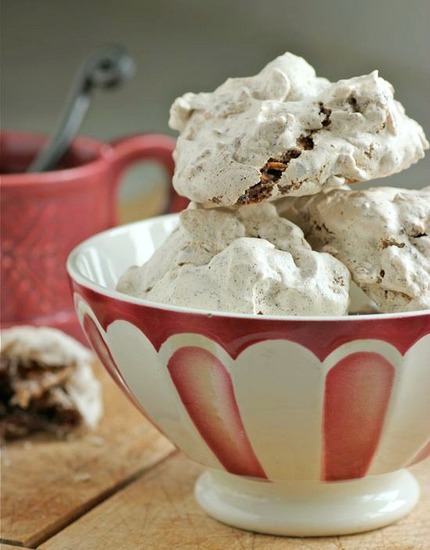 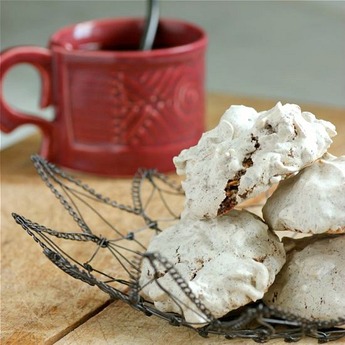  + a recipe from Saveur | December 2014 • 4 egg whites (1/2 cup) • 1 cup granulated sugar • 4 1/2 ounces semi-sweet chocolate, finely chopped • 3 cups cornflakes (preferably organic) • 1 teaspoon pure vanilla extract 1. Preheat oven to 300˚F and line two baking sheets with parchment paper. 2. Using a stand or handheld mixer, begin whipping the egg whites at medium speed and when frothy, slowly add the sugar. Increase speed to high and continue to whip until you have firm peaks. By hand, fold in the cornflakes, chopped chocolate, and vanilla. 3. Drop meringues in 1 tablespoon mounds, with 1-inch spaces between, onto prepared baking sheets. Bake cookies for 20 minutes total, switching baking sheet positions after 10 minutes. Remove from oven and cool on a baking rack. TAKE a LOOK: 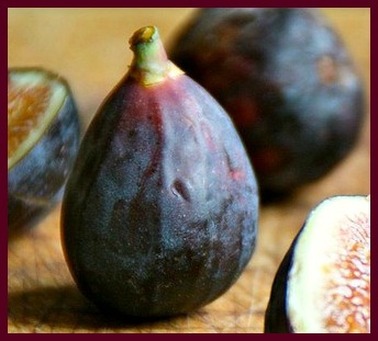

This time of year, I cannot walk past a carton of figs without picking one up and bringing it home with me. I am still trying to figure out how to grow them in Minnesota. Yes, I know... that probably won't happen. But the New York Times article, Italy to Brooklyn, Fig by Fig, gives me faint hope. 

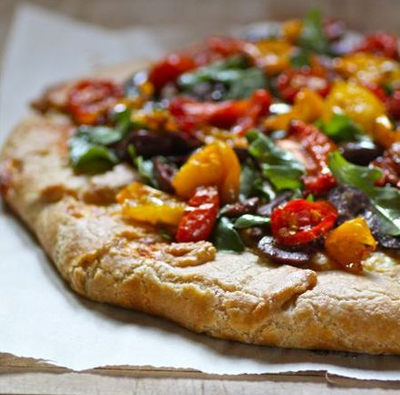
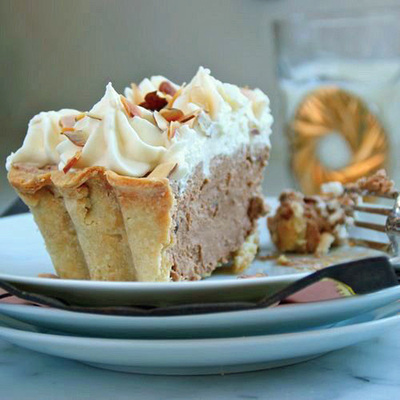
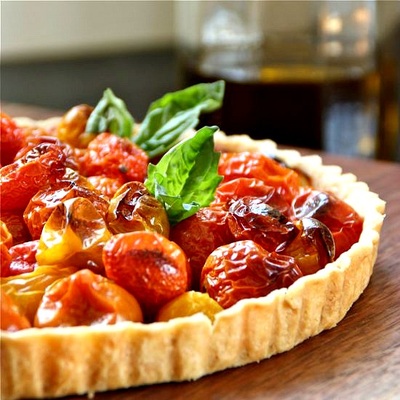
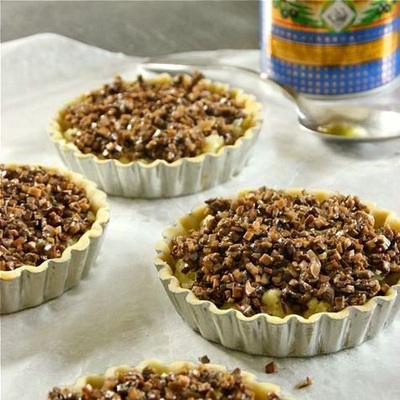
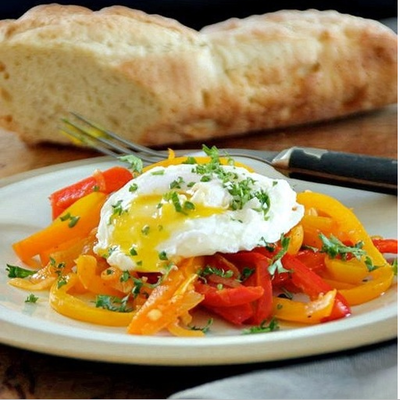
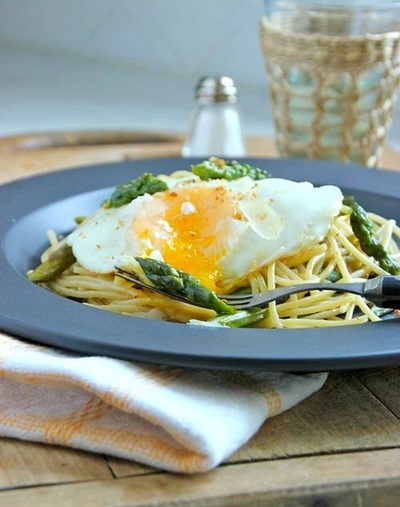
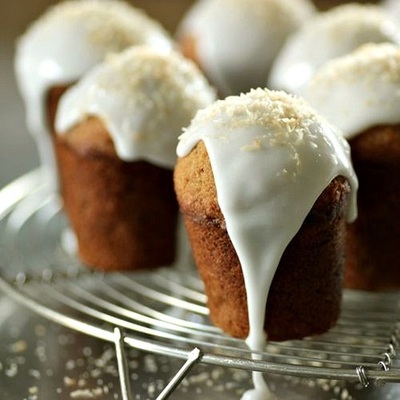
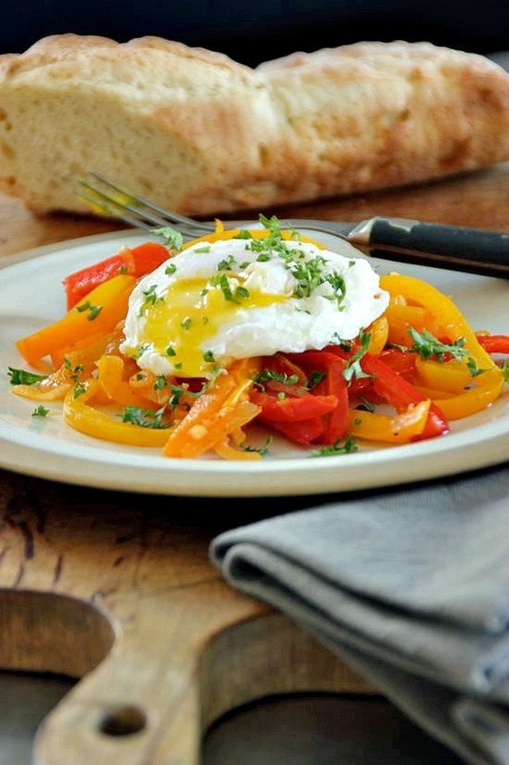
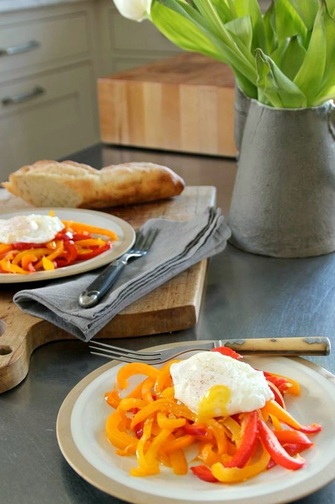
• recipe from Matthew Accarinno PORT CREAM • 1/2 cup ruby or tawny port • 2 tablespoons granulated sugar • One 3-by-1-inch strip of orange zest • 1/2 cup heavy cream CLAFOUTIS • 1 cup half-and-half • 1/2 cup granulated sugar, plus more for the baking dish • 2 large eggs • 2 teaspoons pure vanilla extract • 1/2 teaspoon finely grated orange zest • 1/4 teaspoon salt • 1/4 cup plus 2 tablespoons all-purpose flour • Melted butter, for the dish • 3/4 pounds fresh Black Mission figs, halved lengthwise • Confectioners' sugar, for dusting 1. Combine the port, sugar, and orange zest in a small saucepan and bring to a boil. Reduce the heat and simmer until reduced by half. Transfer the mixture to a small bowl and let cool. Remove the orange zest and refrigerate syrup. 2. Combine the half-and-half, 1/2 cup granulated sugar, eggs, vanilla, 1/2 teaspoon grated orange zest, and salt in a blender container. Add the flour in 3 parts, pulsing for 10 seconds after each addition. Let the mixture rest for 30 minutes. 3. In the meantime, make the port cream. Place the 1/2 cup heavy cream in a medium bowl and either whisking by hand or using an electric mixer, beat until cream thickens. Drizzle in 1 1/2 tablespoons (I probably used 2 1/2 tablespoons) of the reduced port syrup and whisk until you have soft peaks. Refrigerate the whipped cream and remaining syrup separately. 4. PREHEAT OVEN to 425˚F. Brush a 9-inch cast iron skillet or baking dish with melted butter; dust with sugar. Pulse the custard mixture once again and pour into the prepared skillet or dish. Arrange the figs in the skillet, cut side up. 5. Place skillet on the middle rack of preheated oven and bake for 15 minutes. Reduce heat to 375˚ and continue to bake for an additional 20 to 25 minutes, or until the custard filling is just set and light golden. 6. Allow the clafoutis to cool for 5 minutes, then dust with Confectioners' sugar. To serve, drizzle a little port syrup over individual slices of clafoutis and top with a dollop of whipped port cream. TAKE a LOOK:  Beans, beans, and more beans... we've been eating them practically every night now for weeks. I should plant my beans in stages; not three packages of seeds all at once. I say this every year, but I continue to do as I've always done. Would someone please remind me next spring not to do this? 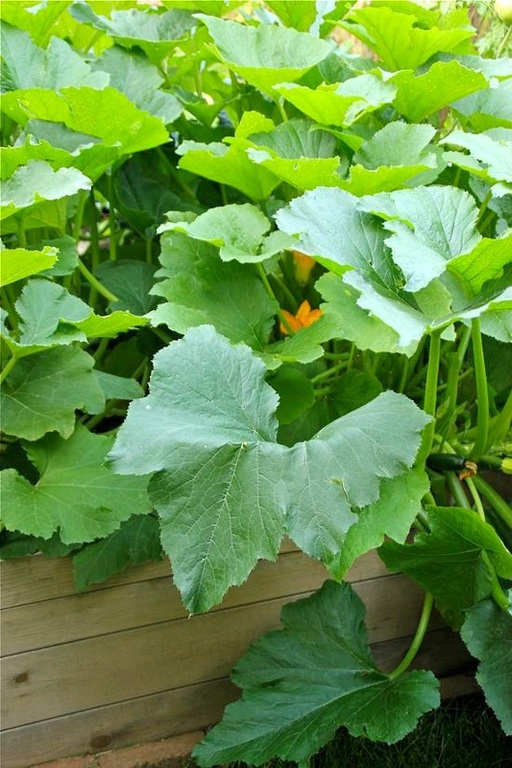 At least this week my entire garden has finally begun producing! I now have tomatoes, cucumbers, beets, jalapeños, and zucchini ready for the picking, giving me a more diverse dinner menu! I probably devote too much of my garden to zucchini plants, with their huge leaves invading the other vegetables in my garden. But I love them and can make breakfast breads, pancakes, stuffed zucchini boats... and more. Tonight I made Zucchini and Tomato Quiche; a recipe from the Parisian pâtisserie of Gérard Mulot. 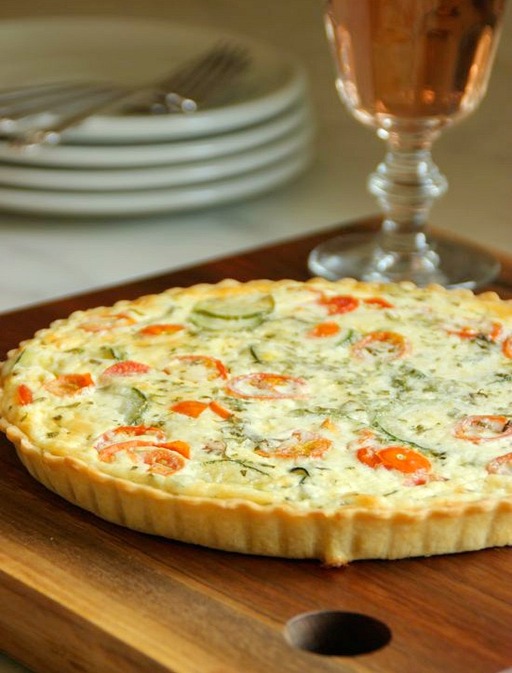 This recipe calls for Crème Fraîche, as many savory French custard tarts do. I've always made my own (recipe HERE) but only occasionally, when needed. I seem to be using it more and more, and now have Crème Fraîche on hand at all times. If you like baking French clafoutis this time of year when fresh cherries and berries are plentiful, you should be doing the same. This creamy tart's leftovers make a great breakfast! 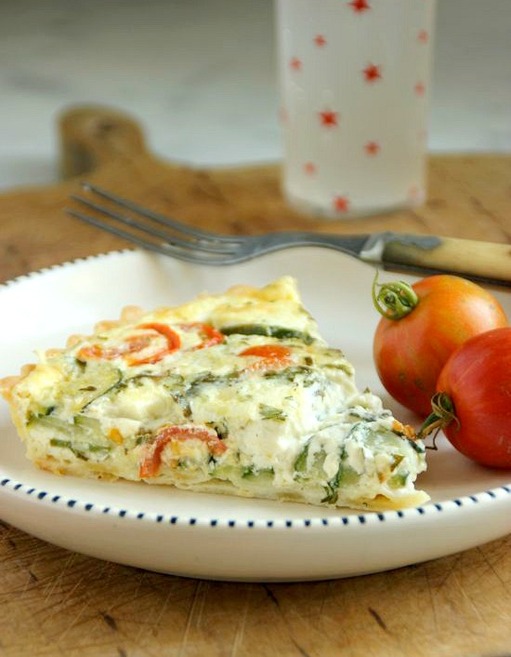 • • • Zucchini and Tomato Quiche • • • adapted recipe from Paris Boulangerie Pâtisserie by Linda Dannenberg NOTE: I always fully bake my tart crusts before filling with custard. The original recipe calls for a partially baked, pale golden crust. It's your call... • 1 recipe Pâte Brisée baked blind in a 10 1/2-inch-to-11-inch tart pan with a removable bottom (recipe HERE) • 2 small zucchini, rinsed, ends trimmed, and thinly sliced • 2 tablespoons unsalted butter • 1 small garlic clove, minced • Salt and freshly-ground black pepper • 2 large eggs • 1 cup whole milk • 3/4 cup crème fraîche or heavy cream • 2 fresh basil leaves,chopped • a sprig fresh cilantro, chopped • 1 ripe plum tomato, cored, seeded, and cut into small dice (I used several cherry tomatoes from my garden) PREHEAT OVEN to 400˚F 1. Blanch the zucchini slices in salted, boiling water for 3 minutes; immediately drain in a colander and run under cold water to stop the cooking. Shake zucchini to remove as much water as possible, then turn out onto several layers of paper towels; pat dry. 2. Heat the butter in a medium skillet over medium heat. Add the zucchini and minced garlic; season with salt and pepper. Sauté for 5 minutes, using a metal spatula to frequently turn the zucchini. Do not allow zucchini to brown. 3. In a medium size bowl, whisk to combine the eggs, milk, crème frâiche, basil, and cilantro; season to taste with salt and pepper. 4. Scatter the zucchini slices evenly over the bottom of the tart crust. Sprinkle diced tomatoes evenly over the top of the zucchini. Slowly pour the custard over the tomatoes and zucchini. If you cannot pour all of the custard into the tart shell, begin adding additional custard by spoonfuls after 5 minutes of baking, until it is all used up. 5. Bake until the custard is just set and the top is beginning to turn golden, approximately 30 minutes. Let cool slightly, then remove tart ring. Serve tart warm or at room temperature. TAKE a LOOK: 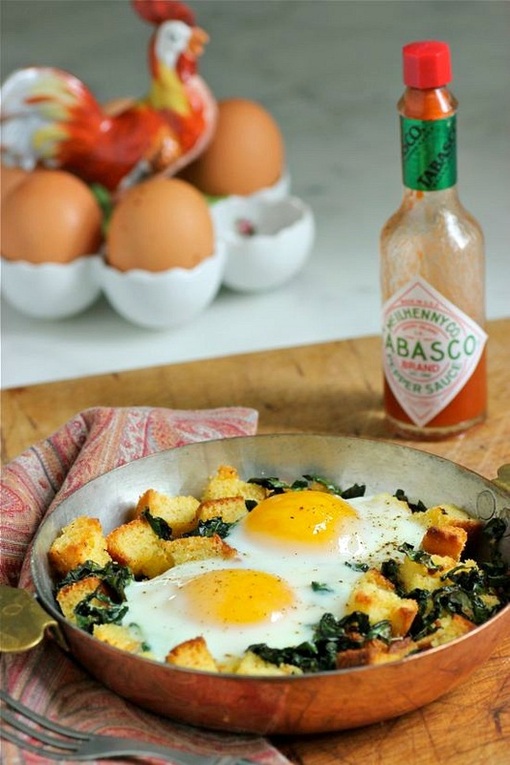 Breakfast this morning was -- no big surprise -- EGGS. I believe, if there's a fried or poached egg on top of something, that something is only made better! These eggs are baked upon creamy kale from my garden and cubes of sweetened cornbread that crisp up a bit when in the oven. I was told that the only thing that could make this meal any better is a glass of crisp, white wine... I think that would now make this lunch! 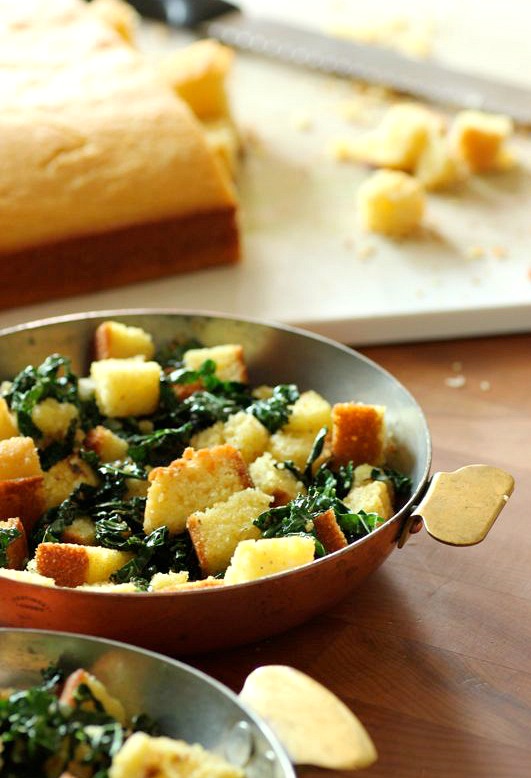 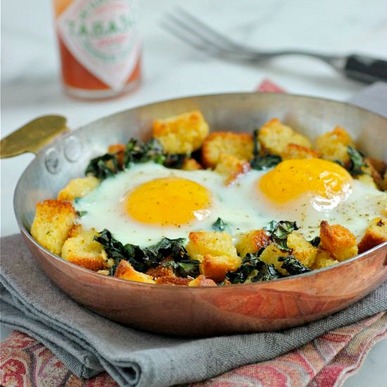  2 SERVINGS • Olive oil, for skillet • 1/4 cup finely diced onion • 4 cups chopped kale, center stem removed • 1/4 cup heavy cream • 2 cups cubed (1/2-inch) cornbread (recipe HERE) • Tabasco • 4 organic eggs • Salt and freshly ground pepper PREHEAT OVEN to 375˚F 1. Warm a hefty drizzle of olive oil in a large skillet over medium-low heat. Add the onion and sauté until softened and beginning to turn golden. Add kale to the skillet and continue to cook, stirring occasionally, until wilted. Season with salt and pepper. 2. Remove skillet from heat and stir the heavy cream into the kale mixture. Add about 5 to 6 drops (more or less depending on the amount of heat you want) of Tabasco. Fold in the cubed cornbread. 3. Transfer mixture to two greased 6-inch baking dishes or one larger baking dish. Using the back of a spoon, press wells into the kale mixture and fill with the cracked eggs. 4. Place baking dishes on a sheet pan and transfer to middle rack of oven. Bake for 18 to 20 minutes, or until the eggs are just set and yolks still runny. Sprinkle eggs with a little salt and a grinding of pepper. Serve immediately. TAKE a LOOK: 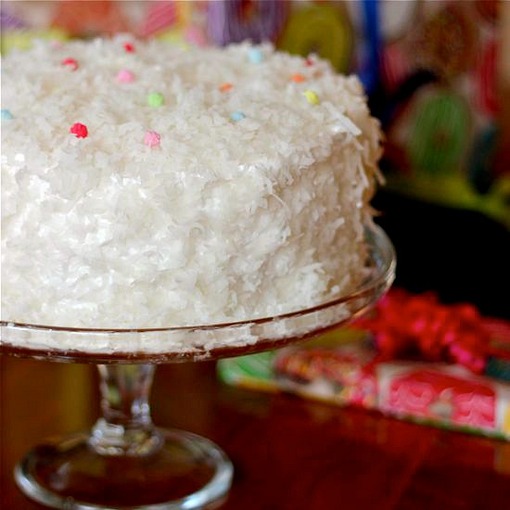 Well... it finally happened. Claire turned 21! She's in a good place right now; loves her school and her classes. One more year of study left and an exciting future ahead. Claire's plans include teaching in France for a year, then returning to the U.S. to become an elementary school teacher in a French Immersion school. If any one can make their dreams happen, it will be Claire. She astounds me daily with her creativity and enthusiasm.  Dinner out and gifts with family were followed by friends and neighbors joining us for cake and ice cream. Claire asked for a coconut birthday cake. I was shocked by the request. She never liked coconut... but apparently, her tastes have changed (in a good way). Shocked but thrilled. I have been wanting to make Thomas Keller's over-the-top recipe for some time... I now had the perfect reason to make his coconut cake rounds floating between billowy mounds of Italian Meringue. This cake is fabulous! Two things... 1. One of the ingredients in the cake batter is mayonnaise. Trust me on this -- Thomas Keller doesn't use Kraft Mayo from a jar. I made my own, from scratch. 2. The recipe calls for coconut extract. Pure coconut extract is not available in the Twin Cities; after an exhaustive search, all I could find was imitation extract, so I left it out of the cake. It is available on-line. If you want to use it, do so, but the cake will be delicious without it. One other thing... I've adjusted the temperature for the sugar syrup in the Italian Meringue. The recipe called for 250˚ on a candy thermometer. I've changed that to 235˚. Trust me on this, too. 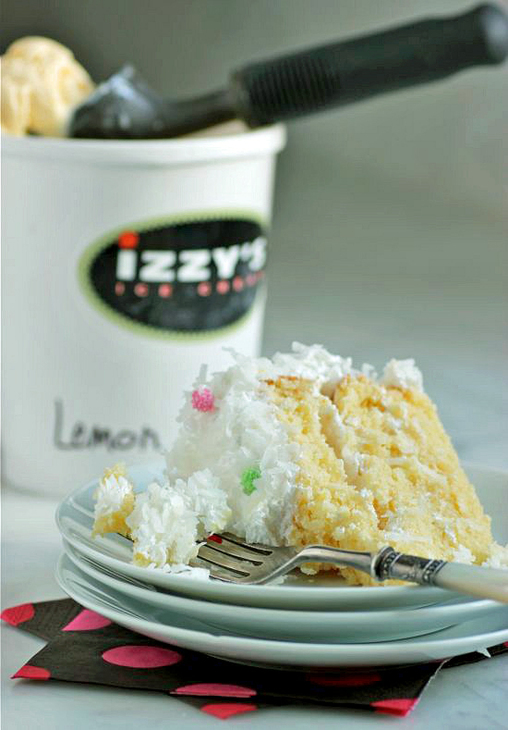 A cake like this deserves the best ice cream you can find. I bought a quart of Lemon Custard from local producer IZZY'S. It was the perfect match. 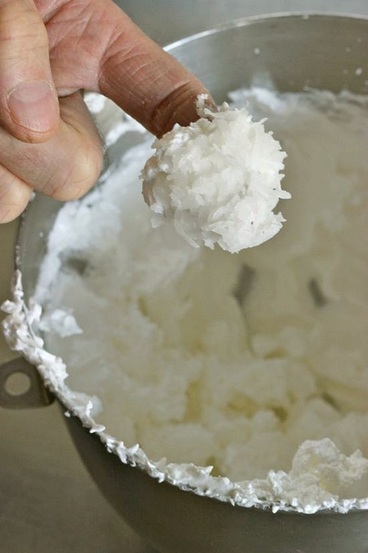 And fortunately, I made two batches of the Italian Meringue since my husband couldn't keep his fingers out of it. 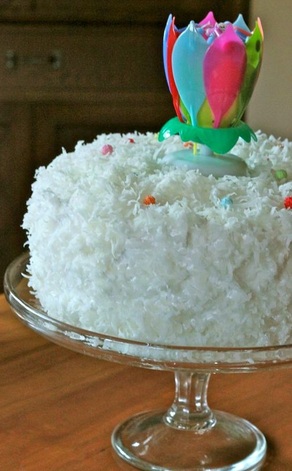 My plans for documenting, by video, the flower petals opening to reveal lighted candles swirling to a recording of "Happy Birthday" were thwarted when it created a fireworks event in my dining room that almost took out the light over the table (not to mention my husband's arm and numerous paper napkins surrounding the cake stand). Everyone who suggested doing this outdoors apparently knew what they were talking about.   • slightly-adapted recipe | Saveur, January 2014 (I have altered the temperature for the sugar syrup in Italian meringue) FOR THE CAKE: • Unsalted butter, for greasing • 2 cups flour • 1 cup desiccated coconut (I used unsweetened, purchased at Whole Foods) • 1 teaspoon baking powder • 1 teaspoon kosher salt • 1 1/2 cups sugar • 3 eggs, separated • 1 1/4 cup mayonnaise (please, do not use purchased) recipe below • 3/4 cup coconut milk • 1/2 cup, plus 1 tablespoon buttermilk • 2 teaspoons coconut extract (do not use imitation -- leave our if pure is not available) • 2 teaspoons vanilla extract FOR THE MERINGUE: • 6 egg whites • 1 2/3 cups sugar • 2 cups sweetened shredded coconut 1. Make the cake: Heat oven to 325°. Grease three 9" cake pans with butter and line with parchment paper; set aside. Whisk flour, desiccated coconut, baking powder, and salt in a bowl; set aside. Place sugar and egg yolks in the bowl of a stand mixer fitted with a paddle attachment; mix until fluffy. Add mayonnaise, coconut milk, buttermilk, coconut and vanilla extracts; mix until combined. With the motor running, slowly add dry ingredients until batter forms; transfer batter to a bowl and set aside. Clean stand mixer bowl and add egg whites; replace paddle with whisk attachment. Whip whites until soft peaks form; fold into cake batter. Divide batter between prepared pans, smoothing tops with a rubber spatula; drop pans lightly on a counter to expel large air bubbles. Bake until a toothpick inserted in middle comes out clean, about 25 minutes. Let cakes cool for 20 minutes in pans; invert onto wire racks and let cool. 2. Make the meringue: Using an electric stand mixer, beat egg whites in a bowl until medium-stiff peaks form, 5–7 minutes; set aside. Bring sugar and ¼ cup water to a boil in a 2-qt. sauce pan fitted with a candy thermometer; cook, without stirring, until temperature reaches 235˚, 4–5 minutes. With the mixer on low, slowly drizzle hot syrup into egg whites until combined. Increase speed to high; beat until meringue forms stiff peaks, about 3 minutes more. Assemble the cake: Place one cake layer on a cake stand and spread 3 cups meringue over cake; sprinkle with ¼ cup coconut. Repeat with second layer. Place remaining layer on top; cover top and sides with remaining meringue and cover outside of cake with remaining coconut, pressing lightly to adhere. Chill cake 30 minutes to firm meringue; serve chilled or at room temperature. HOMEMADE MAYONNAISE + adapted recipe from Cooking for Engineers • 2 large egg yolks • 3 tablespoons lemon juice • 1/4 teaspoon salt • 1 cup canola oil 1. In a medium-size bowl, whisk together the egg yolks, lemon juice, and salt until smooth and light. 2. Secure the bowl by wrapping a dish towel tightly around the base. You want the bowl to be stationary while whisking in the oil. 3. This is a very slow process. Whisk the oil, a few drops at a time, into the mixture. Make sure the mixture is smooth and well integrated before pouring the next few drops of oil. "The whisking will suspend the oil into the yolk mixture and adding the oil a little at a time will keep the mixture in a state of emulsion - which is what you want." 4. After about 1/3 cup of oil has been whisked in, you can speed up the pouring a bit. Make sure the mixture is back in emulsion before pouring any additional oil. Once all the oil has been whisked in, you have mayonnaise. 5. Refrigerate mayonnaise until needed. This recipe will give you just enough mayonnaise for the cake recipe. TAKE a LOOK: 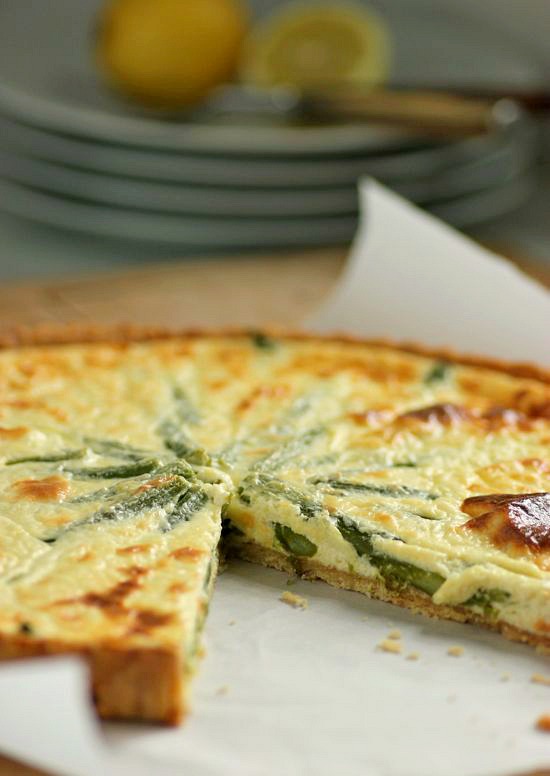 I would never consider myself a picky eater, but growing up I was not fond of asparagus and refused to eat it. I vaguely remember my mother boiling the life out of the tender spears... maybe that was the reason I couldn't stomach it. I'm crazy about asparagus now, however, due in part to these recipes. And I have my fingers crossed that three times a charm. Having struggled for years to grow asparagus in my vegetable garden, I made my third (and final) attempt to plant last year. I'm now waiting to see if it pokes through the ground this spring.  This Lemony Ricotta Tart with Asparagus is perfect for a spring bunch. Invite some friends over to celebrate the end of winter! And consider doing what a restaurant in Prague does to welcome asparagus season. Plan each course around the vegetable. It's a meal my husband had several years ago when he was in Prague on business. His dessert? Asparagus sorbet.   • Pâte Brisée for 11-inch tart pan (recipe below) • 1 pound asparagus • 2 large eggs • 1/2 pound fresh ricotta (if necessary, drained of any liquid) • 1/2 cup freshly grated Parmesan • Grated zest of 1 small organic lemon • 1 tablespoon fresh lemon juice • 1/2 cup heavy cream • 1/2 teaspoon salt 1. Prebake tart shell following recipe below. Reduce oven temperature to 375˚F. 2. In a large sauté pan, gently boil asparagus until just tender, approximately 4 minutes. Drain and wrap asparagus in a dish towel. Set aside. 3. In a medium-size bowl, combine the eggs, ricotta, Parmesan, lemon zest, and lemon juice. Whisk by hand until mixture is smooth. Stir in the heavy cream and salt. 4. Trim asparagus to roughly 4 1/2-inches and arrange in a spoke pattern on the crust. Use leftover trimmings to fill spaces inbetween the spears. Pour the cheese mixture over the asparagus and transfer tart to the middle rack of preheated oven. Bake for 25 to 30 minutes, or until tart is set. Remove from oven and allow to rest for several minutes. Unmold and serve warm or at room temperature. Pâte Brisée • 1 1/2 cups flour • 1/2 teaspoon salt • 8 tablespoons very cold unsalted butter, cut into cubes • 4 tablespoons ice water 1. Place the flour and salt in the bowl of a food processor and pulse to combine. Add the cold butter and pulse until you have tiny pieces of butter about the size of peas throughout. Pour the ice water in slowly and pulse just until the dough starts to come together. You may need a bit more or a bit less ice water. 2. Turn the mixture out onto a piece of plastic wrap and press into a disc. Wrap and chill for at least 2 hours. 3. Roll dough thinly to fit into an 11-inch tart pan with a removable bottom. Wrap in plastic and place in your freezer while you are preheating the oven. 4. Preheat the oven to 400˚F. When the oven is hot, line the pastry shell with foil and fill with rice or dried beans to keep the pastry from puffing-up during baking. Place the tart shell on a baking sheet and bake on the middle rack of the oven for 15 minutes. Remove the foil and rice or beans and return the tart shell to the oven and continue to bake until golden brown. (Watch closely) TAKE a LOOK: 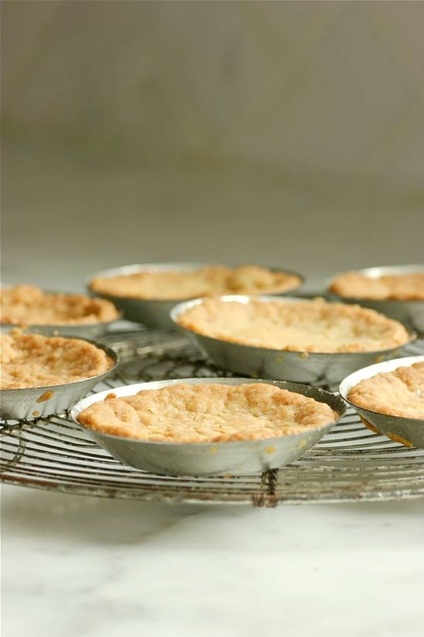 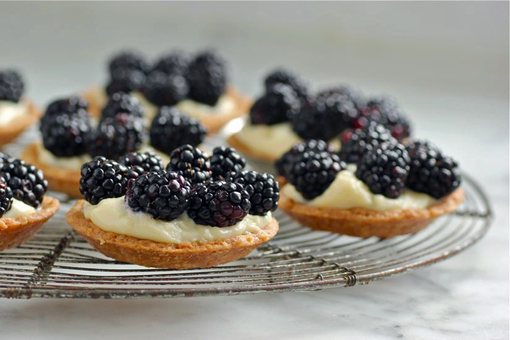 This brown butter pastry goes against everything I know to be true in creating a deliciously delicate tart crust. The butter is baked in the oven until it begins to brown. The flour is the last ingredient to be added. The warm dough is pressed into the tart pans. It's unlike any tart crust I have ever made. And... these tarts were incredible! After assembly, chill the tarts. The combination of the brown butter pastry, the cold pastry cream, and the juicy blackberries is divine. You will thank me... 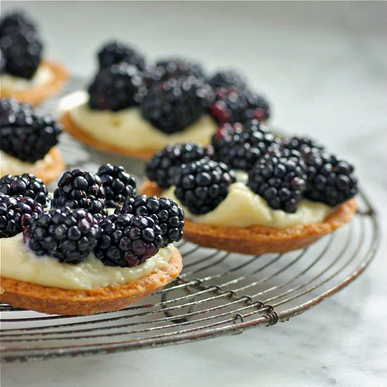   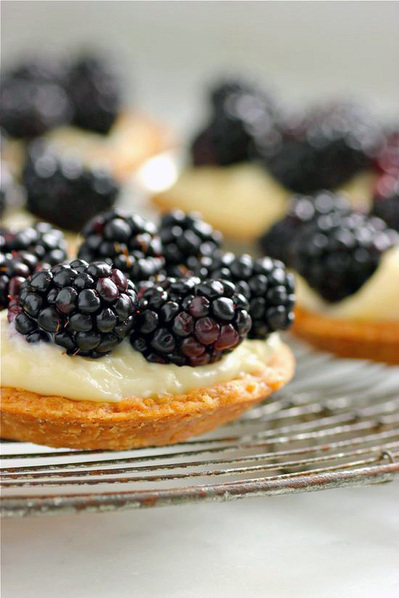 • The recipe below is for five 4-inch tarts. I substituted eight 3-inch molds when making my tarts and slightly less than 1 pint of blackberries. for the crust: • 6 tablespoons unsalted butter, cubed • 3 tablespoons water • 1 tablespoon canola oil • 1 tablespoon sugar • 1/8 teaspoon kosher salt • 1 cup flour for the filling: • 1/4 cup sugar • 3 tablespoons cornstarch • 1 tablespoon flour • 1/8 teaspoon salt • 3 egg yolks • 1 1/2 cups milk • 2 tablespoons butter, cubed and chilled • 1 teaspoon vanilla extract • 5 cups blackberries 1. To Make the Crust: Preheat oven to 400˚F. Combine butter, water, oil, sugar, and salt in a heatproof bowl; bake on middle rack of oven until butter is bubbling and lightly brown around the edges of the bowl -- about 20 minutes. 2. Remove from the oven and add the flour, stirring until the dough comes together. Press dough onto the bottom and up the side of five 4-inch tart pans with removable bottoms (or one large 9-inch tart pan -- or eight 3-inch tart molds as I did). Using a fork, prick dough all over. (I found it necessary to continually pierce the base of the tart dough during baking to prevent the dough from rising up. A solution would be to chill the dough-lined tart pans, then press foil onto the crust and fill with dried beans or rice before baking). Bake until cooked through and golden brown, 10 to 15 minutes. Cool completely before filling. 3. To Make the Filling: Whisk sugar, cornstarch, flour, salt, and egg yolks in a 4 quart saucepan until smooth. Stir in the milk and place pan over medium-low heat; cook, stirring constantly, until thickened. Remove from heat and whisk in the butter until melted and smooth. Stir in the vanilla extract and transfer to a bowl. Cover the pastry cream with plastic wrap, pressing it directly onto the surface. Refrigerate until cold, at least 2 hours. 4. To Serve: Spread pastry cream evenly over the tart shells. Place blackberries on top. Refrigerate until ready to serve. TAKE a LOOK: 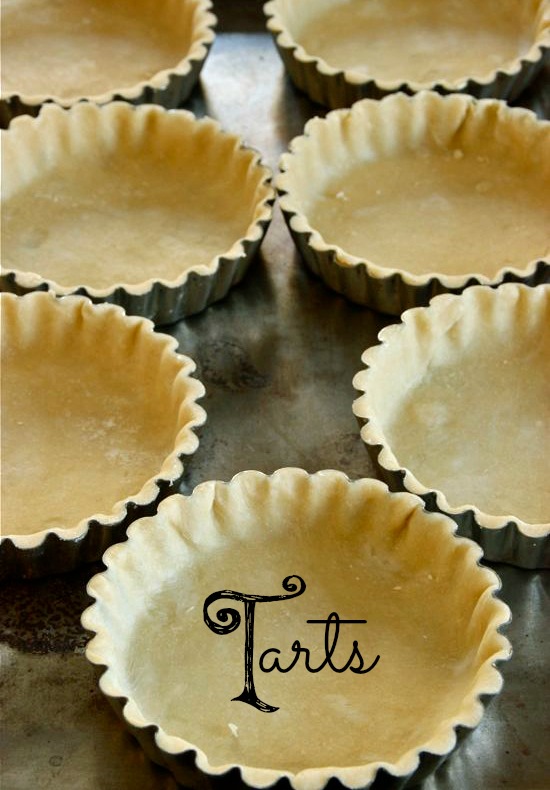 If you've been following Passions to Pasty for a while, you know how much I love making tarts. It's my favorite thing to do in the kitchen. Hardly a week goes by that I do not bake a sweet or savory tart. Today I made individual Prosciutto, Ham, and Gruyére Tarts -- tres à la Francaise! The recipe is from the short-lived magazine, TASTE, by Williams-Sonoma. I've held onto the all-things-French, Fall 2002 special issue, "Paris in the Fall", and still peruse it regularly. Why I sat on this recipe so long, I'll never know. Anything made with crème fraîche is a winner...  And speaking of tarts... if you happen to be in Europe this spring, check out the German desserts magazine, Sweet Dreams. My photo and recipe for Pink Grapefruit and Meringue Tarts is featured in the quarterly publication. 
|


Categories
All
|