Living Tastefully
  • Home
  • PAINTINGS
  • About
  • Passions-to-Pastry Blog
  • Contact
  • Recipes

Two Cakes for Two May Birthdays...

5/30/2016

2 Comments

 
Picture

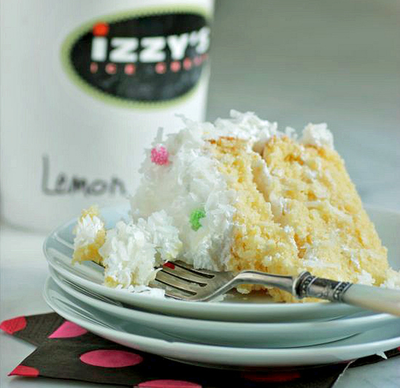
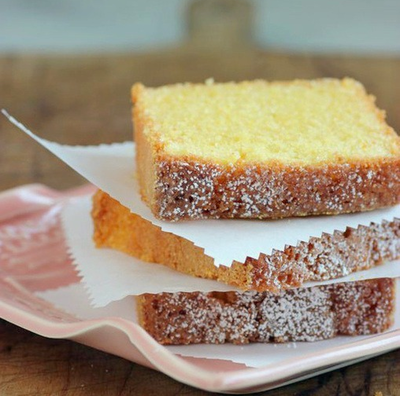
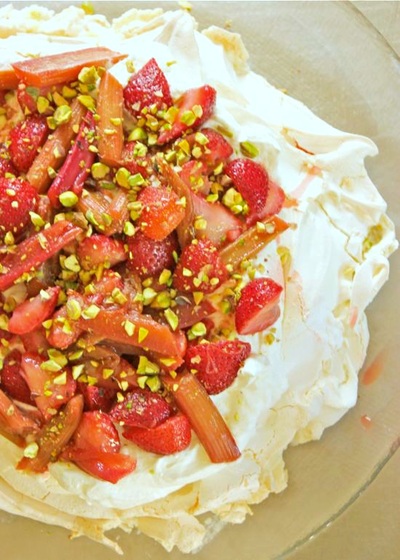
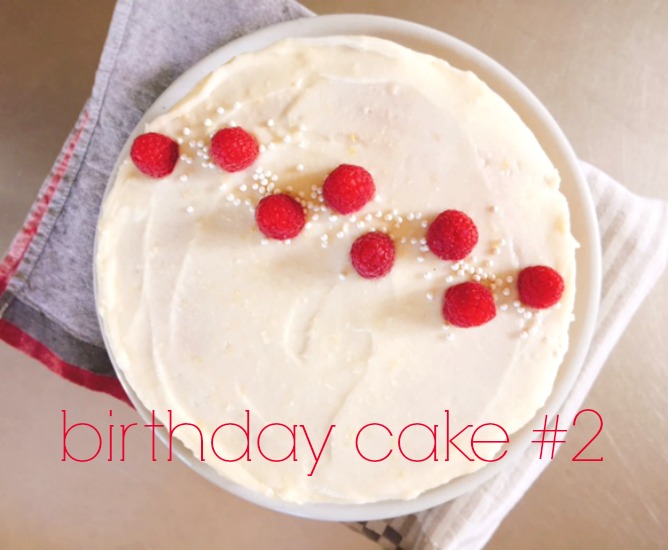
     The women in our family all have their birthdays in the spring.  My youngest daughter, Claire, celebrated her birthday in April (birthday cake #1).  My daughter Whitney's birthday is coming up the end of May (birthday cake #3). I was told I will be hearing from her soon about the cake.  It sounds to me like there's some serious thought going into my baking assignment. 
     And that leaves birthday cake #2, which was mine.  There seems to be a flavor trend in the first two cakes -- lemon and raspberry.  My cake layers contained Greek yogurt and fresh raspberries and were frosted with lemon-cream cheese icing.  A perfect spring cake!  Cake #1 (Claire's) had lemon cake layers with raspberry curd (recipe HERE).  I expect Whitney's cake to be nothing like the first two.


Picture

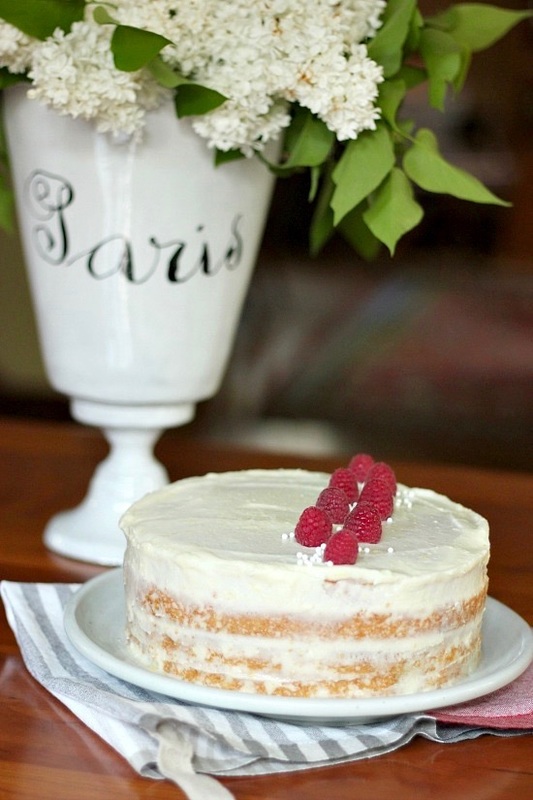
     I actually preferred my cake the next day, when I finished off the last two (generous) slices.  Yes... I devoured everything that was left on the cake plate the next day.  I tend to like cakes and cookies on the dry, day-old side, but that's just me.  Recipe for Raspberry Yogurt Cake with Lemon Cream Cheese Frosting HERE.

Picture
Picture

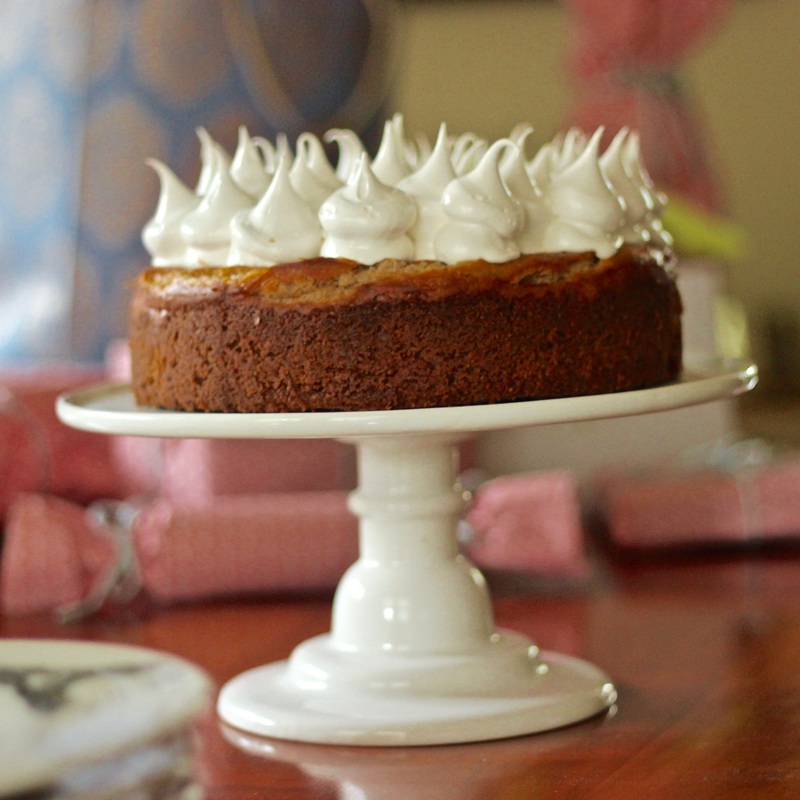
     And that leaves cake #3... Yesterday, we celebrated my daughter Whitney's birthday with a Peanut Butter Cheesecake topped with Swiss Meringue. 

Picture
Picture

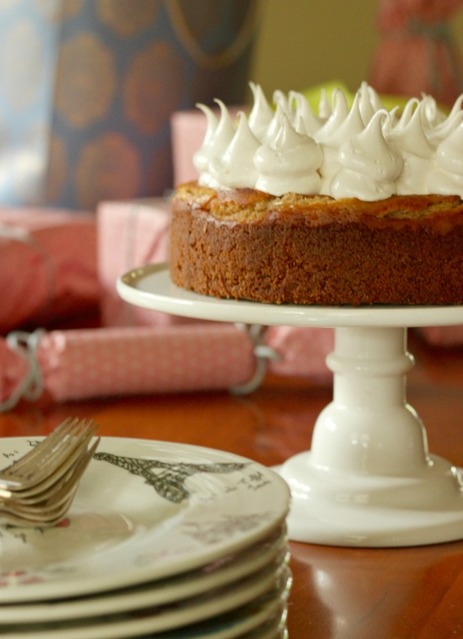
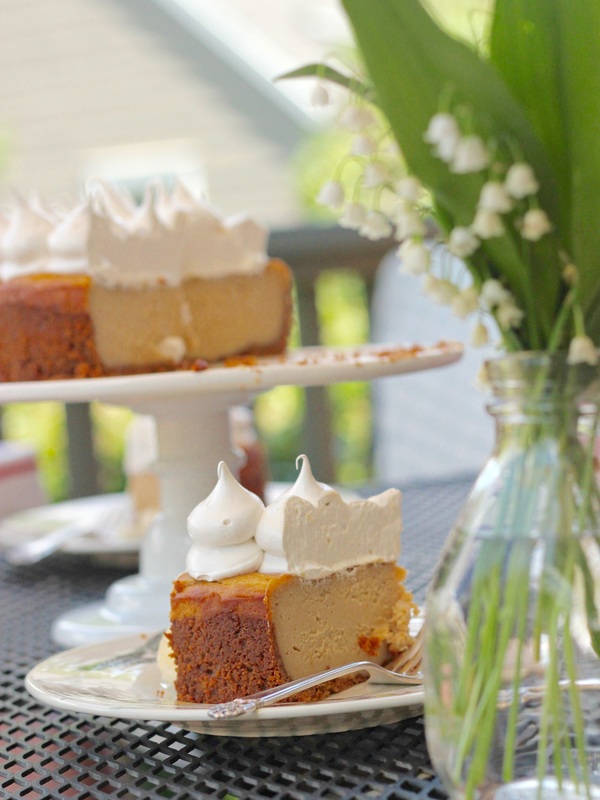
     Yes... it was as good as it looks!  Not only peanut butter in the cheesecake filling, but the crust is peanut butter, also, made from ground peanut butter cookies (recipe HERE; made without the chocolate chips).

+ Peanut Butter Cheesecake with Swiss Merignue +

• recipe via how sweet it is

CRUST
• 2 cups crushed peanut butter cookies
• 1/4 cup unsalted butter, melted
CHEESECAKE
• 3  8-ounce packages cream cheese, softened
• 1 cup peanut butter
• 1 cup sugar
• 2 large eggs
• 2 teaspoons vanilla extract
SWISS MERINGUE
• 4 large egg whites
• 1 cup granulated sugar
• 1/4 teaspoon cream of tartar
• 1 teaspoon vanilla extract

• freshly sliced bananas for serving

1.  Preheat oven to 350˚F.  Mix together peanut butter cookie crumbs and melted butter; press into a 9-inch springform pan.  Bake for approximately 6 minutes, until slightly set.  Allow to cool completely.
2.  In the bowl of an electric mixer, beat the cream cheese until smooth.  Add the peanut butter and sugar.  Beat on medium speed until combined and fluffy, scraping down sides of bowl when necessary.  Add the vanilla extract, then beat in eggs one at a time until just combined.  Pour the mixture into the crust and smooth the top.  Place pan on a baking sheet in center of oven.  Bake cheesecake for approximately 55 minutes, or until the center is almost set.  Remove and cool completely.  Cover lightly with a sheet of plastic and refrigerate overnight.
3.  Make the Swiss Meringue... Combine the egg whites, sugar and cream of tartar in a heat-proof mixing bowl.  Place over the top of a double-boiler that contains simmering water.  Whisk constantly until the sugar has dissolved and the egg whites are slightly warm.  Immediately remove the bowl, and using the whisk attachment of the mixer, begin beating at slow speed.  Gradually increase the speed to high and beat for about 6-7 minutes, or until glossy and thick.  Add the vanilla extract and beat for another minute.
4.  Either pile the meringue onto the cheesecake or pipe (using a 1/2-inch tip)..  Serve with sliced bananas!


TAKE a LOOK:


2 Comments

A Spring Birthday Dinner

4/11/2016

1 Comment

 
Picture

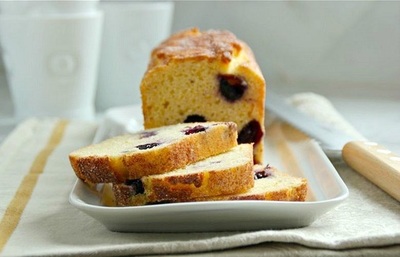
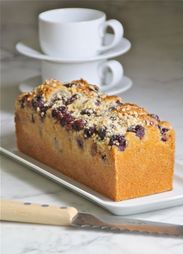
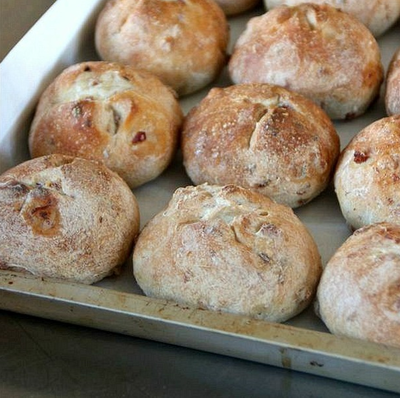
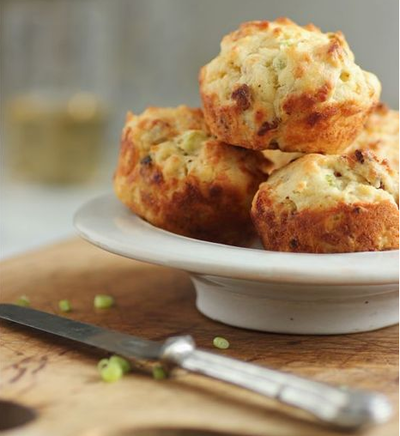
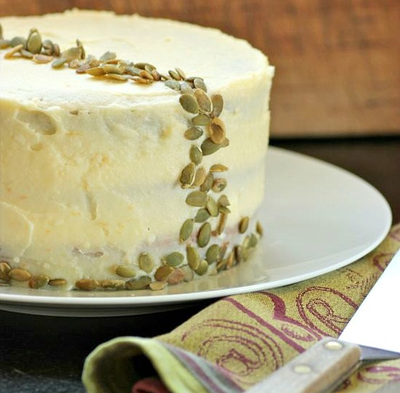
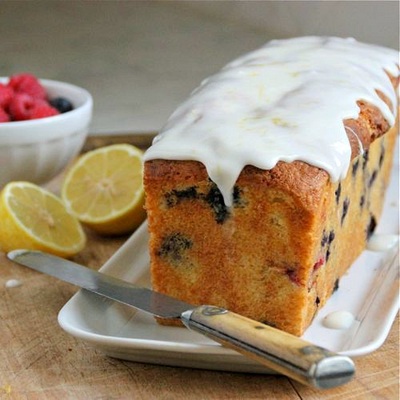
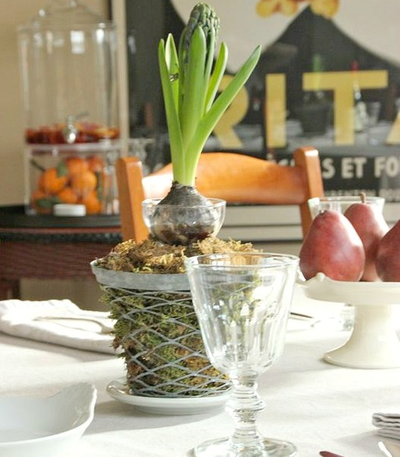
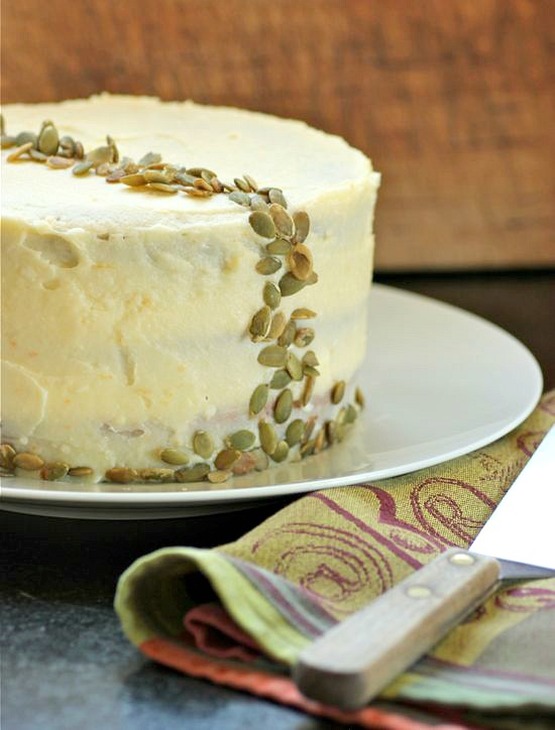
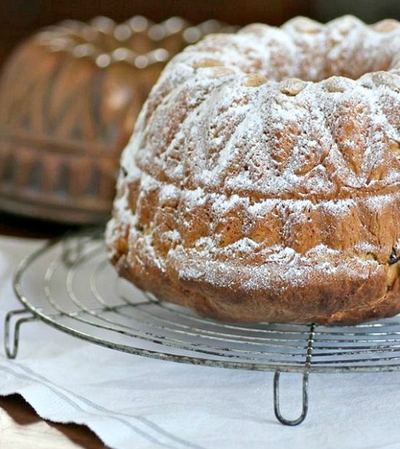
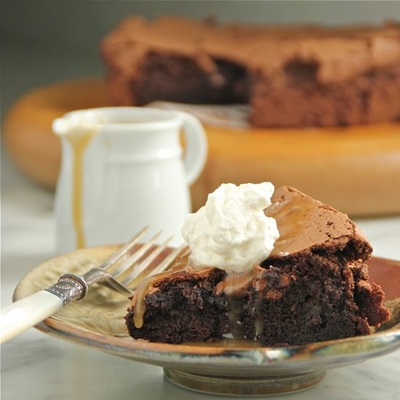
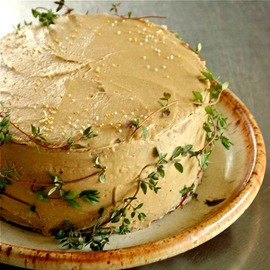
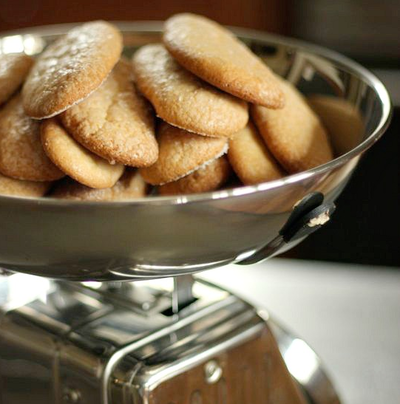
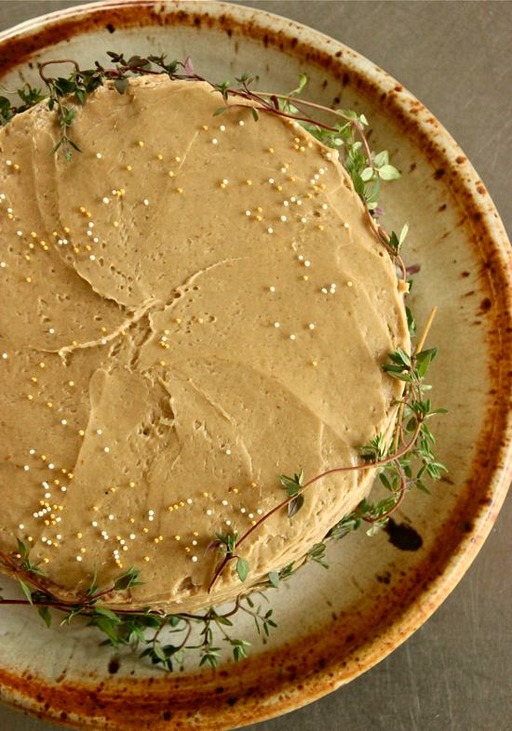
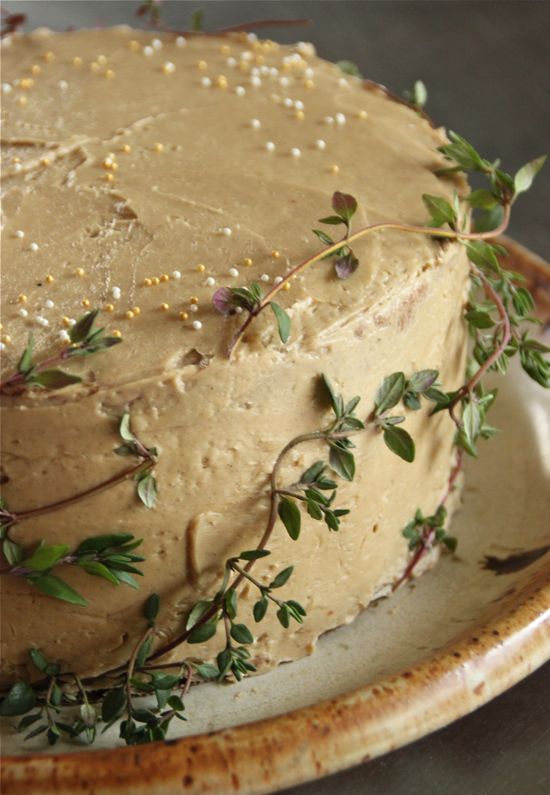
     This past week was the beginning of the spring birthday season at our house. My birthday, along with both of my daughters' birthdays, fall in the months of April and May.  And since my youngest daughter had a destination birthday this year, we weren't able to celebrate until two days later with a Sunday dinner.
Picture

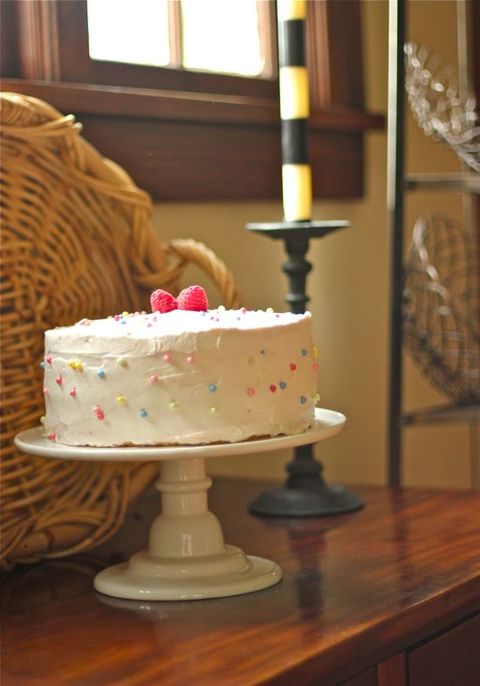
     The post birthday meal was built around Mac & Cheese, and included Turkey Meatloaf layered with Spinach and Prosciutto, a salad of greens with apples and caramelized walnuts, and the most important course... dessert; spongy lemon layers with raspberry curd cream between.
Picture

     As Claire said... the cake tasted like spring.  I almost went with chocolate. That may or may not have been a mistake.  I don't know if chocolate can ever be called a mistake. 
     I also made the lemon cakes twice.  I am never going to use 9-inch cake pans again when called for in a recipe. The results are always disappointing... short layers.  Eight inch pans are usually the way to go, at least for me.


Picture
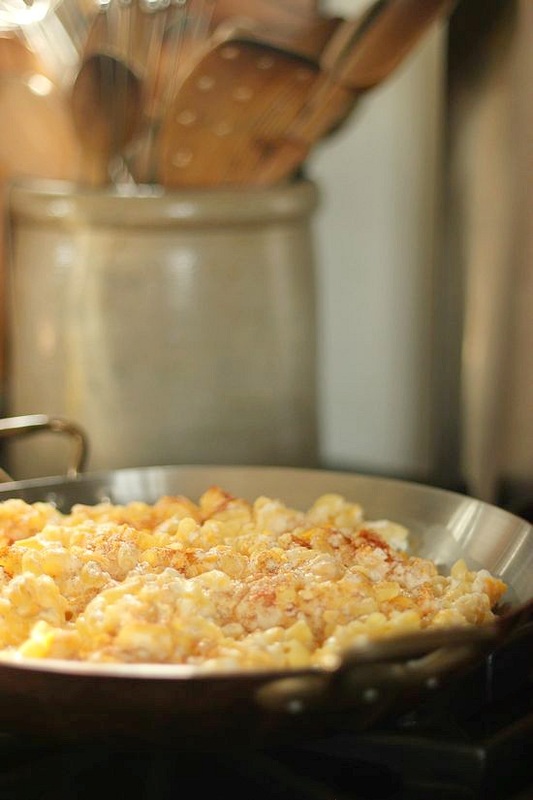
                                                  ... above, the mac & cheese before baking
     The original cake recipe called for 3 cups of heavy cream to layer and frost the cake, but I didn't need close to that amount.  I'll do my best to explain the amounts I mixed together for frosting.

Picture
Picture

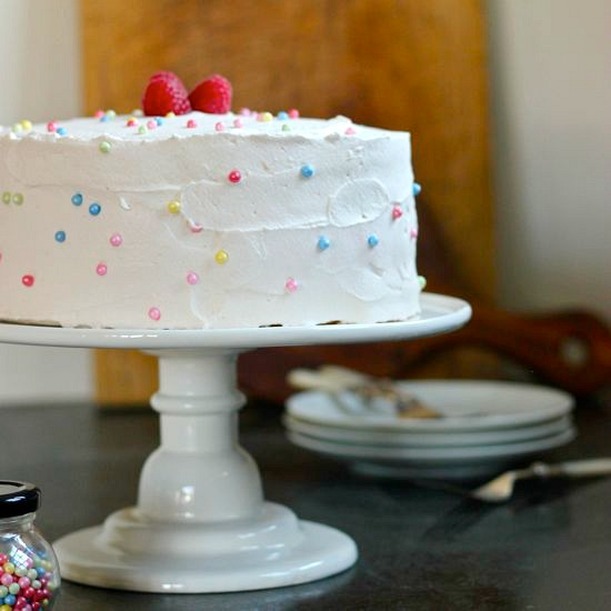
Lemon Cake with Raspberry Curd and Whipped Cream

Picture
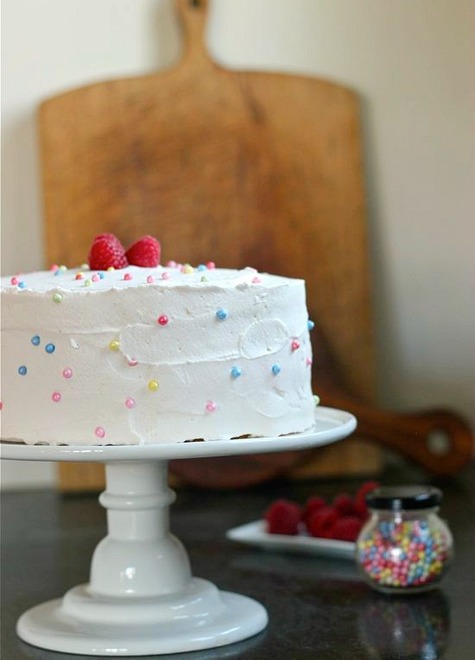
• recipe from Epicurious, adapted

CAKE LAYERS
• Vegetable or coconut oil spray, for the pans
• 4 large eggs
• 2 large egg yolks
• 3/4 cup whole milk
• 1 tablespoon fresh lemon juice
• 1 tablespoon grated lemon peel
• 2 cups cake flour
• 1 1/2 cups sugar
• 2 teaspoons baking powder
• 1/2 teaspoon salt
• 1/2 cup vegetable or expeller pressed canola oil
• 1/4 cup (1/2 stick) unsalted butter, melted and cooled

FILLING
• 1 6-ounce basket fresh raspberries, plus additional raspberries for garnish
• 1 1/4 cups sugar
• 2 large eggs
• 2 tablespoons fresh lemon juice
• 2 tablespoons (1/4 stick) unsalted butter
• 1/8 teaspoon salt
• 3 cups chilled whipping cream


FOR THE CAKE:
1.  Preheat oven to 350˚F.  Spray two 8-inch-diameter cake pans with 2-inch-high sides with nonstick vegetable or coconut oil spray.  Line bottom of pans with waxed paper.
2.  Whisk eggs, yolks, milk, lemon juice, and lemon peel in medium bowl to blend.  Whisk flour, sugar, baking powder, and salt in a large bowl to blend.  Whisk oil and butter into flour mixture.  Add egg mixture and whisk until smooth.  Divide batter between prepared pans.  Bake cakes until tester inserted into center comes out clean, 30-35 minutes.  Cool cakes on racks 10 minutes.  Run knife around edge of pans to loosen cakes.  Turn cakes out onto racks.  Cool completely.  (Cakes can be made 1 day ahead.  Wrap with plastic.  Let stand at room temperature.)

FOR FILLING:
1.  Stir the 6-ounce basket of raspberries, 3/4 cup sugar, eggs, lemon juice, butter, and salt in a medium saucepan over medium heat until thickened and beginning to bubble at edges, about 5 minutes.  Using a mesh strainer, strain raspberry curd into a medium bowl, pressing on solids to release all liquid.  Refrigerate until cold, at least 2 hours, but preferably up to 1 day.  See NOTE below.
2.  Whip cream and 1/2 cup sugar until peaks form.  Fold 1 1/2 cups whipped cream into raspberry curd.  Reserve remaining whipped cream
3.  Cut each cake horizontally into 2 layers.  Place 1 layer, cut side down, on platter.  Spread a thick layer or raspberry filling over.  Repeat with 2 more cake layers and filling. Top with remaining cake layer.
4.  I had approximately 1/4 cup raspberry curd remaining and folded all but about 1 cup of the whipped cream into the curd.  Spread this over top and sides of cake.  You can use the remaining whipped cream (totally optional) by placing in a pastry bag fitted with a star tip and to pipe design around bottom edge of cake.  Decorate cake, if desired, with additional raspberries.  Chill until cold, about 2 hours.  (Can be made 1 day ahead.  Cover with cake dome and keep refrigerated.)

NOTE:  If you would like more raspberry curd in the frosting for the cake, double the recipe for the curd and add to whipped cream before frosting.


TAKE a LOOK:


1 Comment

Goat Cheese, Bacon and Olive Quick Bread

2/27/2016

0 Comments

 
Picture

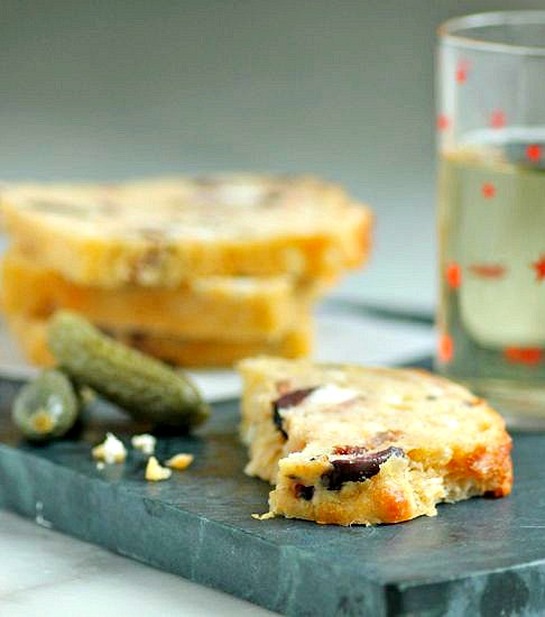
     I suggest you make several loaves of this Goat Cheese, Bacon, and Olive Quick Bread, and keep in your freezer.  That's what I'm doing.  It is such a great savory bread/cake to have on hand!  I like serving it in the late afternoon with a glass of chilled white wine.  If storing in the freezer, defrost and reheat in oven before serving.  This bread (which reminds me of a French weekend savory cake) will be a regular on the patio this summer!

+ Savory Goat Cheese, Bacon, and Olive Quick Bread

  Recipe by David Lebovitz | February 2016 Food & Wine
• 6 slices of thick-cut bacon, cut crosswise into 1/2-inch strips
• 1 1/2 cups all-purpose flour
• 2 teaspoons baking powder
• 1 to 2 teaspoons cayenne
• 1/4 teaspoon kosher salt
• 4 large eggs, at room temperature
• 1/2 cup buttermilk
• 1/4 cup extra-virgin olive oil
• 2 teaspoons Dijon mustard
• 6 ounces fresh goat cheese, crumbled
• 1 1/3 cups freshly grated Parmigiano-Reggiano cheese
• 1/2 cup pitted kalamata olives, halved lengthwise
• 2 scallions, thinly sliced
• 1 red serrano chile, seeded and minced
• 2 teaspoons minced  thyme leaves
1.  Preheat oven to 350˚F.  Coat a 9-inch loaf pan with cooking spray; line the bottom with waxed or parchment paper.  In a skillet, cook the bacon over moderate heat until crispy,  8-10 minutes.  Drain on paper towels.
2.  In a bowl, whisk together the flour, baking powder, cayenne, and salt.  In another bowl, whisk the eggs with the buttermilk, olive oil, and mustard.  Stir the egg mixture into the dry ingredients until just combined.  Fold in the goat cheese, Parmigiano-Reggiano, olives, bacon, scallions, chile and thyme.  Scrape the batter into the prepared loaf pan and smooth the surface.
3.  Bake the bread until golden on top and a toothpick inserted in the center comes out clean, 35 to 40 minutes.  Let cool for 15 minutes, then run a knife around the loaf to loosen it from the pan.  Invert onto a rack and cool completely. 


TAKE a LOOK:


0 Comments

Cranberry, Coconut & White Chocolate Cakes

2/24/2016

1 Comment

 
Picture

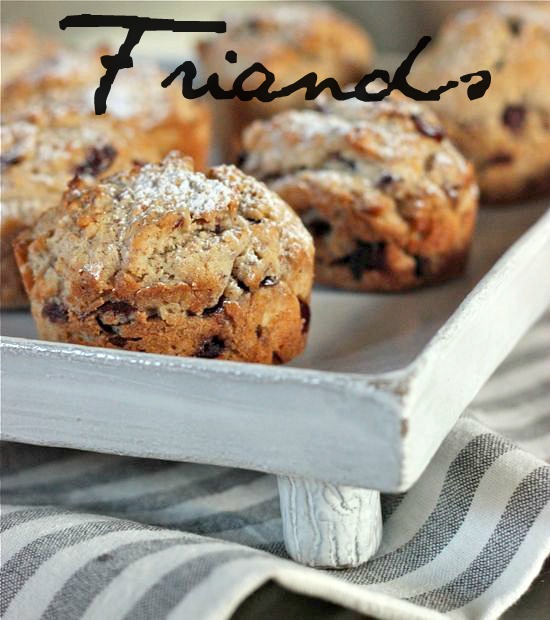
     These Cranberry, Coconut, and White Chocolate Friands (almond cakes) were our dessert one night, and leftovers eaten the following morning along with our cappuccinos.  I found them to be even more flavorful the next day.  The original recipe calls for 1 cup fresh cranberries, which I did not have, so I substituted dried cranberries that I rehydrated in boiling water.  Next time I plan to make the friands with fresh blueberries!

Picture
Picture
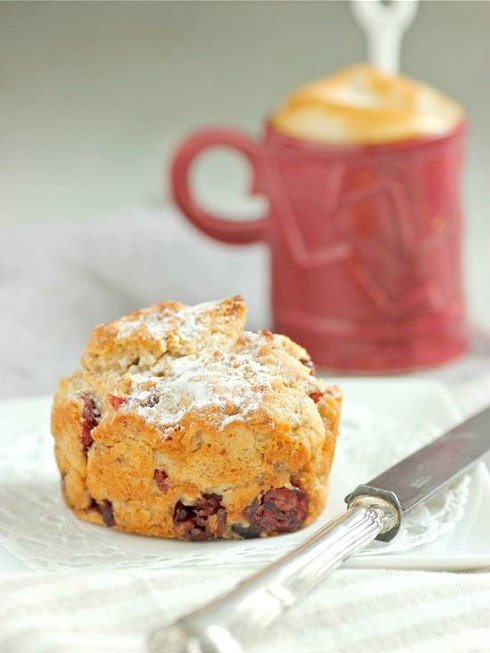
• Jennie Jordan | The West Australian, recipe adapted

MAKES 10 FRIANDS
• 3/4 cup dried cranberries
• 1 3/4 cups almond meal
• 1/4 cup Confectioners' sugar
• 3/4 cup unbleached, all-purpose flour
• 1/2 teaspoon baking powder
• 140 grams unsalted butter, melted
• 5 egg whites, lightly beaten
• 1/2 cup shredded coconut
• 2-3 tablespoons finely chopped white chocolate
1. Place the dried cranberries in a bowl and cover with boiling water.  Steep for 10 minutes, then drain and set aside.
2. In a large mixing bowl, sift together the almond meal, Confectioners' sugar, flour, and baking powder.  Add the melted butter and stir to combine.  Add the egg whites and beat until a smooth batter.  
3.  Fold in the reserved cranberries, coconut, and white chocolate.  Divide batter between 10 greased and lined metal oeufs en gelée molds, if you have them, or muffin tins.  Bake in a preheated 350˚F oven for approximately 25 to 30 minutes, or until golden brown.  Dust lightly with Confectioners' sugar before serving.


TAKE a LOOK:


1 Comment

Christmas Dinner

12/29/2015

1 Comment

 
Picture
    
     I spent the month of December baking cookies.  Nothing new.  All were cookies I've made before; a Christmas tradition. 
     Our family Christmas was delayed by a day, until part of our family returned from out of town.  We celebrated with a big noon meal.  The entrée was a Beef Stroganoff by Jonathan Waxman that I have made several times before and absolutely love.  I meant to photograph it and post the recipe, but I didn't even take the time for a quick shot with my phone.  By the time the meal was plated, I was hungry and dove right into the beef tenderloin with cognac mushrooms in a sauce of mustardy crème frâiche.  If it sounds like your kind of a meal, get the recipe HERE.  If I can make a suggestion... make more than the recipe calls for.  You will end up eating it all!


Picture


Picture

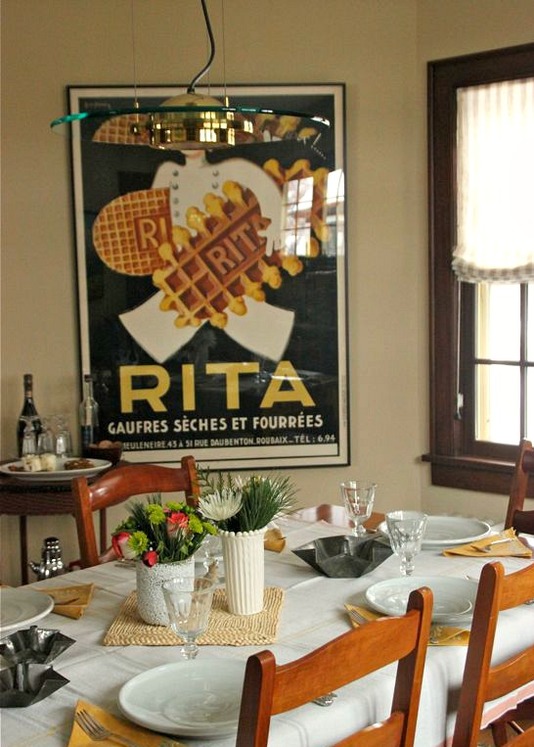
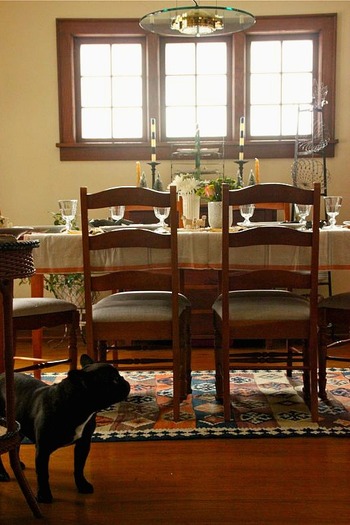
     Grand dog, Miss Midge, waiting for the festivities to begin... and possibly some food to fall to the floor?

Picture

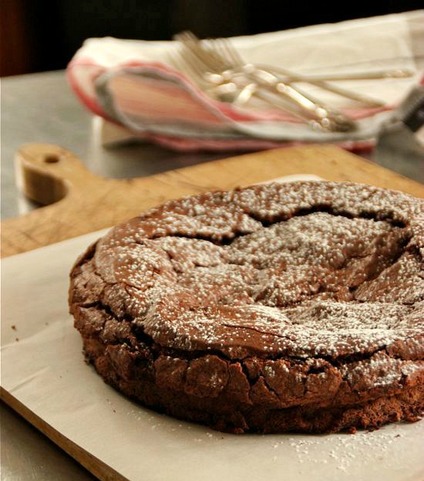
     It was a first time in my kitchen for the Chocolate and Olive-Oil Cake.  This cake is now classified as, "a keeper".  So good!  Whipped crème frâiche is the perfect accompniament.  I got a good laugh from both of my daughters.  Each one walked past the bowl of whipped crème frâiche and plunged their finger in for a lick.  Both made quite a face when the cream they expected to be sweet, wasn't.  It is perfect, tho', alongside the fudgy cake.
     Next up... New Years Day Brunch.  I need to get to work...
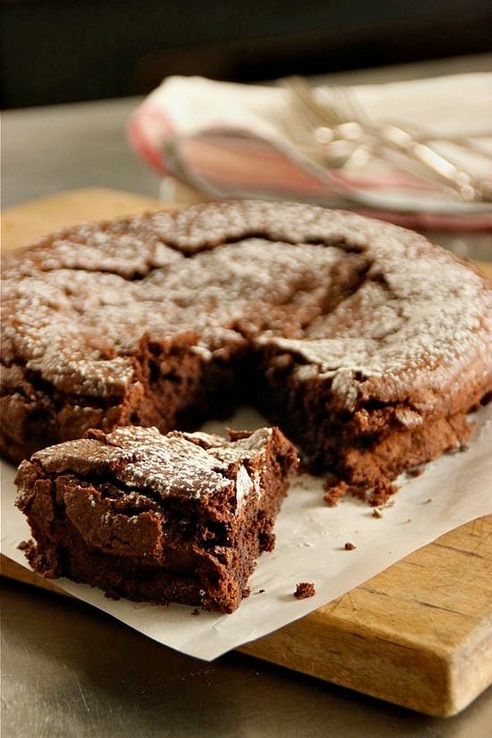
Picture


+Chocolate and Olive-Oil Cake

+ recipe by Diana Henry | HOUSE & GARDEN UK
  • 200g plain chocolate, 70 per cent cocoa solids
  • 125ml strong-flavoured extra-virgin olive oil
  • 200g caster sugar
  • 2 tablespoons ground almonds or hazelnuts
  • 5 large eggs, separated
  • Icing sugar, for dusting, and crème fraiche, for SERVING
  1. Heat the oven to 180°C/fan oven 160°C/mark 4, then butter and line the base of a 20cm spring-form cake tin. Break the chocolate into pieces and place in a heatproof bowl set over a pan of simmering water. Stir a little to help the chocolate to melt.
  2. Once it's completely melted, whisk in the oil in a steady stream, then two-thirds of the sugar, whisking to help the sugar dissolve in the heat of the chocolate. Remove from the heat. Stir in the ground nuts, a pinch of flaked sea salt and the egg yolks.
  3. Put the egg whites into a scrupulously clean bowl with about one third of the remaining sugar. Beat with an electric whisk until the whites are no longer clear, and then add another third of the sugar. Continue beating until the whites have really increased in volume, then add the rest of the sugar and beat until you have medium peaks (firm with tips that droop slightly).
  4. Using a really large metal spoon, loosen the chocolate mixture by folding in a big tablespoon of the egg whites, then fold in the rest carefully so that you don't lose air. Scrape the batter into the prepared tin and bake for 40 minutes. Test by inserting a fine skewer into the centre of the cake. If it comes out clean, with no batter attached, the cake is ready.
  5. Leave it to cool in the tin - it will deflate and crack a lot, but that is fine. Carefully turn it out and remove the paper. Put on to a plate and dust with icing sugar before serving. This is a chic, grown-up cake - it needs nothing more than some crème fraiche on the side.


TAKE a LOOK:


1 Comment

A 65th Birthday...

11/15/2015

15 Comments

 
Picture

     Yes... you read correctly... a 65th birthday.  Not mine!  It's my husband's birthday today.  One of his favorite things... ever... is pumpkin, so that's what he's getting.  A pumpkin layer cake with an orange-cream cheese frosting.  Oh... and I can't forget the pumpkin seeds!

   + Pumpkin Layer Cake with Orange-Cream Cheese Frosting +


•
adapted recipe | 
Bon Appetit, November 2009

CAKE:
• 1 cup (2 sticks) unsalted butter, room temperature, plus additional for greasing pans
• 3 cups unbleached, all-purpose flour, plus additional for dusting pans
• 2 teaspoons baking powder
• 1 teaspoon baking soda
• 1 teaspoon Chinese five-spice powder
• 1/2 teaspoon fine sea salt
• 2 cups (packed) golden brown sugar
• 3 large eggs, room temperature
• 1 15-ounce can pure pumpkin
• 1/3 cup whole milk


FROSTING:
• 3/4 cup (1 1/2 sticks) unsalted butter, room temperature
• 12-ounces cream cheese, room temperature
• 1 tablespoon finely grated orange peel
• 1 1/2 cups confectioners' (powdered) sugar
• pumpkin seeds, toasted

1.  Position rack in bottom third of oven; preheat oven to 350˚F.  Grease three 8-inch cake pans with 1 1/2-inch sides with butter.  Line bottoms with parchment; grease parchment.  Dust the interior of the pans lightly with flour, tapping out excess.
2. Whisk flour and next 4 ingredients in large bowl.  Using an electric mixer, beat 1 cup butter in another large bowl until smooth.  Beat in brown sugar.  Add eggs 1 at a time, beating well after each addition.  Beat in pumpkin.  Add the dry ingredients to butter mixture in 3 additions alternately with milk in 2 additions., beating to blend between additions.  Divide batter between pans.
3. Bake cakes until tester inserted into center comes out clean, about 35 minutes. Cool in pans on rack 15 minutes. Run knife around cakes to loosen. Invert cakes onto racks. Remove parchment. Turn cakes over onto racks, top sides up, and cool completely. DO AHEAD: Can be made 1 day ahead. Wrap cakes in plastic and store at room temperature.
4. TO MAKE FROSTING:  Using electric mixer, beat 3/4 cup butter in large bowl until smooth. Add cream cheese and orange peel; beat until smooth. Add powdered sugar and beat on low speed until smooth.
5.  Trim rounded tops from cakes.  Place 1 cake layer, cut side up, on large platter. Spoon  some frosting atop cake in dollops; spreading to edges. Repeat 2 more times with remaining cakes.  Spread remaining frosting on sides of cake.  (Cake can be made 2 days ahead.  Cover cake and chill.)  At room temperature, decorate cake with pumpkin seeds.  Serve. 


Picture


TAKE a LOOK:


15 Comments

My Dessert at Restaurant Verjus

11/9/2015

4 Comments

 
Picture
 
     What I love most about visiting France is the inspiration I find in just about everything == it's endless.  I believe it is impossible to be there and not be influenced in some small way, visually or gastronomically.  Most likely, it will be both of those.  In the weeks before I travel to Paris, or anywhere else in France, I note historical and cultural centers I should see in addition to pâtisseries I've been longing to visit and restaurants where I want to eat.  But I'm also a big believer in just heading out in a different direction each morning to see where the streets take me.  I am never disappointed.  I'm always guaranteed unique discoveries that will inspire the way I approach something once I return home to St. Paul.   

Picture

     This recent trip was no exception.  In addition to the 1200 plus photos I returned with, which remind me daily of the beauty that abounds, I ate foods that I knew I would attempt to recreate once at home.  For me, that is the most meaningful thing I can do to remember a trip.  There's nothing like being around the table on our patio with friends and family and eating a meal filled with delicious memories (A French Inspired Meal, French Cauliflower Soup with Truffle Oil).
Picture

     One of the culinary highlights during my time in Paris was dinner at Restaurant Verjus.  I had read about it in food magazines and was reminded by friend and food blogger Stacey that the American owners, Braden Perkins and Laura Adrian (a St. Paul native ?!), started their French culinary career by running the highly successful underground restaurant, Hidden Kitchen, out of their Paris apartment.  While googling info on Verjus, I came upon a restaurant review by Alexander Lobrano for Saveur magazine.  He summed up beautifully   my experience there.  (If interested, read the 2012 article HERE.)  There is no ordering à la carte at Verjus.  The meal is a tasting menu of approximately 8 courses.  The only thing we were asked before the service began, was if either my husband or I had any food allergies and if we wanted the staff to pair each course with the recommended wine.  We ended up talking with diners on both sides of our table throughout our meal, and if I had to describe the atmosphere, it could only be "festive".  Everyone dining at Verjus that night was very happy to be there.
    My little home kitchen project became the dessert I ate at Verjus that night.  There are several components to this dish, but the ice cream, candied pine nuts and fresh ricotta can all be made ahead.  I suggest making the cake the day of, only because I like how it slices; the cake's texture becomes more crumbly over time but the flavor is definitely as good.


Picture
Picture
Picture


PINE NUT ICE CREAM
+ found on Chowhound

MAKE ICE CREAM THE DAY BEFORE

• 3/4 cup pine nuts
• 3/4 cup sugar, divided
•2. 1/2 cups whole milk
• 1 teaspoon almond extract
• 5 egg yolks
1.  Put 3/4 cup of pine nuts in a pie pan and roast them at 350 until fragrant.
Put roasted pine nuts and 1/4 cup sugar in a food processor. Process until you get a peanut butter-like consistency, Combine this with 2 1/2 cups whole milk in a saucepan. Add 1 teaspoon almond extract. Bring to a boil and then immediately remove from the heat.
2.  While the milk is heating. whisk together the 5 egg yolks with the remaining 1/2 cup sugar. Once milk mixture boils, slowly pour it into the egg mixture.
Pour back into saucepan and heat over low heat - DO NOT BOIL - stir constantly. Remove from heat once custard is thick enough to coat a spoon, about 10 minutes.  Cool in the fridge for at least 3 hours or overnight.
3.  Put into your ice cream maker and churn as directed.   Freeze overnight.


CANDIED PINE NUTS
+ found on about.com

* 1/2 cup pine nuts
• 1 1/2 teaspoons honey
• 1 1/2 teaspoons water
• 1 tablespoon granulated sugar
• Pinch of salt
• 1/8 cup Demerara sugar
1.  PREHEAT oven to 350˚F.  In a small bowl, whisk together the honey, water, salt, and granulated sugar until smooth.  Toss the pine nuts and Demerara sugar in the honey mixture stirring well to coat.
2.  Spread the nut mixture onto a parchment lined baking pan in a single layer and bake until the nuts are golden brown.  Watch closely so nuts do not burn.  Allow the nuts to cool to room temperature; chop coarsely.  Keep candied pine nuts in an air-tight container.


FRESH RICOTTA
+ Use either purchased Fresh Ricotta or make your own.  Recipe HERE.

OLIVE OIL CAKE with RED GRAPES
+ recipe, adapted,  found at marthastewart.com

• 1/2 cup extra-virgin olive oil, plus more for pan
• 1 cup unbleached all-purpose flour, plus more for pan
• 1/2 cup almond meal
• 1/4 cup coarsely ground yellow cornmeal
• 1 1/2 teaspoons baking powder
• 1/2 teaspoon salt
• 2 large eggs
• 2/3 cup sugar
• 2 teaspoons finely grated lemon zest
• 1/3 cup whole milk
• 2 cups red seedless grapes
1.  PREHEAT oven to 350˚F.  Brush a 9-inch square pan with oil; dust with flour, tapping out excess.  Whisk together flour, almond meal, cornmeal, baking powder, and 1/2 teaspoon salt.  Beat eggs, sugar, and zest with a mixer on high speed until pale and fluffy.  Reduce speed to low; slowly add the oil.  Beat in flour mixture in 3 additions, alternating with milk, and beginning and ending with flour.
2.  Spoon the batter into pan.  Scatter 1 cup of grapes over the top.  Bake for 15 minutes.  Scatter the remaining 1 cup grapes over cake.  Bake until cake is golden and a toothpick inserted into the center comes out clean; another 25 to 27 minutes.  Let cool in pan on a wire rack, then turn out and slice into thin rectangles.


Picture
ASSEMBLY:
• Fresh Ricotta
• Good quality, runny Honey
• Olive Oil Cake with Red Grapes
• Pine Nut Ice Cream
• Candied Pine Nuts
1.  On a small plate, smear a large spoonful of Fresh Ricotta; drizzle ricotta with honey.
Place a slice of the Olive Oil Cake on top of ricotta.  Add a scoop of the Pine Nut Ice Cream to the plate and sprinkle with the Candied Pine Nuts.  Serve and Enjoy!


TAKE a LOOK:


4 Comments

Summer Peach & Almond Upside-Down Cake

8/18/2015

0 Comments

 
Picture

               I braved the 90 degree heat and turned on my oven... so glad I did.  Our dessert last night, was our breakfast this morning.

Picture
Picture

+
Summer Peach & Almond Upside-Down Cake
+ adapted recipe | via Food Network
• 8 tablespoons unsalted butter, at room temperature plus more for the pan
• 1 1/2 cups sugar, divided
• 4 medium peaches, pitted and cut into 6 wedges each
• 1 1/2 cups unbleached, all-purpose flour
• 1/2 cup almond flour

• 2 teaspoons baking powder
• 1/2 teaspoon salt
• 2 large eggs
• 1/2 teaspoon vanilla extract
• 1/4 teaspoon almond extract
• 3/4 cup whole milk

PREHEAT OVEN to 350˚F
1.  Lightly butter a 9-inch-round cake pan. Melt 1 tablespoon butter in a medium skillet over medium heat. Add 3/4 cup sugar and 1 tablespoon water and cook, stirring occasionally, until smooth and deep golden brown, 8 to 11 minutes. Pour the mixture into the prepared pan and tilt to coat the bottom. Arrange the peach wedges snugly in the bottom of the pan in a single layer, cutting to fit if needed.

2.  Whisk together flour, almond flour, baking powder, and salt in a medium bowl, 
3.  Beat the remaining 7 tablespoons butter and 3/4 cup sugar in a large bowl with a mixer on medium-high speed until light and fluffy, about 4 minutes. Add the eggs, one at a time, beating well after each addition. Beat in the vanilla and almond extracts. Beat in the flour mixture in 3 batches, alternating with the milk and beginning and ending with the flour mixture; beat in each addition until just incorporated.
4.  Spread the batter evenly in the prepared pan and bake until golden and a toothpick inserted into the center comes out clean, approximately 55 minutes. Transfer to a rack and let cool 30 minutes. Invert onto a plate and let cool completely.


TAKE a LOOK:


0 Comments

Rustic Rhubarb and Almond Cake

6/19/2015

3 Comments

 
Picture

    I told you I'd be back with more rhubarb recipes... I am being very aggressive this year cutting and using the stalks of our eight enormous rhubarb plants.  They become so large that the leaves shade and kill surrounding grass.  Unfortunately, those conditions also provide the perfect habitat for slugs.  So I'm using up the rhubarb as fast as I can.  Yesterday I made a quadruple batch of Rhubarb Syrup (recipe HERE).  This evening friends of ours, who just returned from Italy, will join us for an al fresco dinner that will begin with glasses of Rhubarb Syrup and Prosecco.            
    Tomorrow I will make Rhubarb Chutney (recipe HERE) in an attempt to use up even more rhubarb.  And when I run out of any desire to eat another rhubarb dessert, bread/muffin or condiment, I will dice it and freeze it.


Picture

     This rustic Rhubarb and Almond Cake is my kind of dessert.  It's full of ground almonds and tart rhubarb; a dense cake that bakes for close to 80 minutes.  I made it late last night, and when I walked into my kitchen this morning, the intense almond scent made me feel as though I had just walked into a French patisserie.  Not a bad way to start the day!

Picture


Picture

    
    I have sampled (as my husband has also) a few small bites (I had to be sure it tasted as good as it smells).  The cake will finish our dinner tonight outdoors (most likely with a little whipped cream that has been sweetened with rhubarb syrup). 
   Yes... this is definitely my favorite time of the year!

Picture


Picture
+  adapted recipe | Alison Roman | Bon Appétit, April 2015

• 1 cup (2 sticks) unsalted butter, room temperature, plus more for pan
• 3/4 cup plus 3 tablespoons sugar, plus more for pan
• 1 pound rhubarb stalks, trimmed
• 1 1/4 cups all-purpose flour
• 3/4 cup blanched almonds (I substituted just slightly less almond flour)
• 1 teaspoon baking powder
• 3/4 teaspoon kosher salt
• 1 vanilla bean, split lengthwise
• 2 large eggs
• 1/4 cup plain Greek yogurt

SPECIAL EQUIPMENT:  One 11x8-inch tart pan or one 9-inch diameter tart pan, both with removable bottoms.

1.   Preheat oven to 350°. Butter tart pan and sprinkle with sugar, tapping out excess. Slice rhubarb in half lengthwise (quarter if very large). Set 8 of the prettiest pieces aside for the top of the cake; chop remaining rhubarb into 1/2" pieces. Pulse flour, almonds, baking powder, and salt in a food processor until almonds are finely ground (texture should be sandy).
2.  Place 1 cup butter and 3/4 cup sugar in a large bowl. Scrape in seeds from vanilla bean; reserve pod for another use. Using an electric mixer on high speed, beat until light and fluffy, about 4 minutes. Add eggs, one at a time, beating to blend first egg before adding second. Beat until mixture is pale and fluffy, about 4 minutes.
3.  Reduce speed to low and gradually add dry ingredients, followed by yogurt. Beat, scraping down the sides of bowl as needed, just to combine (batter will be thick). Fold in chopped rhubarb and scrape batter into prepared pan. Smooth batter and arrange reserved rhubarb over top; sprinkle with remaining 3 tablespoons sugar.
4.  Place tart pan on a large rimmed baking sheet (to catch any rogue juices) and bake, rotating once, until cake is golden brown and rhubarb on top is soft and beginning to brown, 70–80 minutes. Transfer to a wire rack and let cake cool before removing from pan.
DO AHEAD:  Cake can be baked 3 days ahead. Keep tightly wrapped at room temperature.


TAKE a LOOK:


3 Comments

Spice Cake with Espresso-Cardamom Frosting

5/18/2015

4 Comments

 
Picture

     May is a busy time for me with birthdays and baking.  I made this cake last week.  We visited friends at their cabin and I was asked to bring this cake along.  Honestly, at first I thought we should be eating rhubarb.  It is definitely rhubarb season!  Spice cakes, for me anyway, conjure up thoughts of fall and cooler temps.  This however, was the perfect cake for our weekend get away and easily one of my favorite cakes ever.  A very bold statement for me to make; I have eaten and baked a lot of cakes in my 62 year life.  I beg of you... make this cake!  And don't wait until fall.
     The only change I made to this recipe was to add more powdered (confectioners') sugar to the frosting.  The 3/4 cup in the original recipe didn't make it thick and fluffy enough for me.

Picture

Picture

• 2 1/4 cups unbleached flour
• 1 teaspoon baking powder
• 1 teaspoon baking soda
• 1/2 teaspoon salt
• 1 teaspoon ground cinnamon
• 1/2 teaspoon ground cloves
• 1/2 teaspoon ground black pepper
• 1/2 teaspoon ground cardamom
• 1 stick(1/2 cup) unsalted butter, softened
• 1/2 cup dark brown sugar
• 1 cup white granulated sugar
• 2 eggs
• 1 teaspoon vanilla
• 1 1/4 cups buttermilk
• Espresso-Cardamon Frosting (recipe follows)

1.  Preheat oven to 350 degrees F. Grease and flour 2 (8-inch) or 1 (13x9-inch) baking pans.
2.  Sift flour, baking powder, baking soda, salt and spices together; set aside.
3.  In a large bowl, cream butter, brown sugar and white granulated sugar together, then add eggs one at a time then vanilla, mixing until light and fluffy (about 5 minutes), scraping the sides of the bowl while mixing.
4.  Beat in dry ingredients alternating with the buttermilk, beginning and ending with the flour mixture. Beat until just smooth, about a minute. Pour into prepared pans.
5.  Bake in a preheated 350 degree F oven for about 30-35 minutes for layers, 40-45 minutes for the oblong cake, or until cake tests for doneness. Remove from oven and cool on racks about 10 minutes, then remove from pans (13x9-inch cake may be left in the pan) and finish cooling on racks.

Picture

ESPRESSO-CARDAMOM FROSTING

• 1/4 cup milk
• 1 tablespoon espresso powder
• 1 teaspoon ground cardamom
• 1 teaspoon vanilla
• 2 sticks (1 cup) butter, softened
• 3/4 cup confectioners' sugar, plus additional to make thicker and fluffier.  I used at least 1 cup -- possibly more.
1.  Heat the milk and dissolve the espresso powder in it, then allow it to cool.
2.  Beat together the remaining ingredients for the icing together, then add the coffee/milk mixture and continue beating until fluffy.


 TAKE a LOOK:


4 Comments
<<Previous
Forward>>
    Picture


    Picture
    Picture
    Enter your Email

    Preview | Powered by FeedBlitz


    Categories

    All
    Amana
    Appetizers
    Beef
    Breads
    Breakfast
    Cakes
    Chocolate
    Condiments
    Cookies
    Daring Bakers Challenge
    Desserts And Sweets
    Drinks
    Eggs
    Espresso
    Etcetera
    Fish
    French Bulldogs
    Friday Night Dinner
    Fruit
    Germany
    Gratins
    Great Kitchens
    Grilling
    Ice Cream
    Lamb
    Main Dishes
    Muffins
    My Garden
    My Kitchen Renovation
    New Years Day Brunch
    Paris
    Pasta
    Pork
    Poultry
    Provence
    Restaurants
    Rhubarb
    Rice
    Salads
    Scones
    Seafood
    Side Dish
    Soup
    Sunday Mornings
    Sweet And Savory Tarts
    Thanksgiving
    Tomatoes
    Vegetables
    Vegetarian

  • Home
  • PAINTINGS
  • About
  • Passions-to-Pastry Blog
  • Contact
  • Recipes